


Take Your Brick and Mortar Business Online in 7 Steps
Published By Sophie Krokida
April 6, 2020

06/04/20
The Internet has taken over our lives for good and brick and mortar stores should follow.
Because, with a wide range of effective advertising types, online businesses prove more and more profitable and needed.
Numbers speak for themselves. Global eCommerce sales are expected to top $4.2 trillion USD in 2020 while more than 2.1 billion shoppers are expected to purchase goods and services online by 2021.
And while I could cite tons of statistics on the rise of eCommerce, I will only give you a few good reasons why a brick and mortar business that went online is important:
- It’s aimed not only at the local but at the world market too
- It’s open 24/7
- It can be updated in no time
- It communicates sales and offers fast
So, what are the required steps for taking your business online?
First things first
I feel you. Taking your brick and mortar store online seems fascinating.
All that growth potential, the millions of customers…
You’ve been flirting with the idea of creating an e-store for quite a long time, and maybe now is the best time to do it.
Whatsmore, there are so many online tools available to help you make your dream come true, even if you are on a strict budget.
But, sometimes all these choices may confuse you. You need a platform that is easy to use, professional, trustworthy and capable of supporting your company’s growth. How on earth will you find the one that combines all these?
You are right, it’s not an easy choice. Because every brick and mortar store is unique. And your online store should reflect that.
So how do you come to the right decision?
Choosing the right platform
Before guiding you through the whole process of taking your brick-and-mortar store business online, here are the things you should consider before sticking with a platform. Let me explain:
Hosting
There are platforms that include hosting, while others let you host your e-store on the hosting provider of your choice (self-hosted).
Hosted
Platforms like Shopify and Wix include hosting. In such platforms, you create a profile on their website and they take care of everything so you don’t have to worry much with the creation of your e-store. These platforms are easy to use and don’t require any technical skills from your side.
The drawback of using such a platform is the cost and the freedom to do anything you imagine. This means that, if your online business starts growing, your demands might also grow. So, eventually, you might need something more advanced. And moving your e-store to another platform isn’t that easy.
Self-hosted
Choosing the self-hosted way means that you are in charge! You can customize your e-store any way you like, as well as “play” with your website’s code or choose if and when you want to make any updates. But, if something doesn’t work properly, it’s you that should fix it.
Drag & drop convenience is usually not an option here, so setting up your website might take more time.
Cost
Some platforms are free while others come with monthly or yearly plans, depending on their services or your e-store’s traffic. Make sure you read the small print before coming to a decision.
Available payment methods
Online shopping has different rules from brick and mortar stores. Offering your customers various payment methods is very important. But, not all platforms support them. Don’t take this lightly, and make sure the platform you choose supports your country’s currency.
Security
Security is on the top of your customers’ list when it comes to shopping from an e-store again and again. SSL certificates are one of the first and most important security factors, so make sure the platform of your choice provides that too.
Design
Creativity is super important when it comes to creating a functional and attractive e-store. Some platforms offer hundreds of themes, while others offer a limited amount of themes for free. But they may be just what you’re looking for!
Content management
Content plays a big part in your e-store’s growth. It’s not only what you sell, but also the way you sell it.
That’s why you should choose a platform that makes it easy for you to add pages, images, copy or videos fast and simple. Make sure the platform you choose offers a reliable Content Management System (CMS).
Mobile-friendly
By 2021, mobile eCommerce sales are expected to account for 54% of total eCommerce sales.
Owning a mobile-friendly e-store today is not just a good idea. It’s a must. So check whether the platform you choose offers mobile-friendly themes or lets you use mobile plugins to adjust your e-store.
Ready to go
So there you have it. There is a ton of eCommerce platforms out there but now you know the key-factors of choosing the right platform for your brick and mortar store.
However, it’s a fact that WordPress + WooCommerce is the most popular choice among users at the moment.
In terms of comparison between WooCommerce WordPress vs Magento & Shopify, over 26% of all online stores prefer using the former over the other two.
WooCommerce is one of the largest eCommerce platforms and it’s a flexible option that doesn’t require advanced technical skills.
So in this post, I’ve decided to walk you through the process of setting up an online store in WordPress using WooCommerce.
Sounds Greek to you?
Let’s start, one step at a time.
1. Register a domain
To set up an eCommerce site you first need to register a domain name.
A domain name is your website’s address on the internet. It’s what users will type in their browsers in order to visit your website.
For this guide, I chose to register a domain through the popular platform GoDaddy.com.
Let’s see how you can register a domain, step by step.
On the homepage, enter your preferred domain name, and click Search.
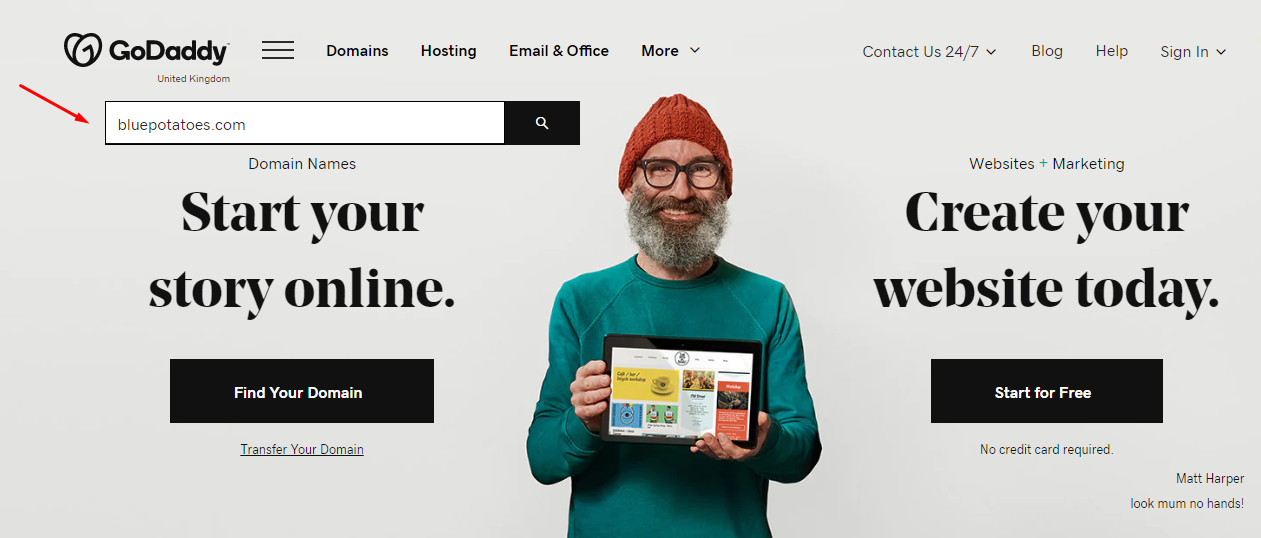
If the domain name you’ve entered isn’t available, you’ll be prompted to search for a new domain name or select a different variation.
GoDaddy’s suggestion tool will list new ideas, with different extensions or variations, that you can review.
If your domain name is available, you’ll be presented with the opportunity to add it to your cart, along with the different prices for every different extension.
The cost also depends on where you buy the domain from — a reputable registrar, a private seller or an aftermarket service, the length of time you’re registering the domain for, as well as additional options such as domain privacy, etc.

Click Add to Cart once you’ve chosen the one you prefer, and then Continue to Cart to continue.
You’ll be then asked to create an account or sign in if you’ve already registered at Godaddy.com
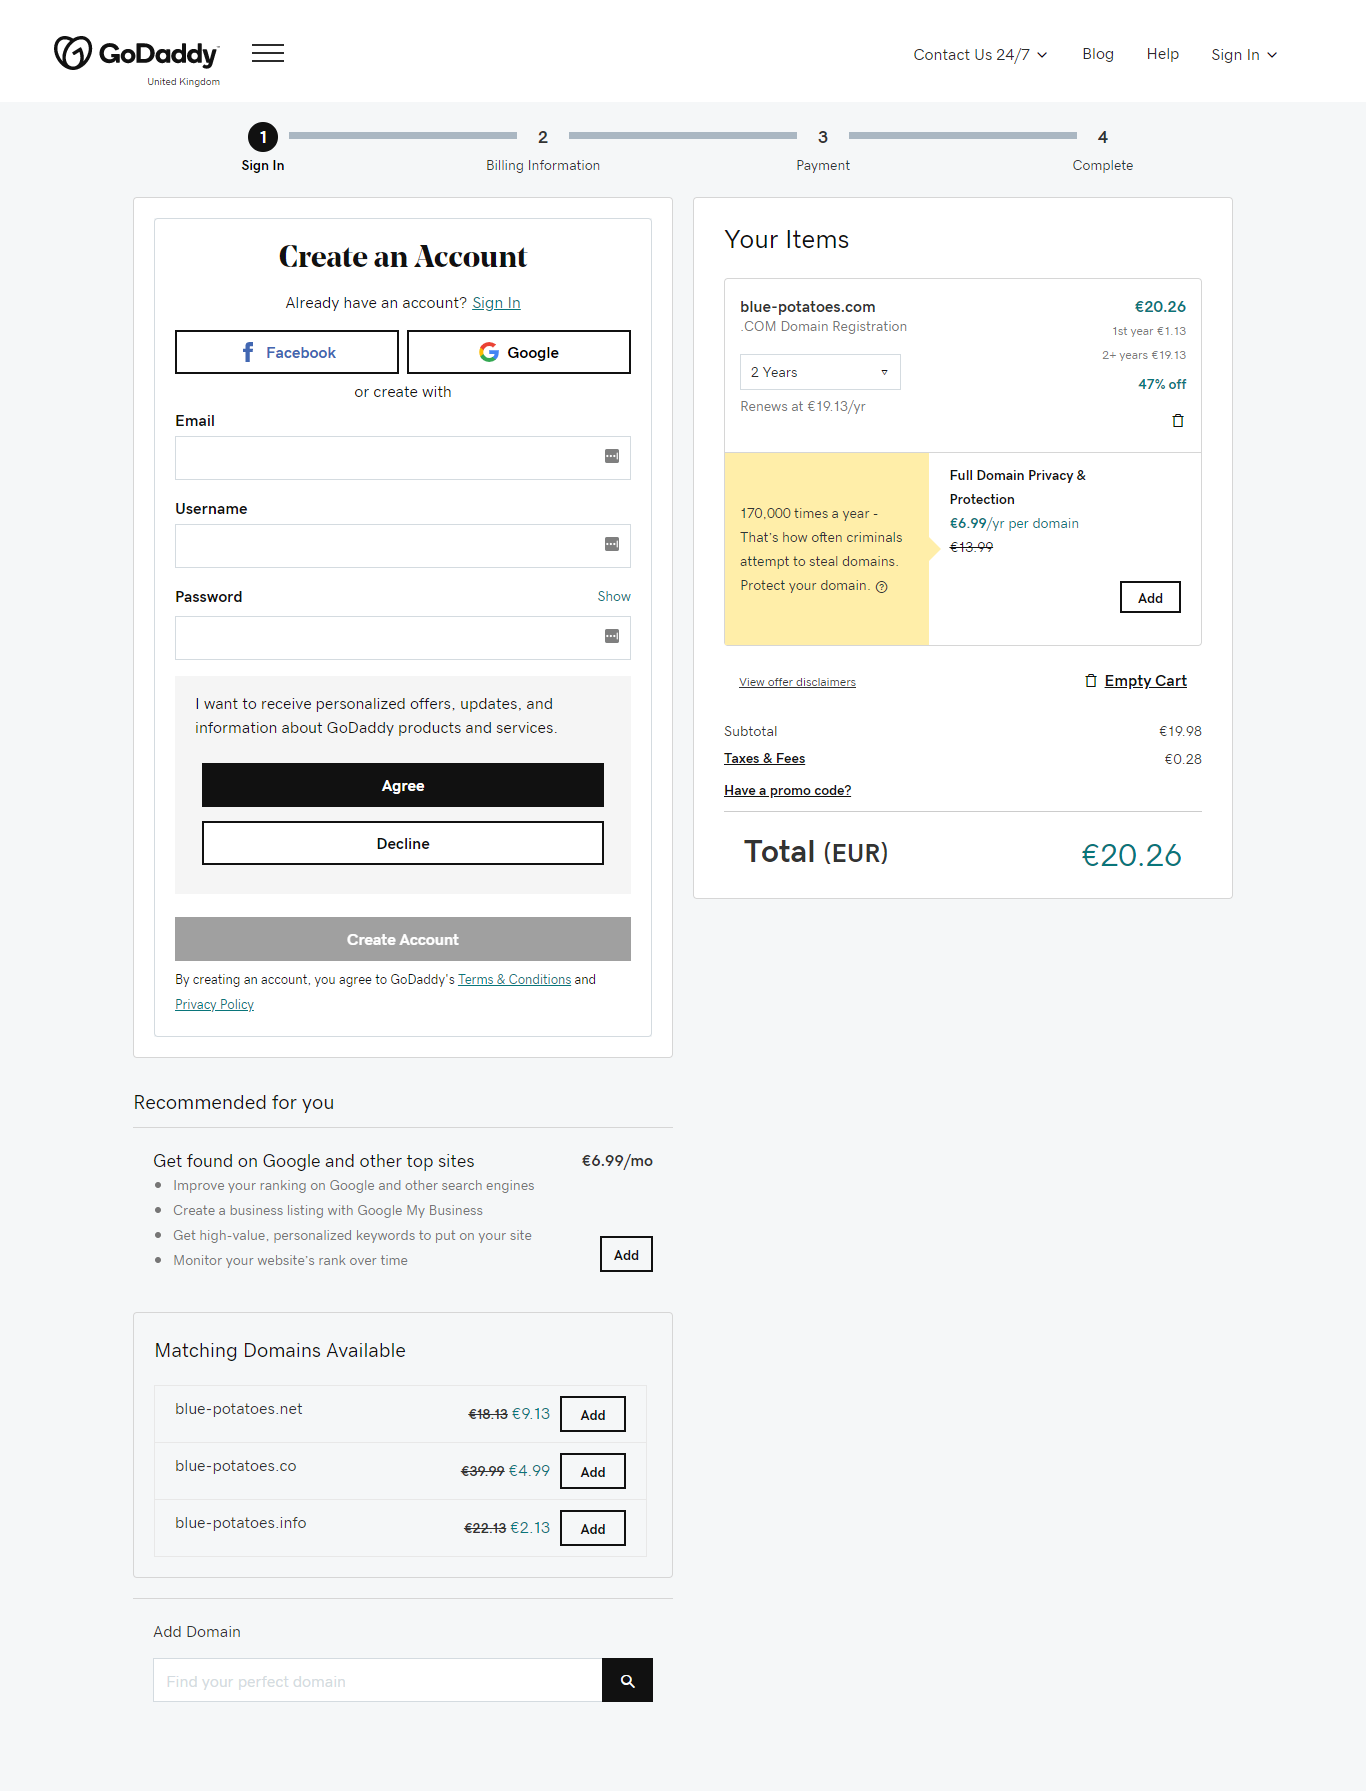
Once you’ve completed this step, fill in your billing information and click Save. Next, enter your payment information. Before completing your purchase, you’ll be presented with the domain and preferences you’ve chosen.
If you like, from here you can change the period of time you want to buy your domain for, or add full domain privacy & protection if you wish. The price will change automatically.

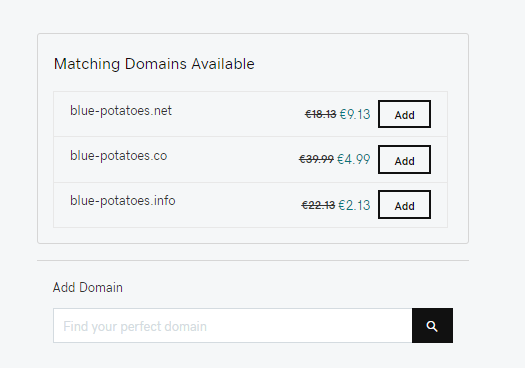
On the bottom of the page, you will also see a few matching domains which you can add to your cart. It’s a good idea to also buy a few more key domain extensions so that these domains cannot be used by another company.
Once you’re happy with your domain(s), review your order under My Items and click Complete Purchase.
Wow, that was fast!
Tips for the curious mind
Choosing the right domain name for your site is a very important task.
Your domain name will play an integral role in the promotion of your online business. It will help you take your brand out there fast and of course, it will determine your visibility in the search engines.
Every domain name is unique and must help the user understand what your website is about.
The perfect domain name should include at least one of the keywords for which you’d want to rank at the search engines.
The domain extension is also very important. It’s always a good practice to go for one of the original top-level domains (LTS’s) like .com, .net or .org. It’s a way to add authority to your website and makes your customers trust you.
Your domain should be short, easy to read, write and remember, and easily associated with your products or services. Refrain from using numbers and symbols, as they might confuse your users and lead them to a competitor instead.
Once you’ve decided on your domain name you should then make sure it’s available. If not, then try a few variations, such as changing a word, adding a dash and more. Once you’ve found the right available one, then go ahead and register it before anyone else does!
I would also advise you to buy the most important, if not all, of your domain name extensions in order to protect your brand and ensure that no one can have a domain name that matches yours.
Also if you are looking for alternatives to GoDaddy, Namesilo and Papaki and other domain registrars offer similar services.
2. Sign up to a hosting provider
If a building is your brick and mortar store’s house, then web hosting is your website’s house on the internet. It’s a service that lets you upload a website and is offered for a specific period of time, usually per year.
For this guide, I chose to continue with GoDaddy but there are also other available hosting providers out there, as it also offers some WordPress Hosting plans. WordPress hosting plans come with WordPress already installed and ready to go so you save yourself the trouble of installing WordPress. (For those that choose a plan that doesn’t come with WordPress, there’s a guide on installing it further down the post.)
So let’s see how you will purchase your plan.
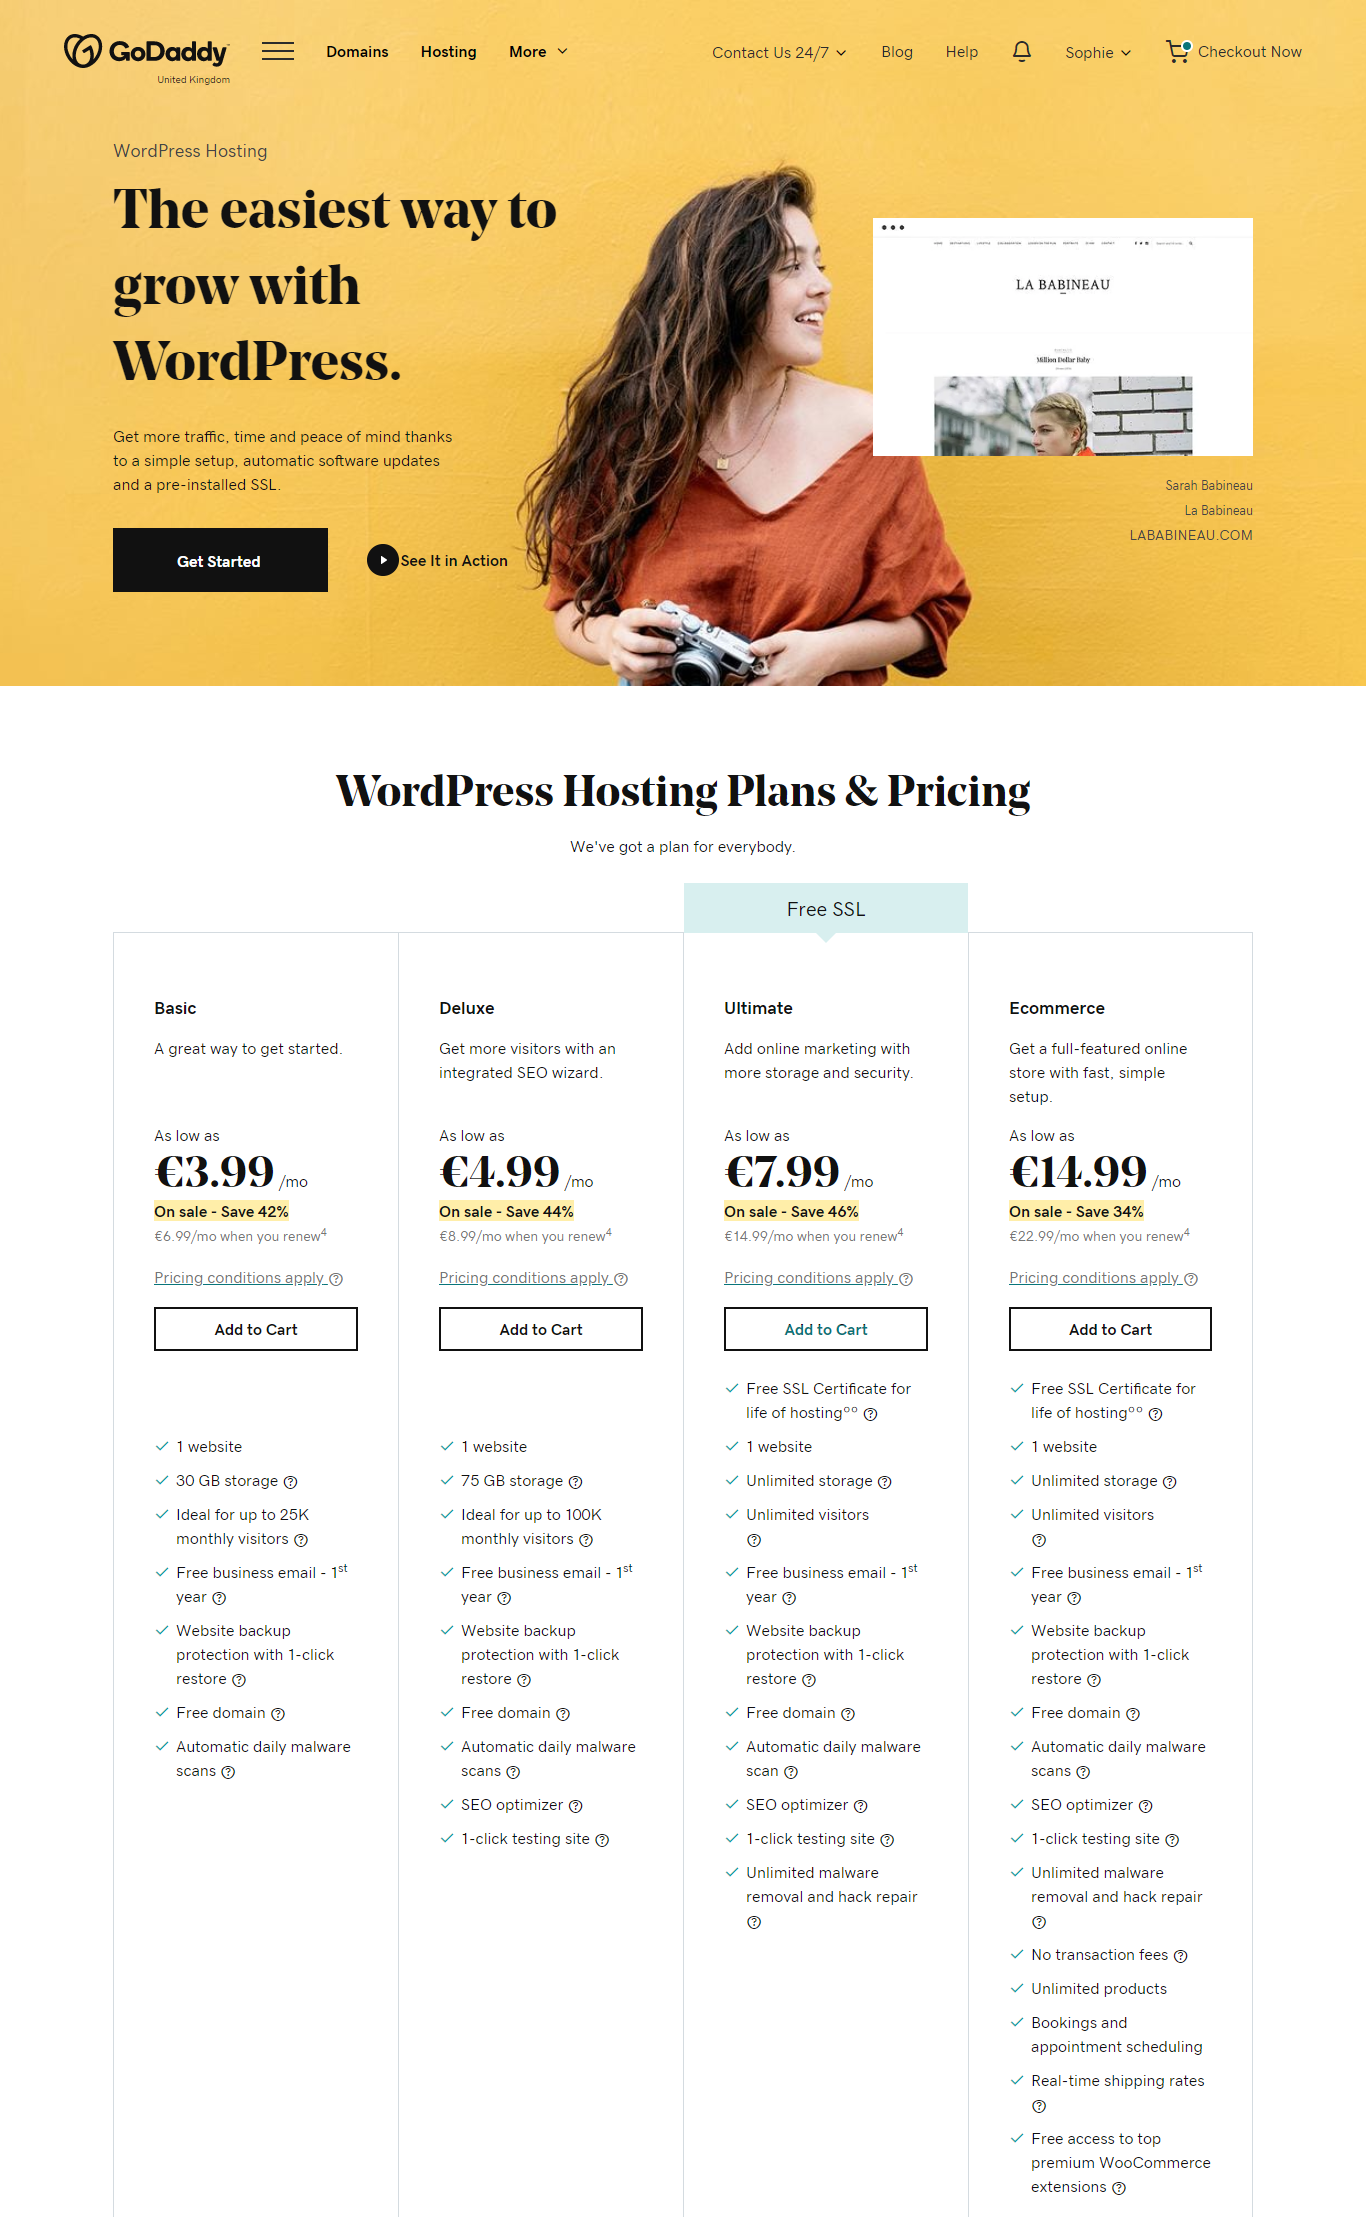
Visit GoDaddy.com and click on Hosting.

Then, click WordPress Hosting, under the WordPress category.

You’ll be presented with all the available plans. I went for the Basic one as it is a good starting point and you can always upgrade later.
Next, choose the length of your contract and click Continue.
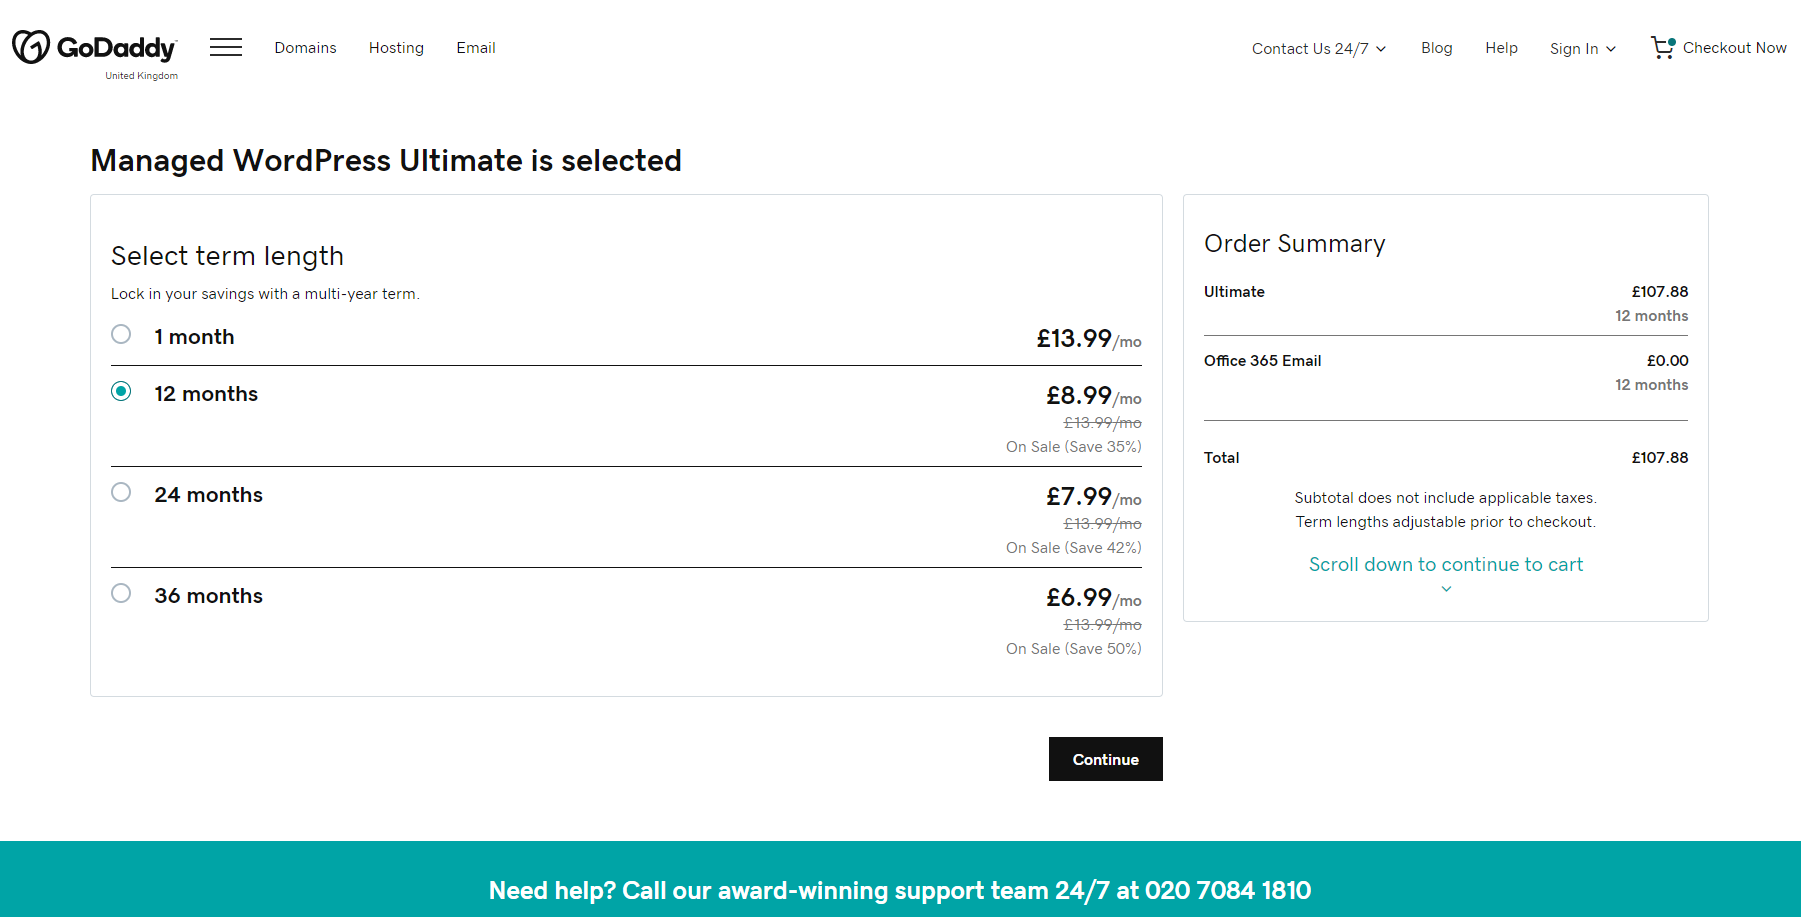
Next, fill in your billing information, click Save, and click Complete Purchase.

Once your order is complete, a notification will appear on the top right of your screen. You’re good to go!
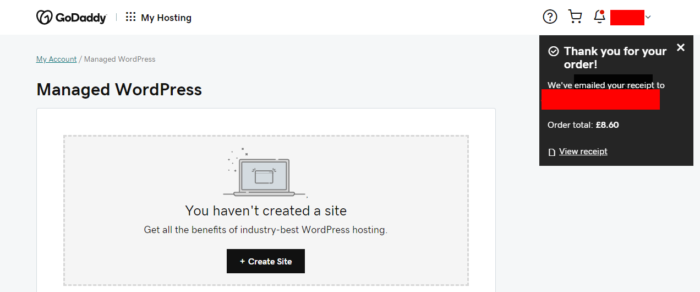
Now the next step is to connect your domain to your WordPress site.
Connect your domain with WordPress
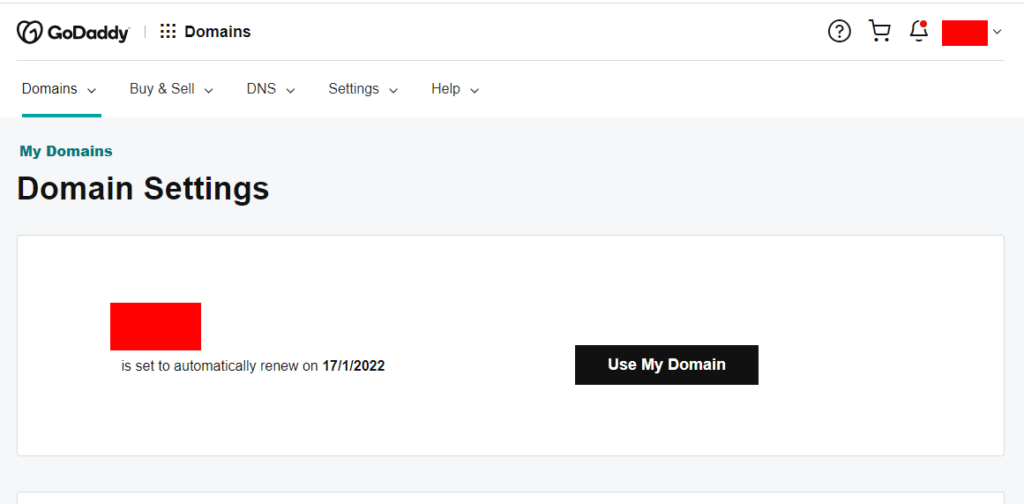
From the GoDaddy.com dashboard, click on the name of your account and then click Manage Domains.
On the page that appears, click on the Use My Domain button.
Next, locate the Build a new website icon and click Build to continue.

From the options presented choose Store and Yes, the easier to build the better, and then click Setup on the Managed WordPress option.

Next, choose a theme that suits your e-store, by clicking on the Online Store tab and previewing the available options. Don’t worry, you can always change your theme later on through your WordPress account.

When you’ve decided, choose the theme you want to use and tick the boxes of your choice and click Continue.

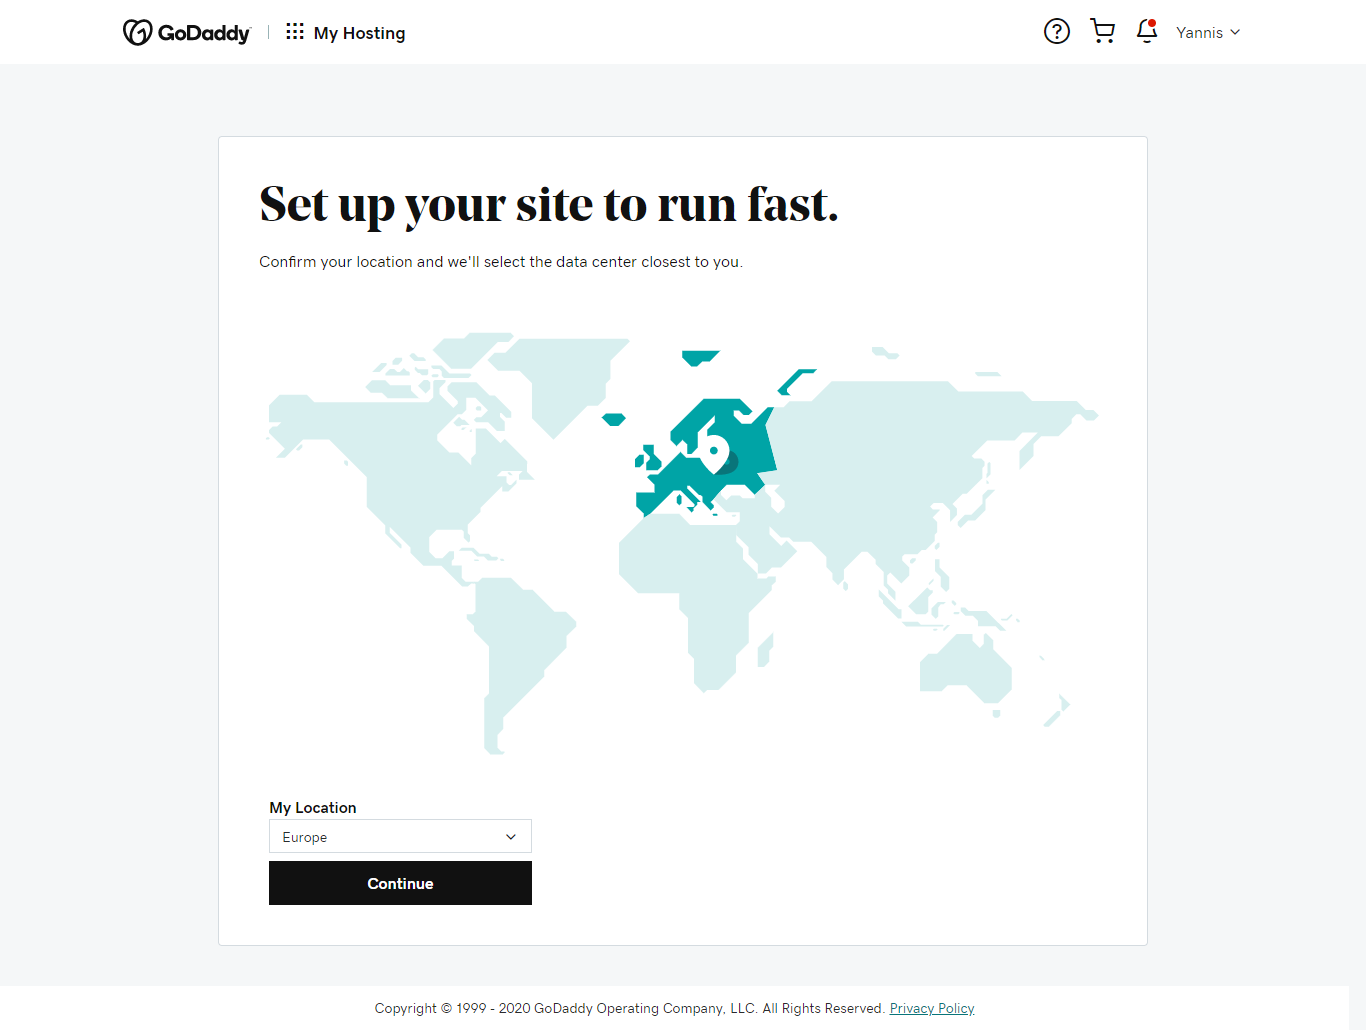
Choose your location and click Continue.
Wait for a few minutes while your site is being created…

That’s it! You’ve got yourself a brand new website!
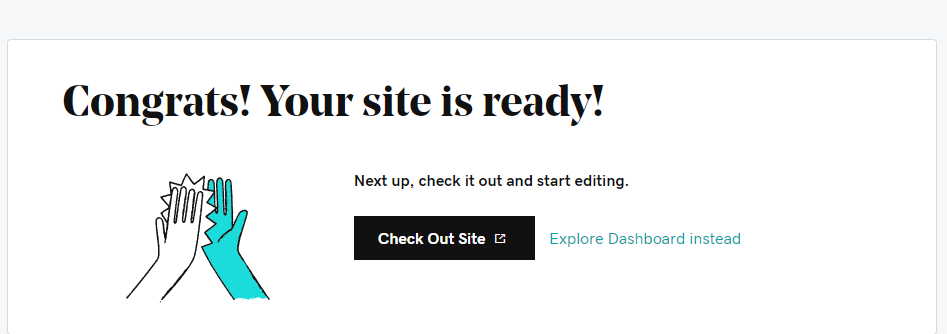
To complete the process, click on Explore Dashboard instead, to be directed to your WordPress dashboard.

Click on Add Domain and you will be directed to GoDaddy.com. From the dropdown menu choose the domain you’ve previously bought and click Attach.

When you’re ready, this window will pop up on the right of your screen.
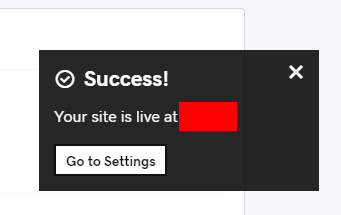
You can now go back to your WordPress dashboard and click on My Site to admire your new creation. Yes, it’s live!
Tips for the curious mind
While for this guide I went straight for the option of WordPress hosting, which is the easier option for a beginner taking their brick and mortar business online, it’s good to know a few more things on web hosting.
There are 3 basic types of web hosting to choose from:
- Shared server
- Virtual servers
- Dedicated servers
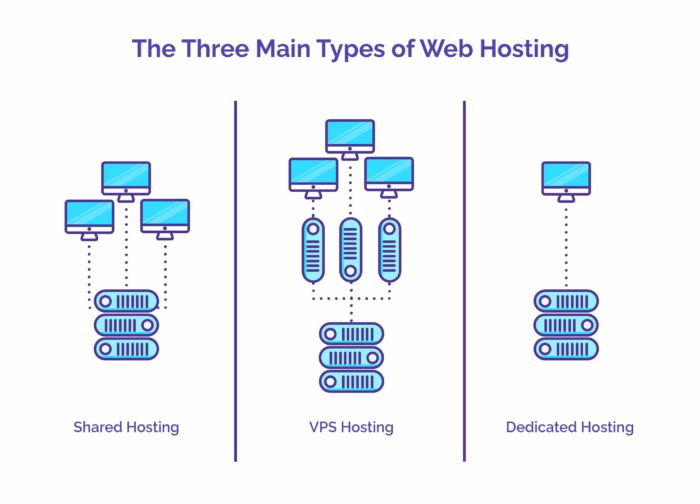
Shared server
Choosing a shared server means choosing to share the server’s pores with other websites. Usually, it’s the most affordable option, but it comes with a few disadvantages. If other websites have more traffic than yours, then they might cause your site to load slower. While shared servers are ok for those looking for a cheap solution for small-traffic websites, it’s definitely not recommended for e-stores.
Virtual servers
Virtual servers (VPS) offer stability and more pores. It’s an ideal solution for small businesses that run an online store, while it’s also good for “welcoming” a few thousand visitors per day.
On the downside, it might prove a bit high-priced for a small business’s budget.
Dedicated servers
This is the perfect choice for large businesses with very high traffic and bigger needs. They are the most expensive but reliable hosting solution.
In general, when choosing the right web hosting for your online business you should consider the following:
- Reliability
- Fast connection
- Price
- Control panel
- Server location
- Data backup
- Bandwidth and traffic
- Support
3. Install WordPress (for web hosting plans that don’t include WordPress)

You’ve chosen the long way. You’re a brave one.
If you want to install WordPress on your web server, then using your cPanel software is the best road to take.
cPanel is the dashboard that most web hosts give to their customers. It is used as a control panel that simplifies website and server management and it helps you install WordPress through an auto installer.
Autoinstallers help you automate the whole installation process. So instead of doing everything manually you just input some basic information, click a button, and, ta-dah, WordPress ready!
Here’s a fast tutorial you can watch to help you install WordPress using cPanel:
4. Set up WooCommerce
Now that your WordPress account is all set, it’s time to set up WooCommerce. You don’t have to install it since the hosting plan comes with WooCommerce pre-installed.
Why WooCommerce you ask. Only because it’s No1, with about 2.3 million eCommerce stores using it today.
Also, it’s super user-friendly, flexible, with powerful features.
Basically, WooCommerce, the eCommerce extension of WordPress, is a free plugin that will turn your website into a fully functional e-Commerce store.
Woocommerce has created a super easy to follow setup wizard that makes the whole process a lot less daunting.
Let’s start.
1: Access the Setup Wizard
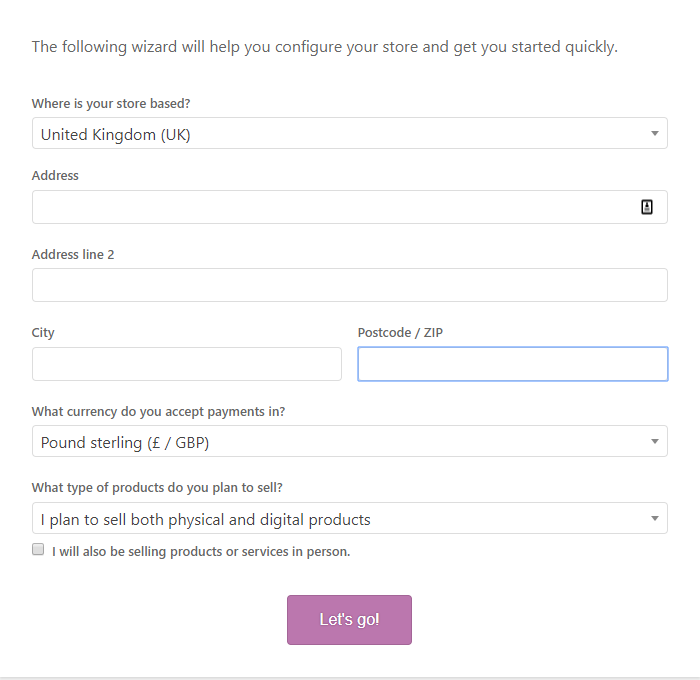
From your WordPress dashboard, click on the Run the Setup Wizard button.
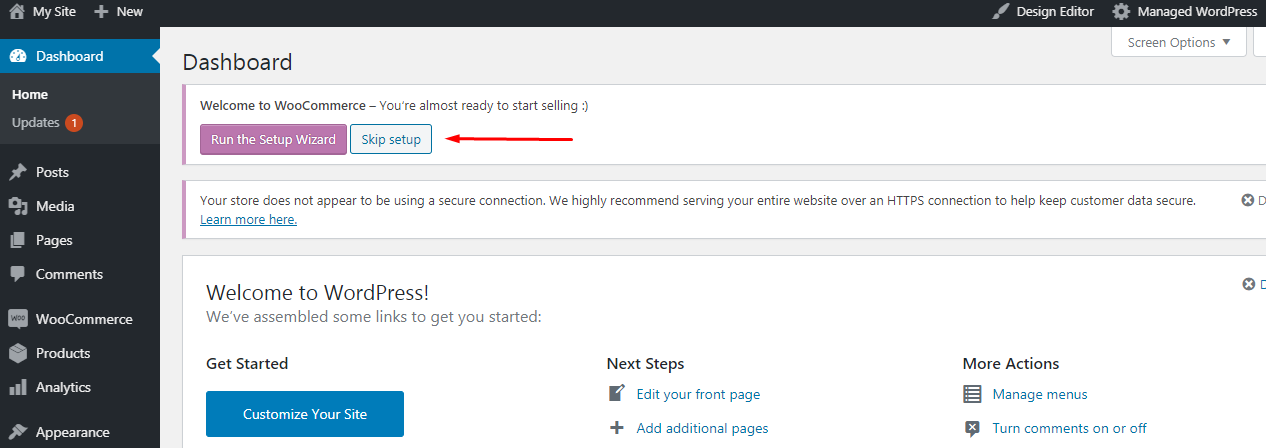
Fill in all the requested information and click Let’s Go!
2: Payment Methods
In this step, you are going to select one or more payment methods to offer in your WooCommerce store.
In the Setup Wizard, you can choose between PayPal and Stripe or both. You can also install additional payment methods later!
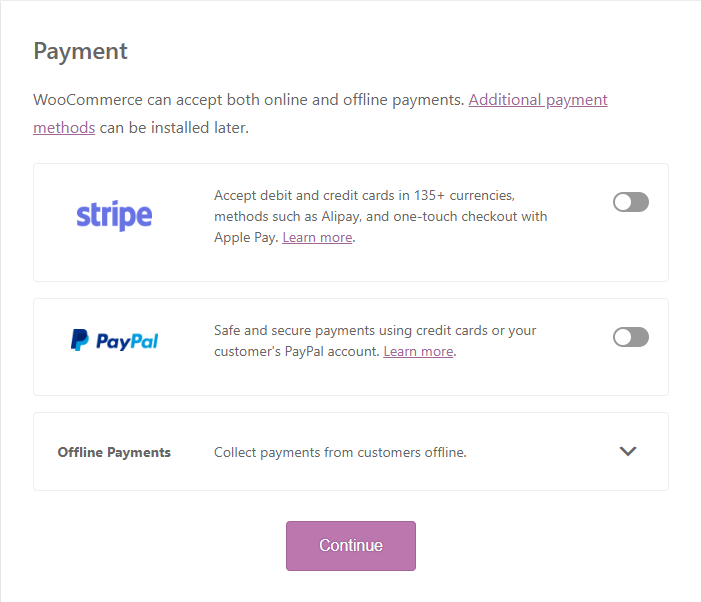
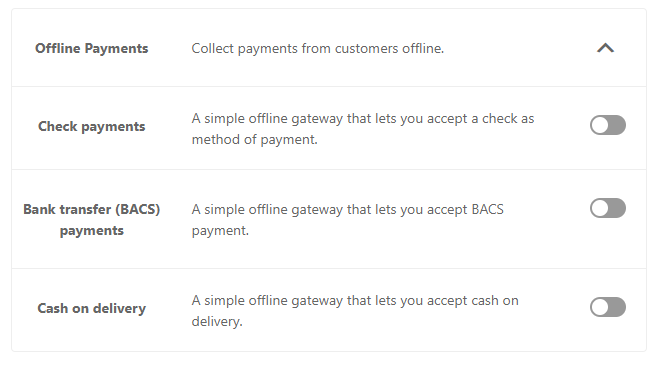
In addition to online payment methods, you can also activate Offline Payments.
Click on the drop-down menu to choose from a range of offline options:
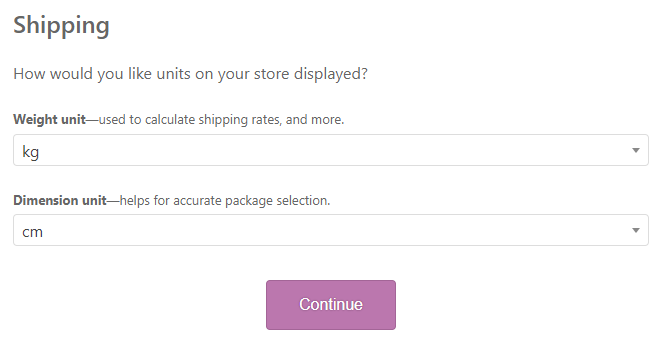
3: Shipping Options
You’ve selected the available payment methods for your WooCommerce store, so now it’s time to configure the shipping details.
In this step, you are able to select the metric you want to choose for the dimensions and weight of the package.
Choose the ones that are commonly used in the geographic location most of your customers come from.
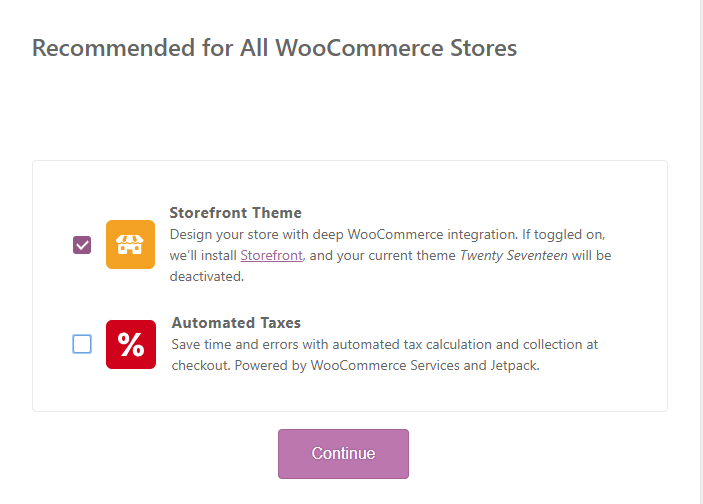
4: Recommendations
The next step is sort of optional, but you might want to follow through with it.
The wizard is going to recommend some additional plugins/themes to make your Woocommerce experience even better.
Et voilà! You’re done!
6. Add products to your store
Now for the fun part! I’m sure you’d love an easy way to add products from your brick and mortar store to your website.
Well, WooCommerce makes it easy as pie. Let’s start.
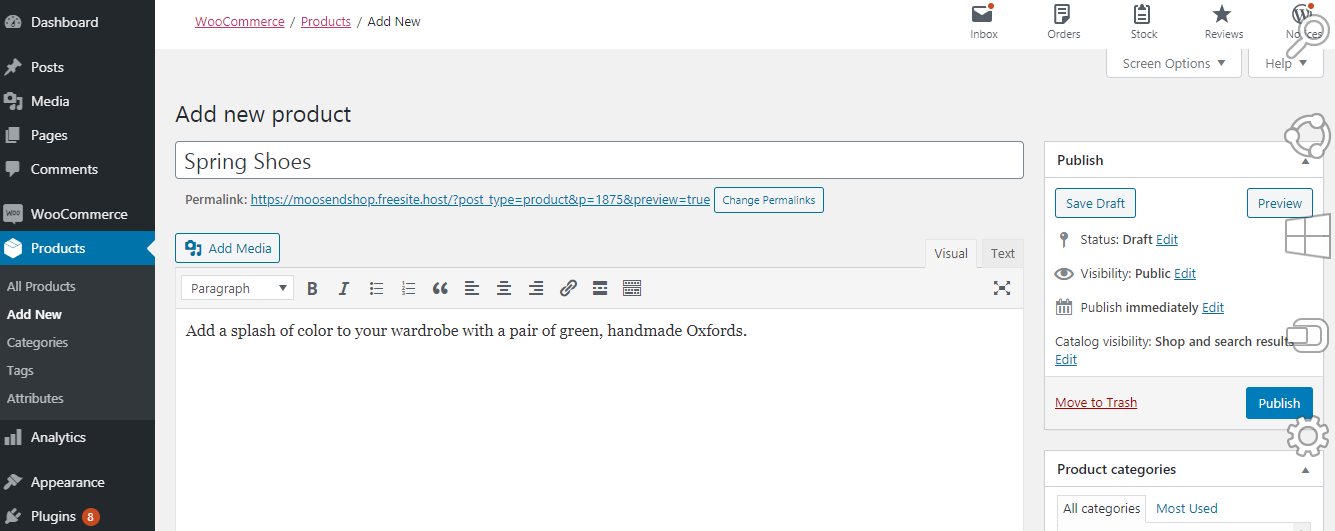
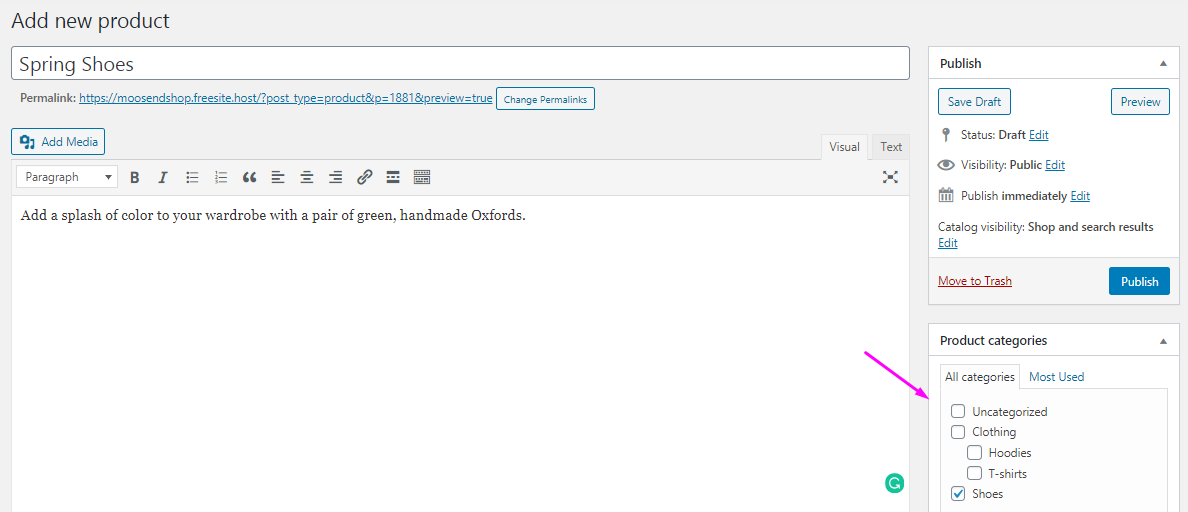
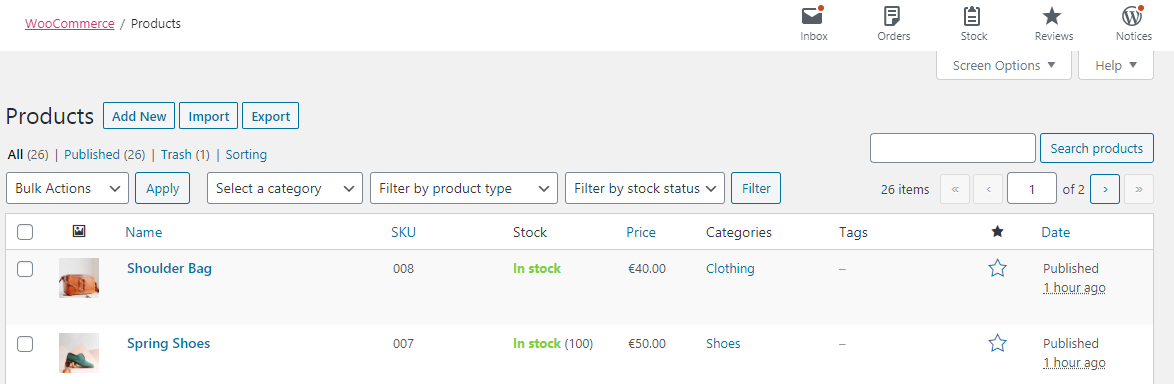
From your WordPress dashboard go to WooCommerce > Products > Add New.
You will land on this page, where you must enter your product’s title and description.
As you see, I have added a pair of green shoes that would definitely be in my dream e-store!
Next, go to the Product Data panel, and select downloadable (digital) or virtual (service) if applicable.
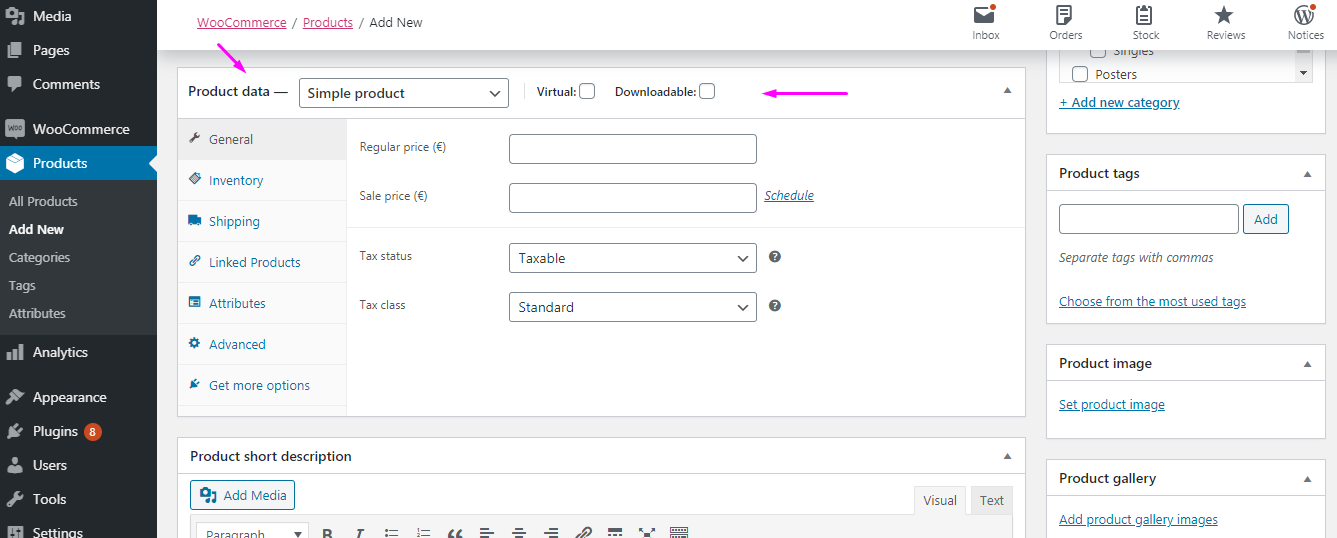
Now, a few words about the Product Data panel.
This is where all the important information is added to your products.
From the Product Data dropdown menu you can choose between:
Simple product
Most products in an online store can be “Simple products”. They can have different delivery methods.
Grouped product
This means a group of products that can be purchased individually and only consist of simple products.
External/Affiliate product
This is for any product that shows in your e-store but is actually sold from someone else’s e-store.
External products are always linked with an outbound link to a different site.
Variable product
Variable is any product that can have different features, such as a T-shirt available in different colors.
The Product Data panel also includes a list of other information that you must enter, such as shipping details, so now it’s the time to add all your product’s data that should show on your website.
Every product type shows only its relevant settings.
Let’s see how to fill all the information needed, tab by tab.
General
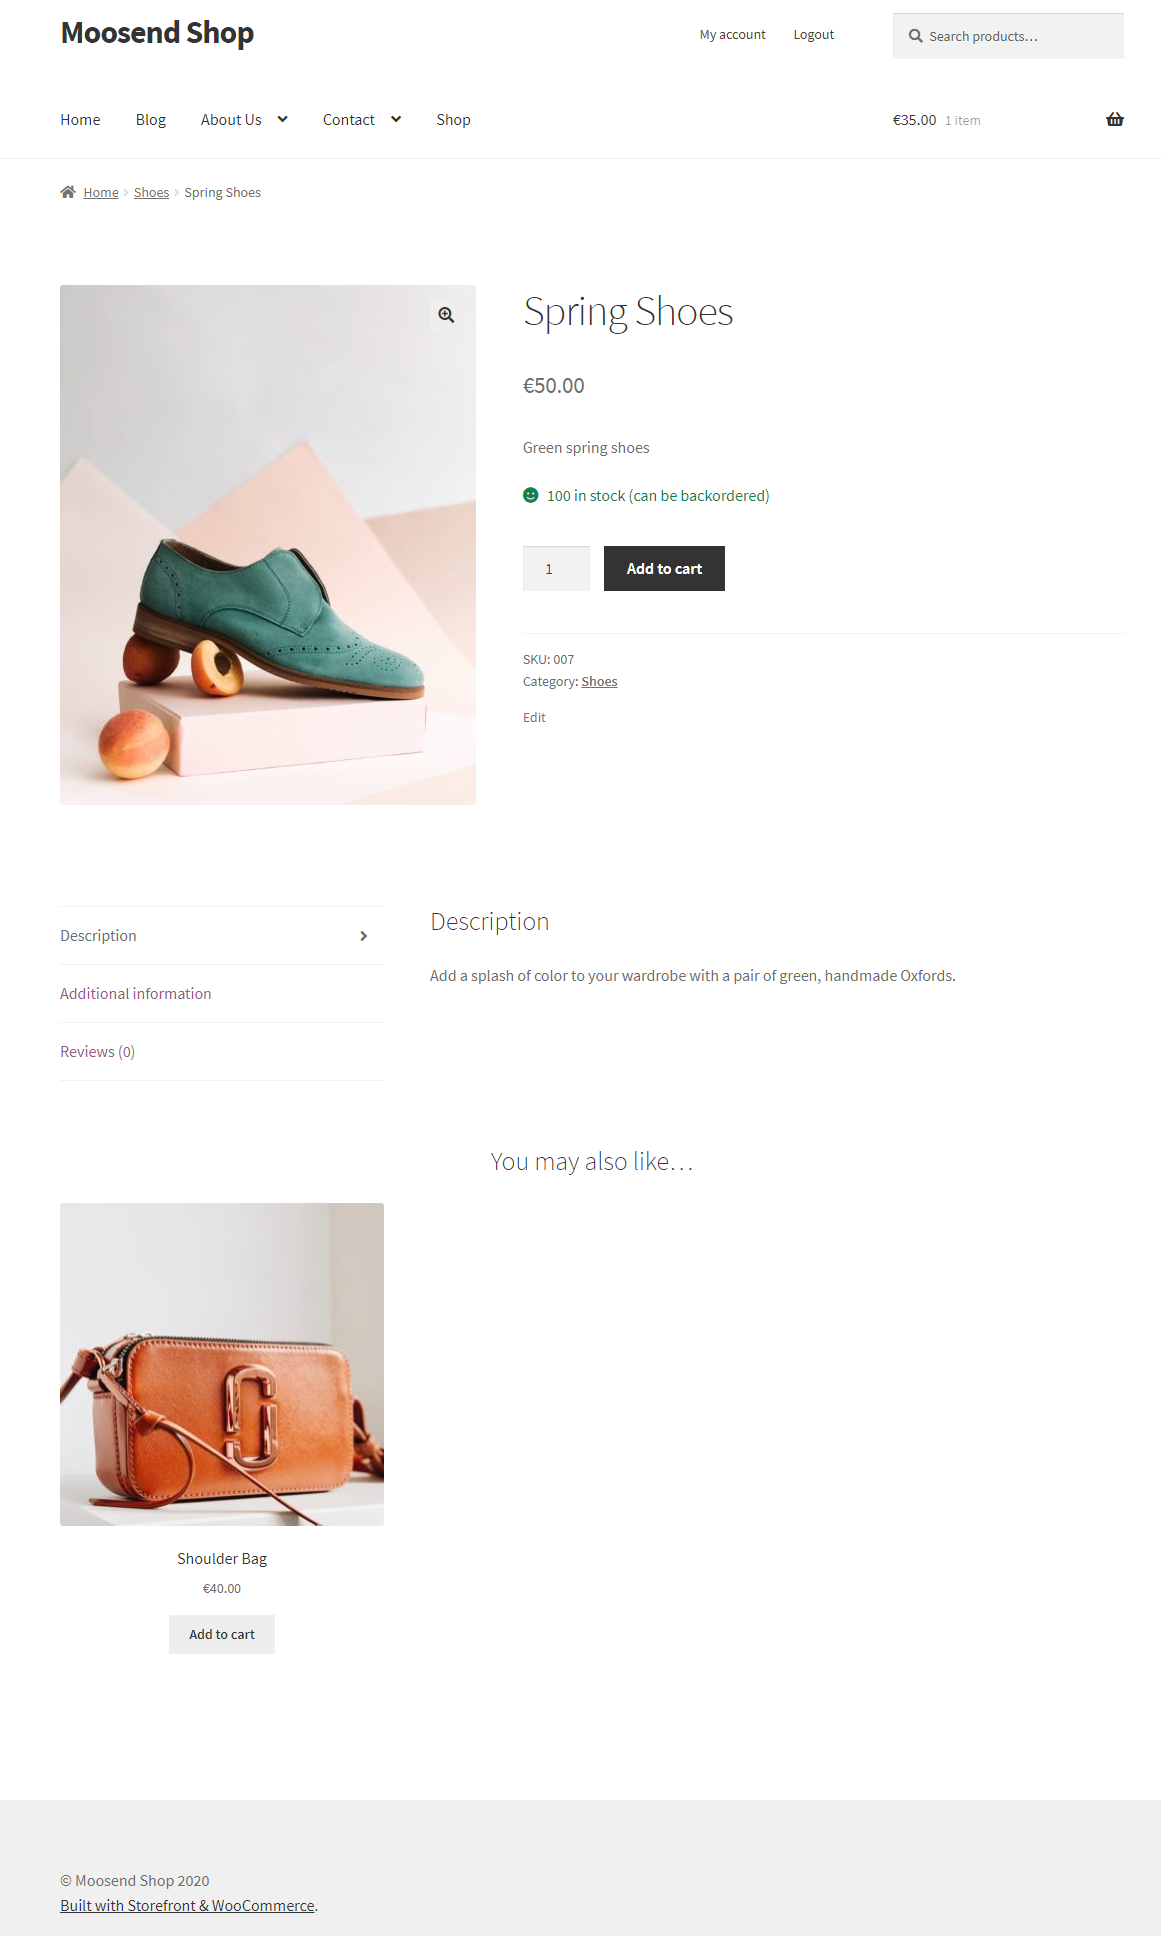
Now, let’s not forget about those green shoes!
I choose the Simple Product option and now it’s time to add the price.
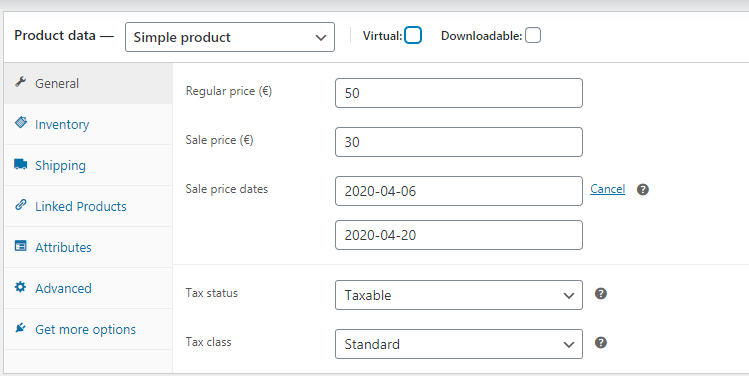
The product’s original price is 50€.
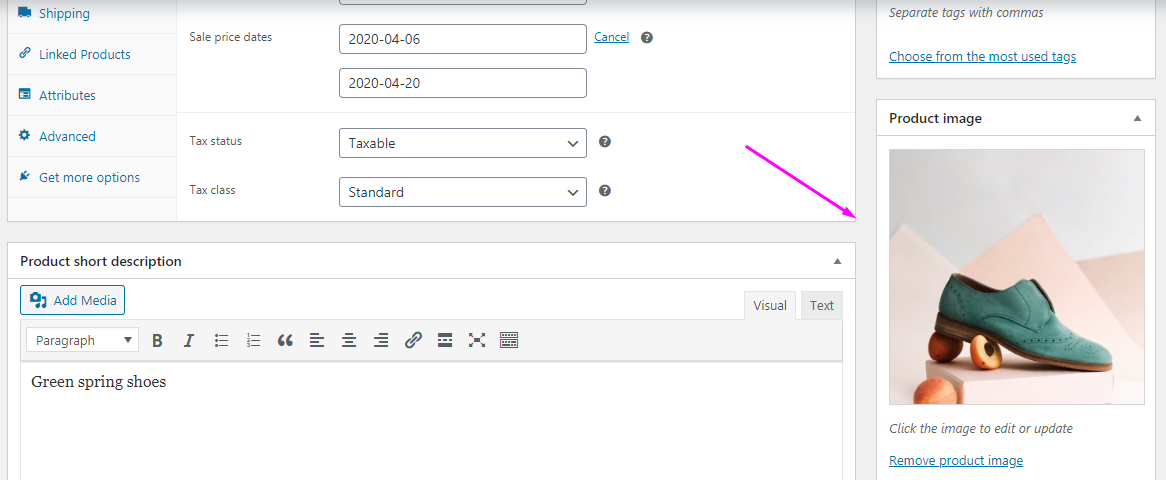
This is a product on sale, so I go ahead and enter that price too. Next to the Sale price, there is a Schedule button. Click on it to set the exact duration of your sale price.
When you’re done, choose the Tax status and class and move on to the next step.
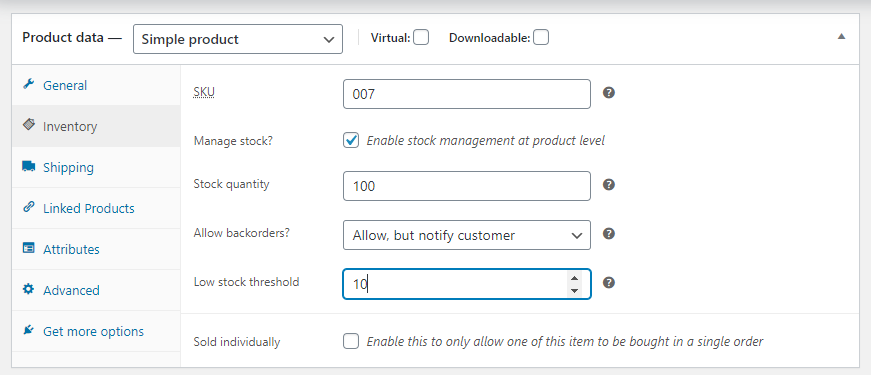
Inventory
Through the inventory section, you can manually various important information.
SKU
A unique identification, usually alphanumeric, of a particular product that allows it to be tracked for inventory.
Manage stock
Determine whether you want to track your product’s stock via WooCommerce.
Stock quantity
This option only shows if you’ve checked the Manage stock box. It’s where you set the number of items in stock for the specific product.
Allow backorders
This option too only shows if you’ve checked the Manage stock box. Click on the dropdown menu to determine how your backorders should be managed.
Low stock threshold
The number upon which you wish to be notified.
Stock status
Choose the current status of your product’s stock. It’s only visible if the Manage stock is disabled.
Sold individually
These options can limit how many pieces of the product a customer can buy at one time.
In my example, I am using a Simple product and have configured the product to track stock and allow back orders with customer notifications enabled.
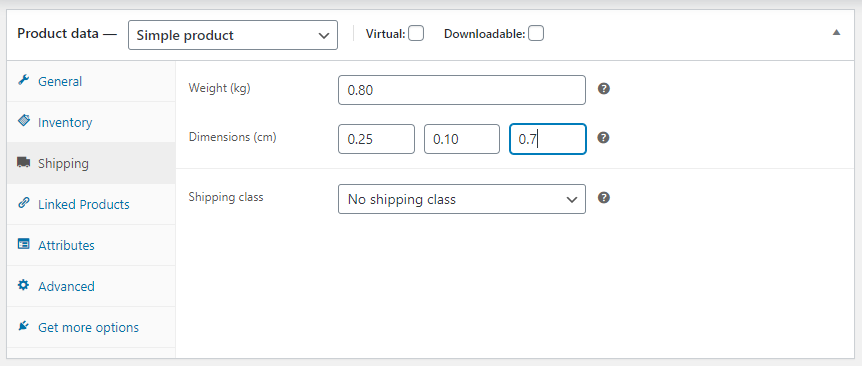
Shipping
Here you can define the product’s weight and dimensions as well as its shipping class.
Shipping class is used by certain shipping methods to group similar products.
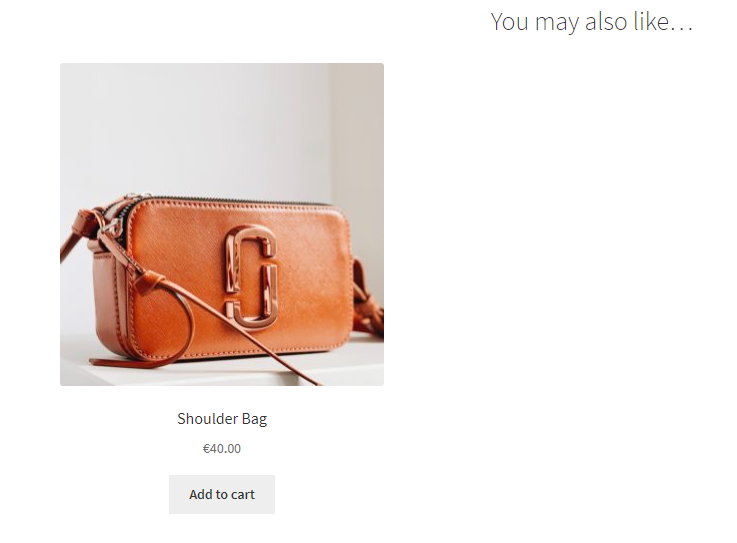
Linked products
From here you can promote other products, in order to upsell or cross-sell.
Both are great eCommerce marketing techniques that I strongly advise you to implement in your strategy.
For example, who wouldn’t want a brown shoulder bag with these shoes? Just enter the name of the product you and it will be automatically added.
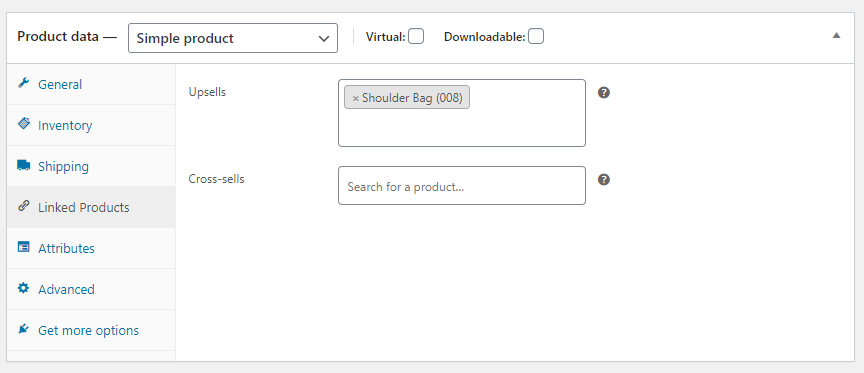
Upsells are displayed on the product details page like this.
Cross-sells are displayed with the cart and related to the user’s cart contents.
Attributes
Here’s where you can assign multiple details for your product.
To choose an attribute, click on the dropdown menu and select the right one. Click on it and press Add to add it to your product.
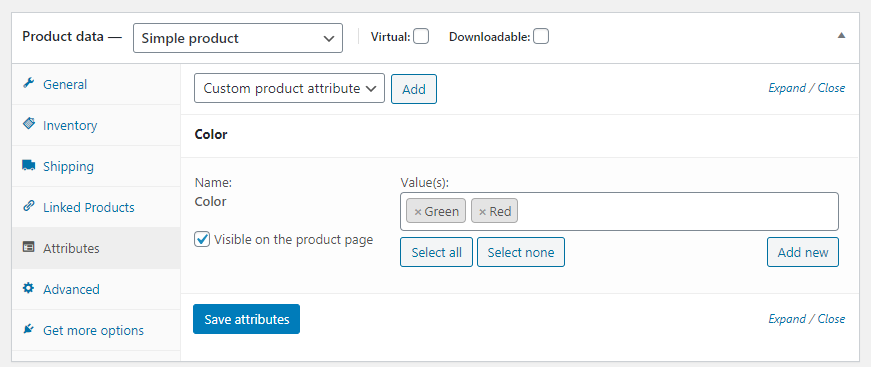
Of course, this step requires using the attributes you’ve already created.
You can check this guide on how to add new attributes.
As you can see, I have added the Color attribute, and also added the values Green and Red, the colors available for this certain product. To do that, click on the Values box and all the available ones will appear.
Click Save attributes and you’re done!
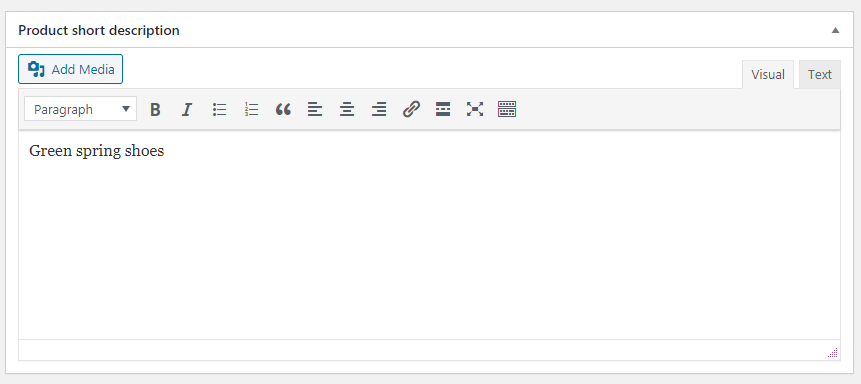
Since this is a post for beginners let’s just skip the Advanced tab and move on to the Product Short Description.
Product Short Description
This description normally appears next to product imagery on the listing page. So, you know, keep it short!
Taxonomies
This is where you show extra product data based on a class. From here you can select the category of your product or add product tags.
For this example, I am simply choosing the Shoes category.
You can easily add new categories or manage the existing ones from the Categories tab on your left.
When you’re done, scroll down to add a Product Image.
Add Product Image
Click on the corresponding button and choose an image either from your Image Library or by uploading a new one.
Click on the Set Product Image button to save your selection. When you’re done, your selection should appear in the Product Image box.
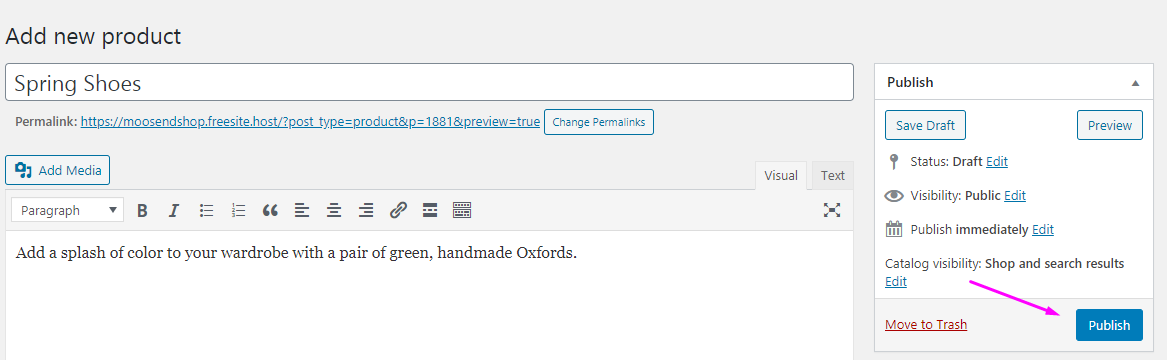
Last but not least
Once you’ve completed all the steps I mentioned above, it’s time to take your product out there! Just click on the Publish button and that’s it!
Congratulations! You’ve just added your very first product on your website. And that’s a reason to celebrate if you ask me! *grabs champagne*
Just click on the Products tab and admire your new items. *opens champagne*
Can’t get enough of it? Click on the product you just added, click on the Preview Changes button and smile at what you’ve achieved. This is what your product page looks like! *drinks up*
Tips for the curious mind
Before moving to the next step, I think it’s my duty to share a few pro tips with you on how to make your newly added products even more valuable and effective.
Product images
This is a visual era we live in. In fact, a staggering 75% of online shoppers say that they rely on product photos when deciding on a potential purchase.
You could say that your product’s image sells more than the actual image. It’s what catches your visitors’ attention and what makes them feel the need to have it. If they can’t visit your brick and mortar store, how will you allure them? It’s super important to only use high-quality images that enhance your products and make them even more desirable. If you are on a low budget, now is not the time to be closefisted. A professional photo shooting is something you can’t afford to skip.
Also, make sure you use high-resolution images, 1080-1600 pixels. It helps shoppers have a better view of your product.
Last but not least, never forget to add ALT Text (Alternative text) to your images when you upload them.
The ALT Text, which includes keywords matching your product is one more way for the search engines to trust your content and help you rank higher and boost your traffic.
There are many WordPress plugins that help you optimize your images, such as reSmush.it and EWWW Image Optimizer.
Product descriptions
It may sound strange to you but a good product description can actually boost your sales!
Put yourself in your visitors’ shoes and imagine you are surfing the internet in search of your next mobile phone. You land in an e-store and find one that meets your expectations at first glance. Then, you zoom in the picture for a better look. Everything seems right at first glance. So far so good.
But is that enough for you to add it in your basket? Didn’t think so. And that goes for all online shoppers.
Think of your product descriptions as a replacement for your brick and mortar salesmen.
A well-written, detailed description of the product will help them solve all their questions and help them make a decision faster.
Get your business to the world
So you’ve done it all. You’ve actually taken your brick and mortar business online, added products and now you’re ready to sell, right?
Not so fast amigo!
While setting up your e-store is the beginning of it all, there’s one more thing (well, maybe more than one), you should do in order to put your self on the road to success.
Which is to market your online business. Just like you did with your brick and mortar!
An all-in-one marketing platform like Moosend is the first tool you should get your hands on if you want to spread the word about your brand new e-store fast and easy.
Most such platforms require zero technical skills, so it’s super simple to market your business effectively and effortlessly.
So let’s see how you can create a Moosend account and get down to business.
1. Register
Go to moosend.com and click on the Start Free button to create a new account.

Next, type in your Business Email Address and click Continue.

Next, fill in your login domain (the URL you’ll be using to visit your account), as well as a password.

And…you’re in!
2. Fill in the details
Now simply type in your first name and last name.

Now complete your company address, and business information to know you better and complete the setup process.

When you’re done, a message will appear informing you that a confirmation email has been sent to your inbox. There’s a chance it’s arrived at your Spam folder, so make sure you check that too.

3. Activate your account
Click on the Activate Account button.

You’re ready to skyrocket your business by creating email marketing campaigns, landing pages, subscription forms and more!
To make the most of Moosend’s amazing tools and features, we’ve created Moosend Academy. It includes a series of step-by-step videos, created especially for eCommerce and it’s all there.
From creating your first mailing list to sending your first email campaign and more. Marketing your brick and mortar business that went online can’t get any easier than this!
Now what?
Now that your marketing stack is complete, here’s what you should do to complete the process of taking your brick and mortar business online:
1. Create ads to market your business through various channels
2. Create various subscription forms to build your mailing list fast and easy
3. Create high converting landing pages to sell more
4. Master the art of email marketing and learn the powers of email workflows
5. Start a blog to leverage the power of content marketing
Follow the links to enter the knowledge:
- The Complete Guide to Market your online business
- List-building 101
- Create a high-converting landing page, step by step
- How to create your first newsletter without any coding skills
- Must-have email workflows that will supercharge your email marketing
- How to start a blog that will add value to your e-store
- Creating an eCommerce Store in Three Simple Steps
- How to Start an Ecommerce Business Step by Step
Ready to roll
Well, that was some guide, huh?
Just by scrolling down, you can tell it’s got everything you need to take your brick and mortar store online and ready to rock some customers.
And it really does! Just follow the steps, one by one, and you’ll see for yourself how easy it was, after all, to introduce your brand to the eCommerce world.
And if you still have questions, well, I’m always happy to help!
Similar Posts
 Published by

 Published by
Create, send and optimize your email marketing campaigns