What is DMARC? How To Use It To Increase Email Deliverability
Do you want to learn more about DMARC? Excellent! Let’s start with the DKIM and SPF first.
I am sure you hear a lot from our support and deliverability teams about how two of the factors that affect deliverability are SPF and DKIM.
I usually call SPF and DKIM “your e-signature” and basically, this is what it is.
When you send emails, mailbox providers (such as Gmail, Outlook, Yahoo/Aol, etc.) need to identify whether the message is a legitimate one sent from the owner of the domain name or a message sent by a spammer.
Unfortunately, you can’t just hit Gmail’s door and say, “Hi, I am using Moosend to send a campaign, and yes, I am the owner of the domain name example.com.”
So instead of that, you simply add two values into the DNS zone of your domain name in order to notify mailbox providers about your identity.
Understanding SPF & DKIM
Consider those values like two sweet twin sisters. Care to meet them?
SPF (Sender Policy Framework)
It defines which IP addresses can be used to send emails from your domain.
The correct record will ensure that all the apps you are using to send emails on behalf of your domain name are included in your SPF record. And this is also tricky.
Because if you don’t set up the values correctly or merge with existing values, SPF will fail or encounter errors. And you don’t want that!
For example, if you’re using Moosend to send campaigns/newsletters, you should put Moosend’s SPF value in your SPF. It’s a simple TXT record, so don’t panic.
Here you will find instructions on how to find Moosend’s value in your account.
DKIM (Domain Keys Identified Mail)
This is your second e-signature! Yes, one is not enough, so let’s have more. The difference is that the value for the DKIM record is UNIQUE for every domain name!
And it’s also cryptographic… And public… So what else makes DKIM so unique?
The fact that it makes sure that the message’s sender is actually the sender of the message!
An example could help here.
You send a campaign to your double opt-in healthy list, using Moosend’s IPs.
So far, so good.
The mail server that will accept your message will look for your DKIM signature to validate it and then use it to verify the encrypted signature.
So basically, the recipient’s server will ask: “Lionel, Is that you?”
If you need to setup SPF, DKIM, and DMARC for any provider (GoDaddy, Squarespace, Google Domains, etc) click here: Set up SPF, DKIM, and DMARC for a Provider.
Getting DMARC Done Right
Now that you are familiar with SPF and DKIM, it’s time to learn more about DMARC.
DMARC (Domain-based Message Authentication, Reporting & Conformance) is an email authentication, policy, and reporting protocol.
It builds on the widely deployed SPF and DKIM protocols, adding linkage to the author (“from”) domain name, published policies for recipient handling of authentication failures, and reporting from receivers to senders, to improve and monitor the protection of the domain from fraudulent email.

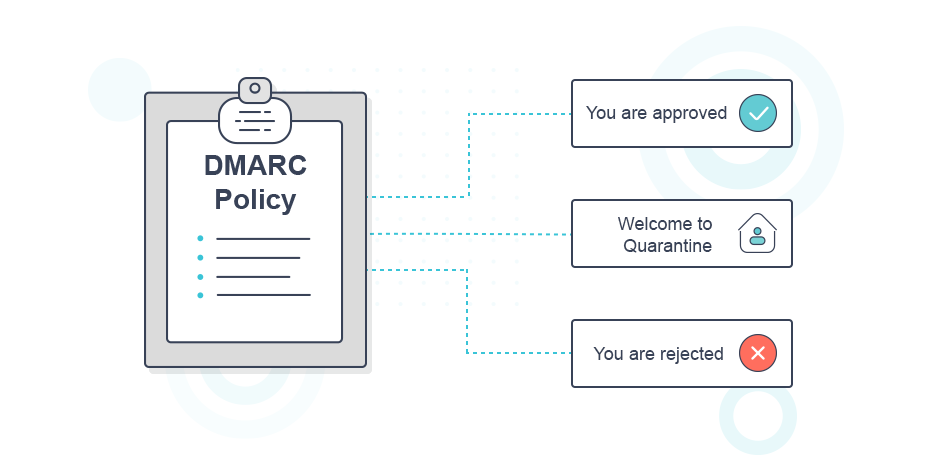
But what happens if DMARC fails authentication?
Your domain name’s policy will handle the rest.
Meaning that one of the 3 options below will take action:

Setting up Your DMARC Value
To do so, you need to proceed with the following steps:
- Contact your provider or your DNS administrator to create a new TXT record in the DNS zone of your domain name.
- Use the following syntax in the DMARC TXT record: v=DMARC1; p=none; fo=1; rua=mailto: enter your email address; ruf=enter your email address
Example:
v=DMARC1; p=none; fo=1; rua=mailto:[email protected]; ruf=mailto:[email protected]
Make sure to enter your email addresses after “mailto:” We strongly suggest to set up a unique email address for the purpose and activate/set up the mailbox so that you can monitor the alerts every day.
There are three values for your DMARC that you need to follow, just like baby steps:
p=none
This means that you are not instructing mailbox providers to take any action with your email that fails authentication. (You will start with that record, and after some time, based on the monitoring, you will change the “none” value for the “p” tag)
p=quarantine
(You need to set up that value before BIMI.) Quarantine policy is related to emails that fail quarantine checks. Most of these emails will end up in the receiver’s junk folder.
When the DMARC policy has been set up as Quarantine, you also need to set up the PCT tag.
The pct tag can be used to stage and sample your DMARC deployment.
For that purpose, you need to increase the percentage based on the monitoring results slowly:
- Quarantine 1%.
- Quarantine 5%.
- Quarantine 10%.
- Quarantine 25%.
- Quarantine 50%.
- Quarantine all.
Reject policy
You can reject all emails that fail the DMARC check. The email receivers should do this ‘on SMTP level’. The emails will bounce directly in the sending process.
When the DMARC policy has been set up as Reject, you will also need to set up the PCT tag. The pct tag can be used to stage and sample your DMARC deployment.
For that purpose, you need to slowly increase the percentage based on the monitoring results :
- Reject 1%.
- Reject 5%.
- Reject 10%.
- Reject 25%.
- Reject 50%.
- Reject all.
Important note: Make sure you have at least an A record, Mail Exchange (MX) record, or AAAA record in the DNS for the domain if you plan on using it to send an email.
I strongly recommend not setting up p=reject or p=quarantine on day one, since monitoring and the reports you will receive will guide you to increase DMARC’s policy.
The Final Details
Are we done? Not just yet!
Once you set up your DMARC value, you will have to change your return-path header too! This will ONLY affect the messages you sent through Moosend.
Although a custom Return-Path isn’t required (since we add our own domain names in that place for you), once you have a DMARC policy implemented for your domain, setting up a custom Return-Path to achieve SPF alignment is strongly advised.
DMARC checks the Return-Path of a message to confirm that the domain matches the domain in your “from” address.
If the path doesn’t match your “from” address, those emails will fail DMARC’s SPF alignment authentication because the Return-Path and “from” addresses aren’t using the same domain.
When the Return-Path domain bounces.example.com is set up and emails are sent from example.com, the domains are aligned for DMARC to operate.
This custom Return-Path scenario would create the header <[email protected]>. And how can you set up your own URL instead of moosend.com?
You will find all the spicy details here!
Now You Know
DMARC means that you care about your domain name, your brand, and your email marketing strategy.
DMARC has one goal: Τo build on a system of senders and receivers to improve sender mail authentication and enable receivers to reject unauthenticated messages.
To check your DMARC setup and ensure email authentication, you can use our DMARC Checker tool.


 Published by

 Published by

 Published by