
Announcing: Major Members Revamp You’ll Love

The waiting is over, everyone!
We just launched a (big) number of important features you’ve been longing for, and our revamped Mailing Lists tab is full of exciting surprises!
Some of the new features are:
- Adding tags to your subscribers to better organize your contacts
- Deleting subscribers to completely purge information for GDPR purposes without getting in touch with our support
- Creating custom fields on the fly without having to edit your file first
- Monitoring each subscriber’s actions for your campaigns separately to gain better control of your marketing actions
- Applying batch actions to save time and effort
Our changes will help you take even better control of your campaigns and love us a little more too. So let’s break down each new feature and discuss how and when to use them in your campaigns.
Mailing lists
1. Organize your mailing lists fast and easy with labels and filters
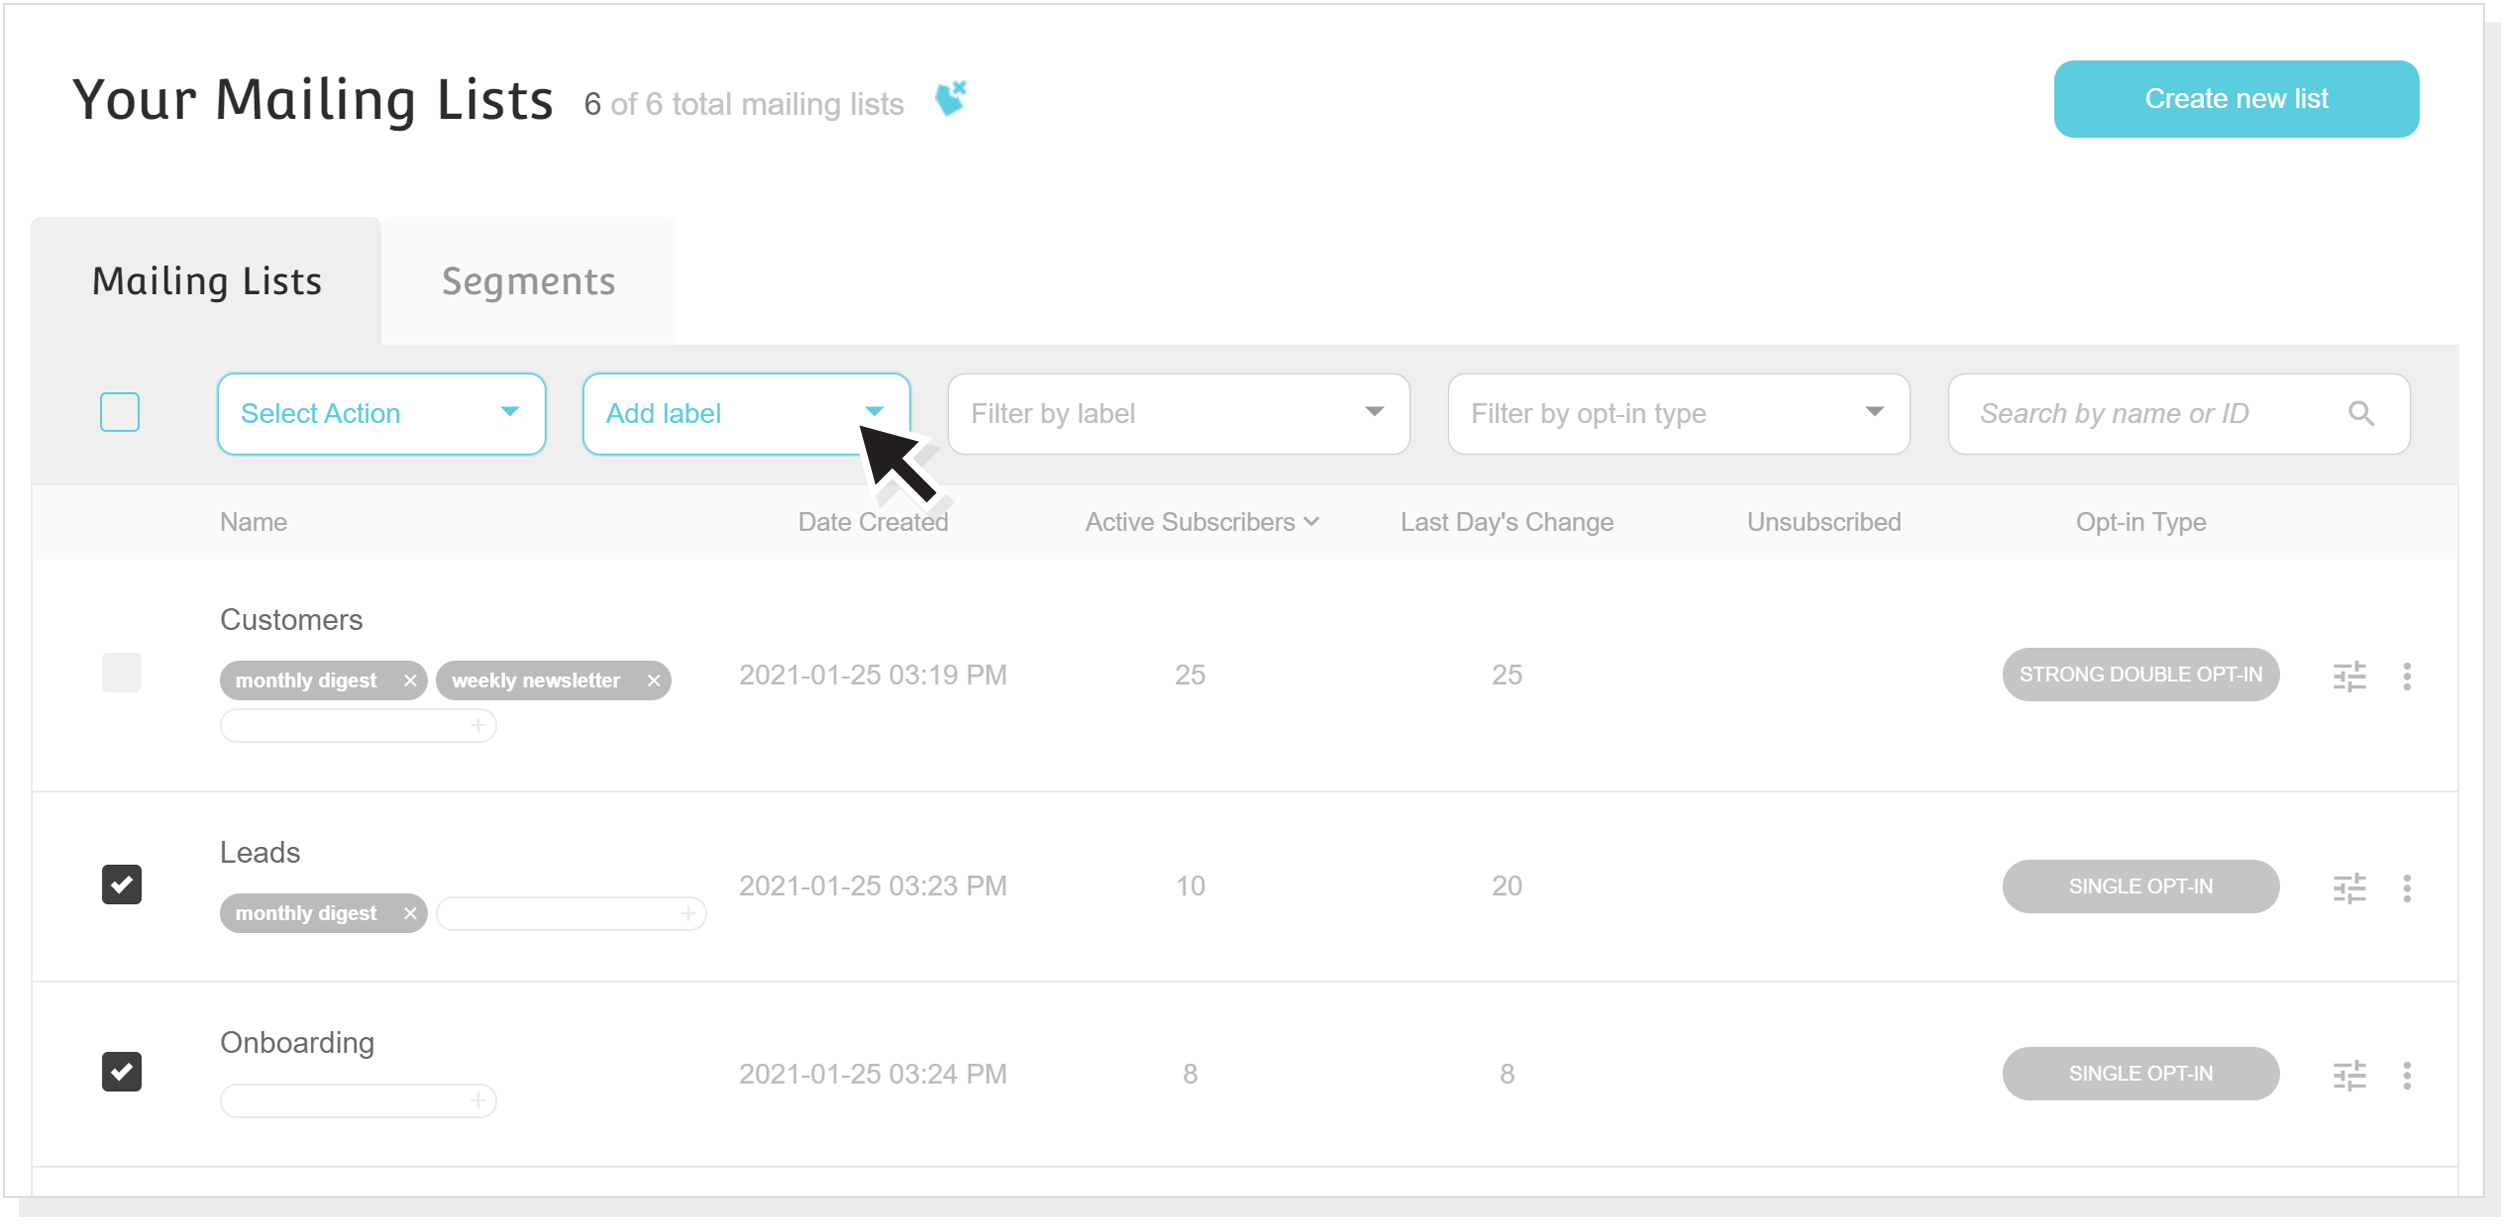
If you have a few mailing lists, you may find it convenient to do a little housekeeping. And what better to do this than organize your various subscribers by adding some labels to them for internal use?
To add a label, click on the blue label icon, type your label in the field, and click enter. If you want to delete a label, click on the x sign next to it. To hide labels under your mailing lists, click again on the blue label icon.
You can also manage labels on multiple campaigns by using the checkboxes on the left so that the Add label dropdown menu appears and selecting the label of your choice.
Additionally, you can find the mailing list you want right when you want it using all the new options! Filter by labels and by opt-in type, or find a mailing list by typing its name.
Oh, and one more thing! You no longer need to delete each mailing list manually. By using the checkboxes on the left, the Select Action menu appears. Choose the ones you want, click Delete, and they will be gone forever!
2. Sort your mailing lists by various information
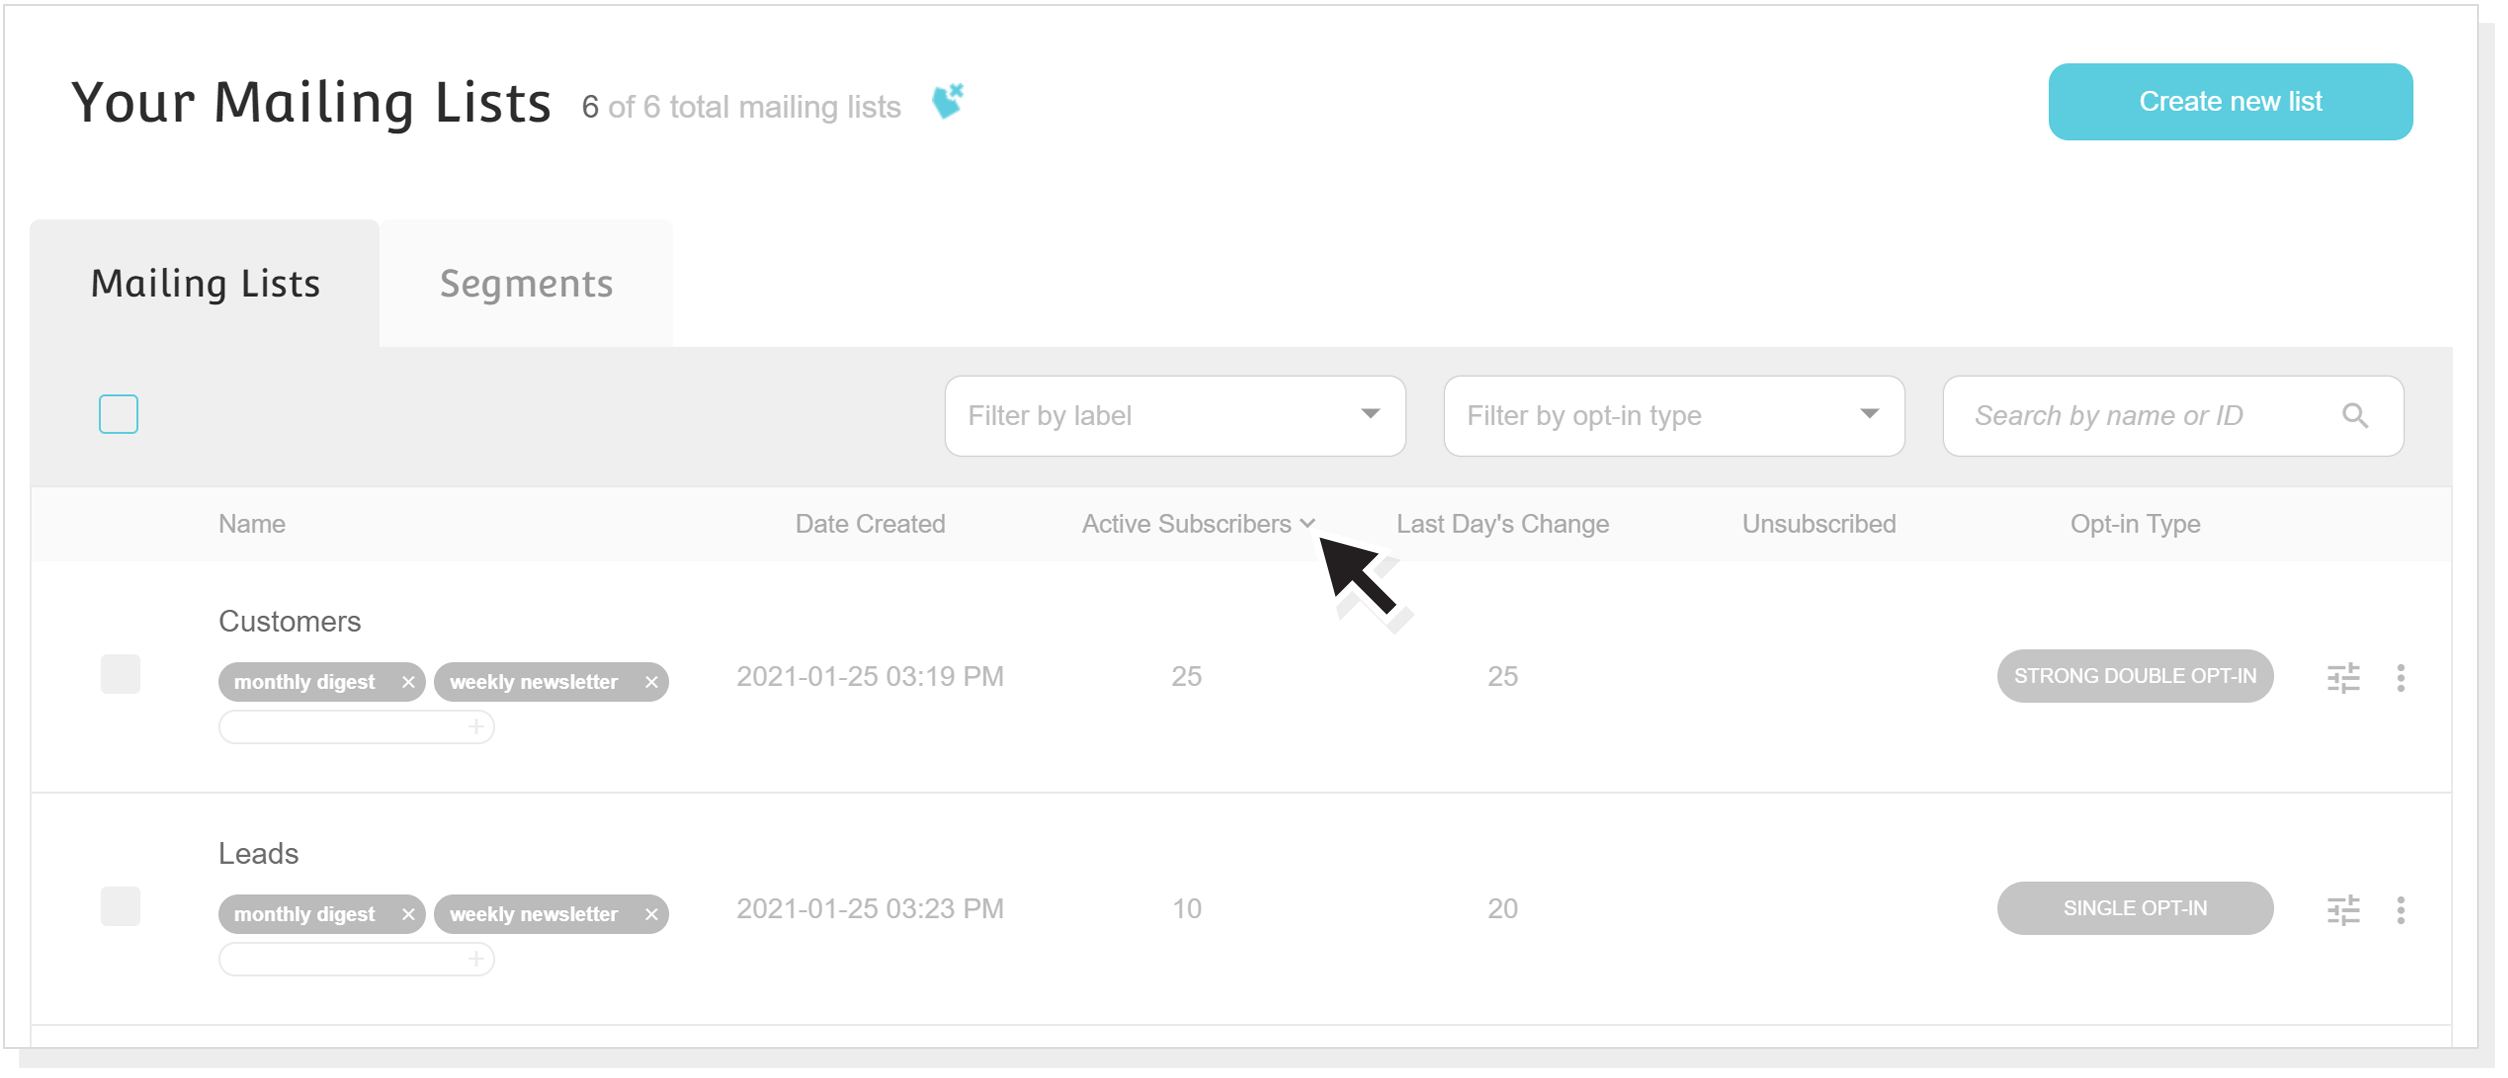
On our revamped mailing lists, you can find all kinds of important information!
Now you have at your fingertips:
- the date you created a list
- the number of added subscribers
- how many people were added on the last day
- how many unsubscribed
- the opt-in type
To sort your mailing lists according to one of the above information, click on the corresponding information.
3. Discover new actions
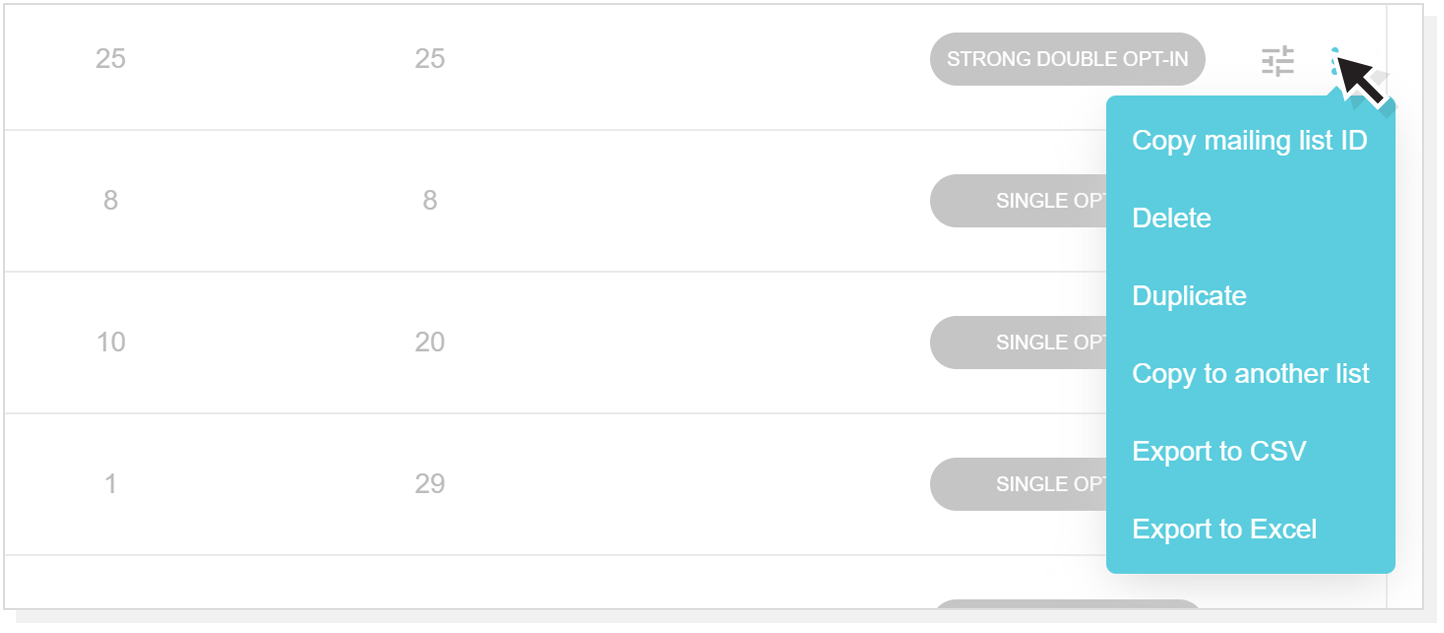
Before, you could only remove and duplicate your mailing list or import subscribers. Now you have a lot more options!
Click on the three dots next to a list to see all options.
Choose to:
- copy a mailing list’s ID
- copy its subscribers to another list
- export it to a CSV or Excel file
Segments
Segments are now much easier to find! There’s a whole new Segments tab inside your Mailing lists control panel to save time, as well as perform a series of amazing brand new actions.
4. Easily organize your segments with labels and filters
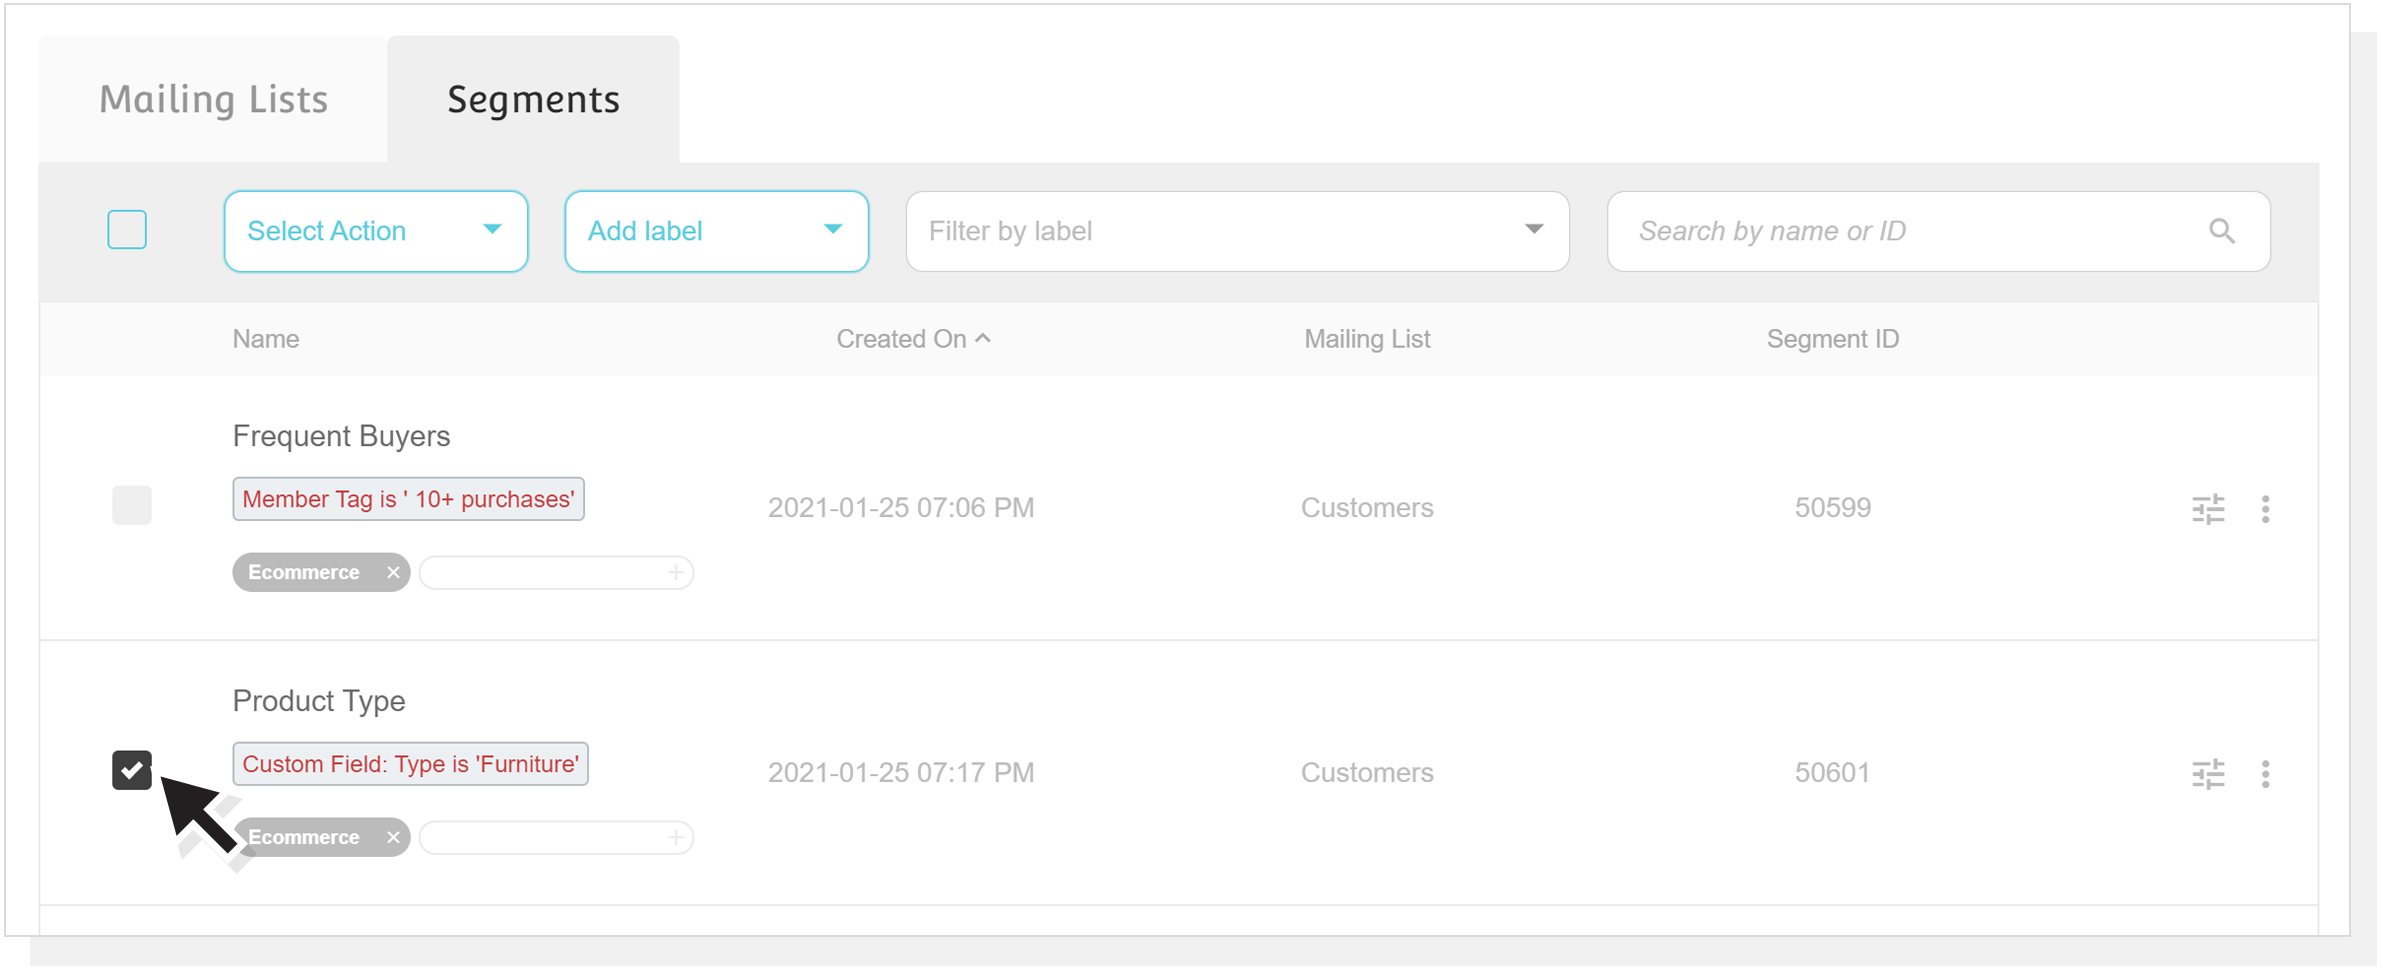
Managing many segments isn’t easy, right? Wrong!
Thankfully you can now organize your segments any way you like, just by adding labels! As with mailing lists, you can add labels to your segments by clicking on the blue label icon and typing your label in the corresponding field.
Also, if you have a large number of segments, it’s probably hard to find the ones you’re looking for. Save time searching your segments by selecting a label or typing their name or ID.
5. Sort your segments according to various information
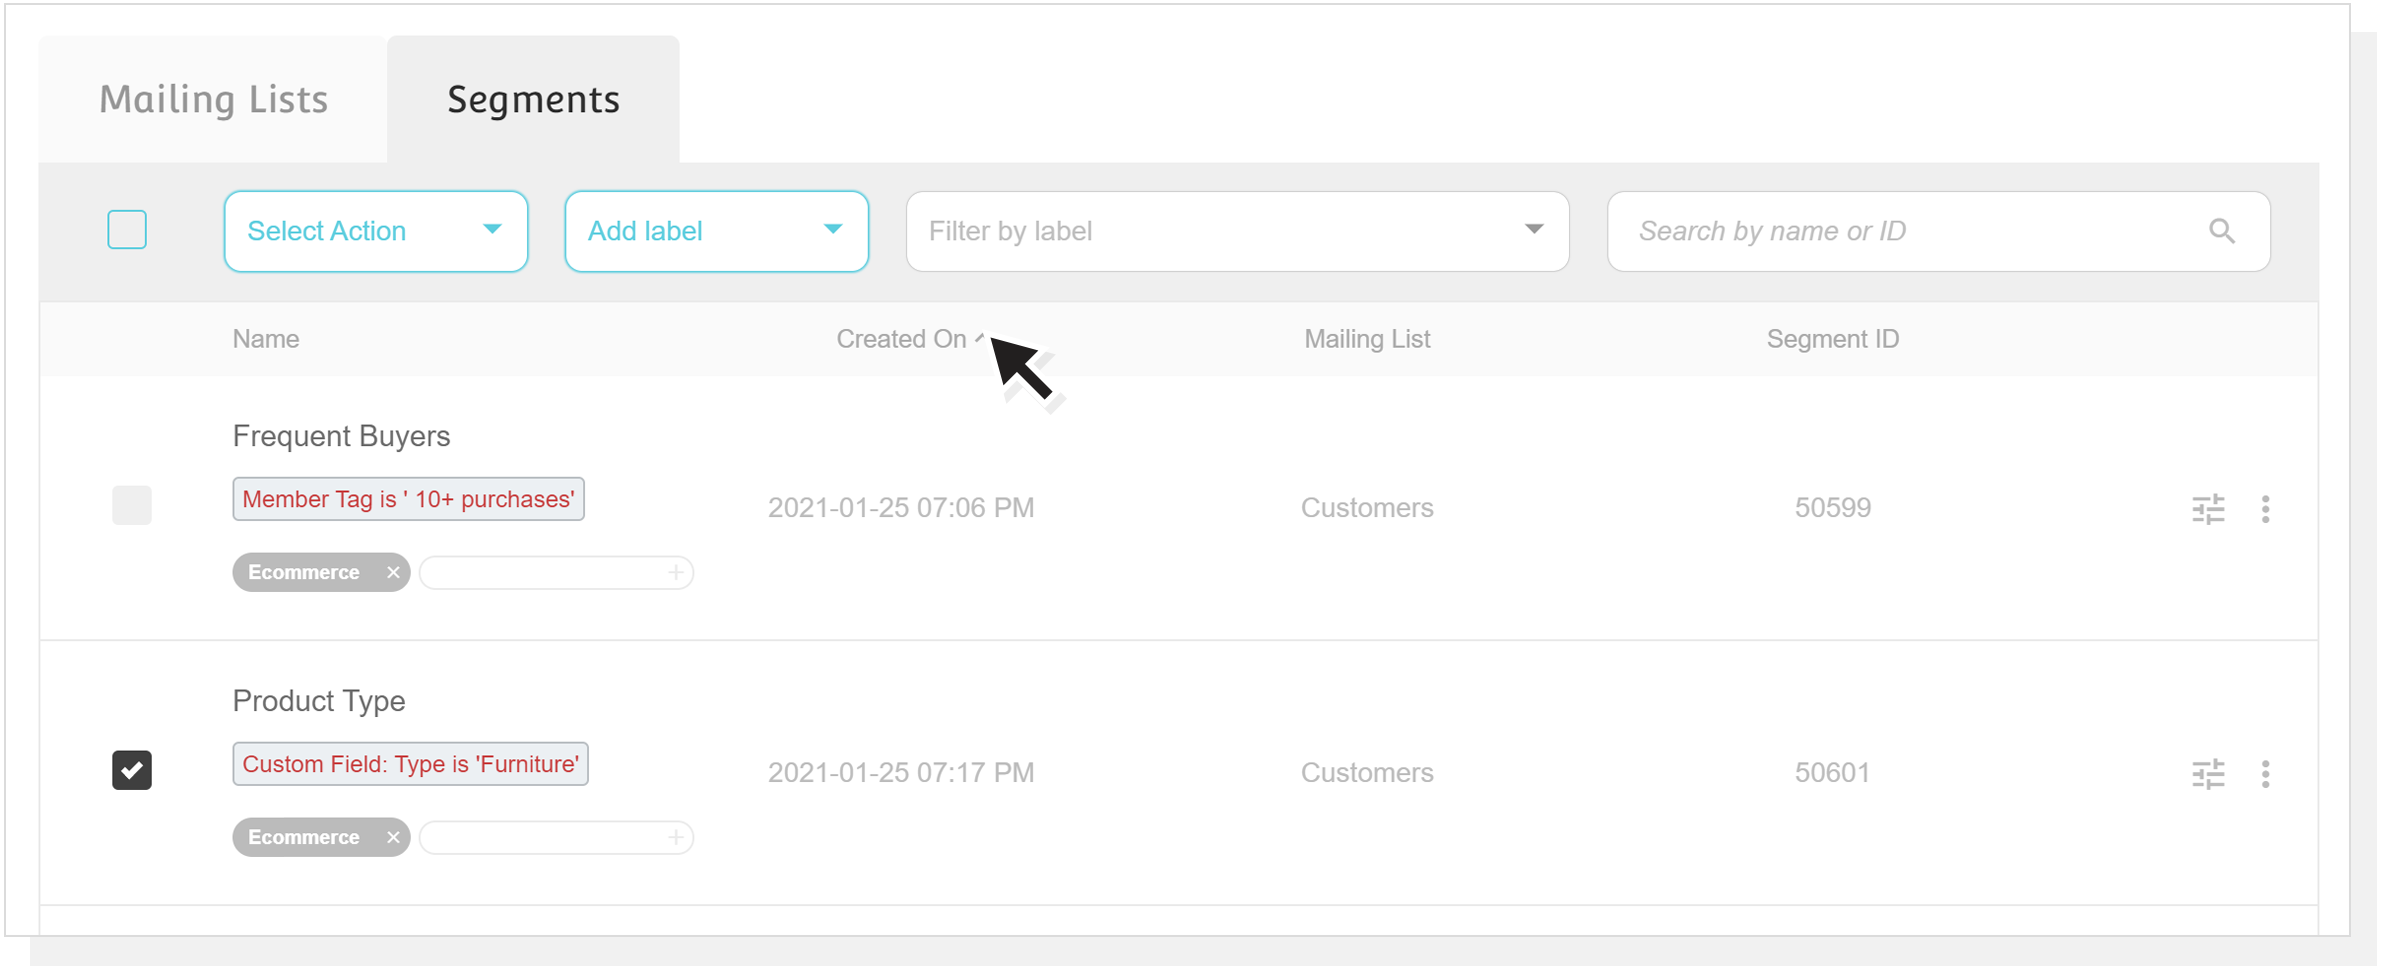
Along with the new Segments section, you can now find all kinds of important information for each of them:
- the date a segment was created
- the name of the mailing list in which it can be found
- its ID
Click on any of them to sort your segment accordingly.
6. Use your segments to the maximum with new actions
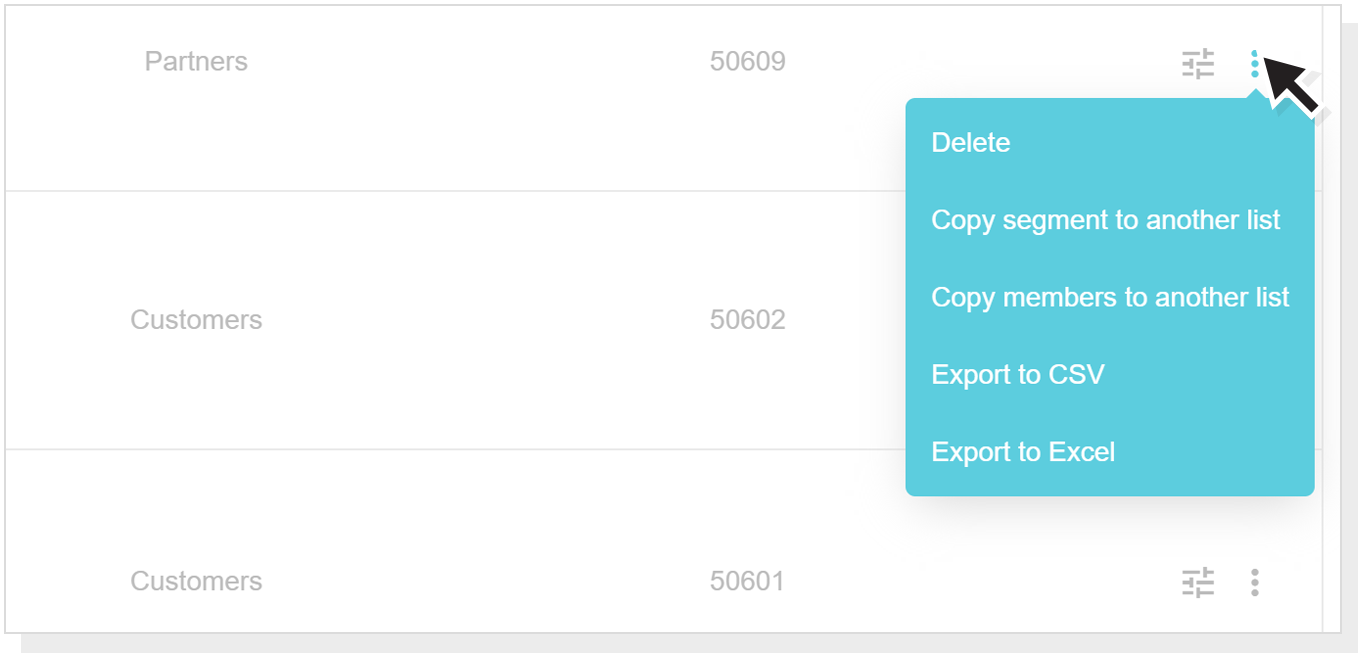
Before, you could only edit or delete a segment. But was it enough? No!
That’s why we added new actions to make use of your segments are more as possible. You can now:
- copy a segment
- copy its members to another mailing list
- export it to CSV or Excel
Dashboard
By clicking on a specific segment, you are now taken to an updated page called Dashboard. And it comes with lots of new insights and actions!

7. Delve into important new data
Better understand your audience and turn information into actions with the help of visualized representations of your data.
The charts allow you to have a clearer picture of who your subscribers are as a whole and monitor a mailing list’s performance and engagement.
So here’s what you can see:
- Growth by (weekly/monthly): the subscribes and unsubscribes of your total number of members over time
- Source by (weekly/monthly): the sources from which your subscribers come from
- Engagement by tag: the tags of your most engaged subscribers based on their total campaign opens
- Engagement breakdown: a comparison of your members’ engagement based on their total campaign opens
- Top locations: the countries and cities where most opens take place
Want to hear something even cooler?
All these charts are also shareable and printable! Just click on the three dots of each chart and choose to export the specific data or download it as a PDF file.
8. Save a segment as a template
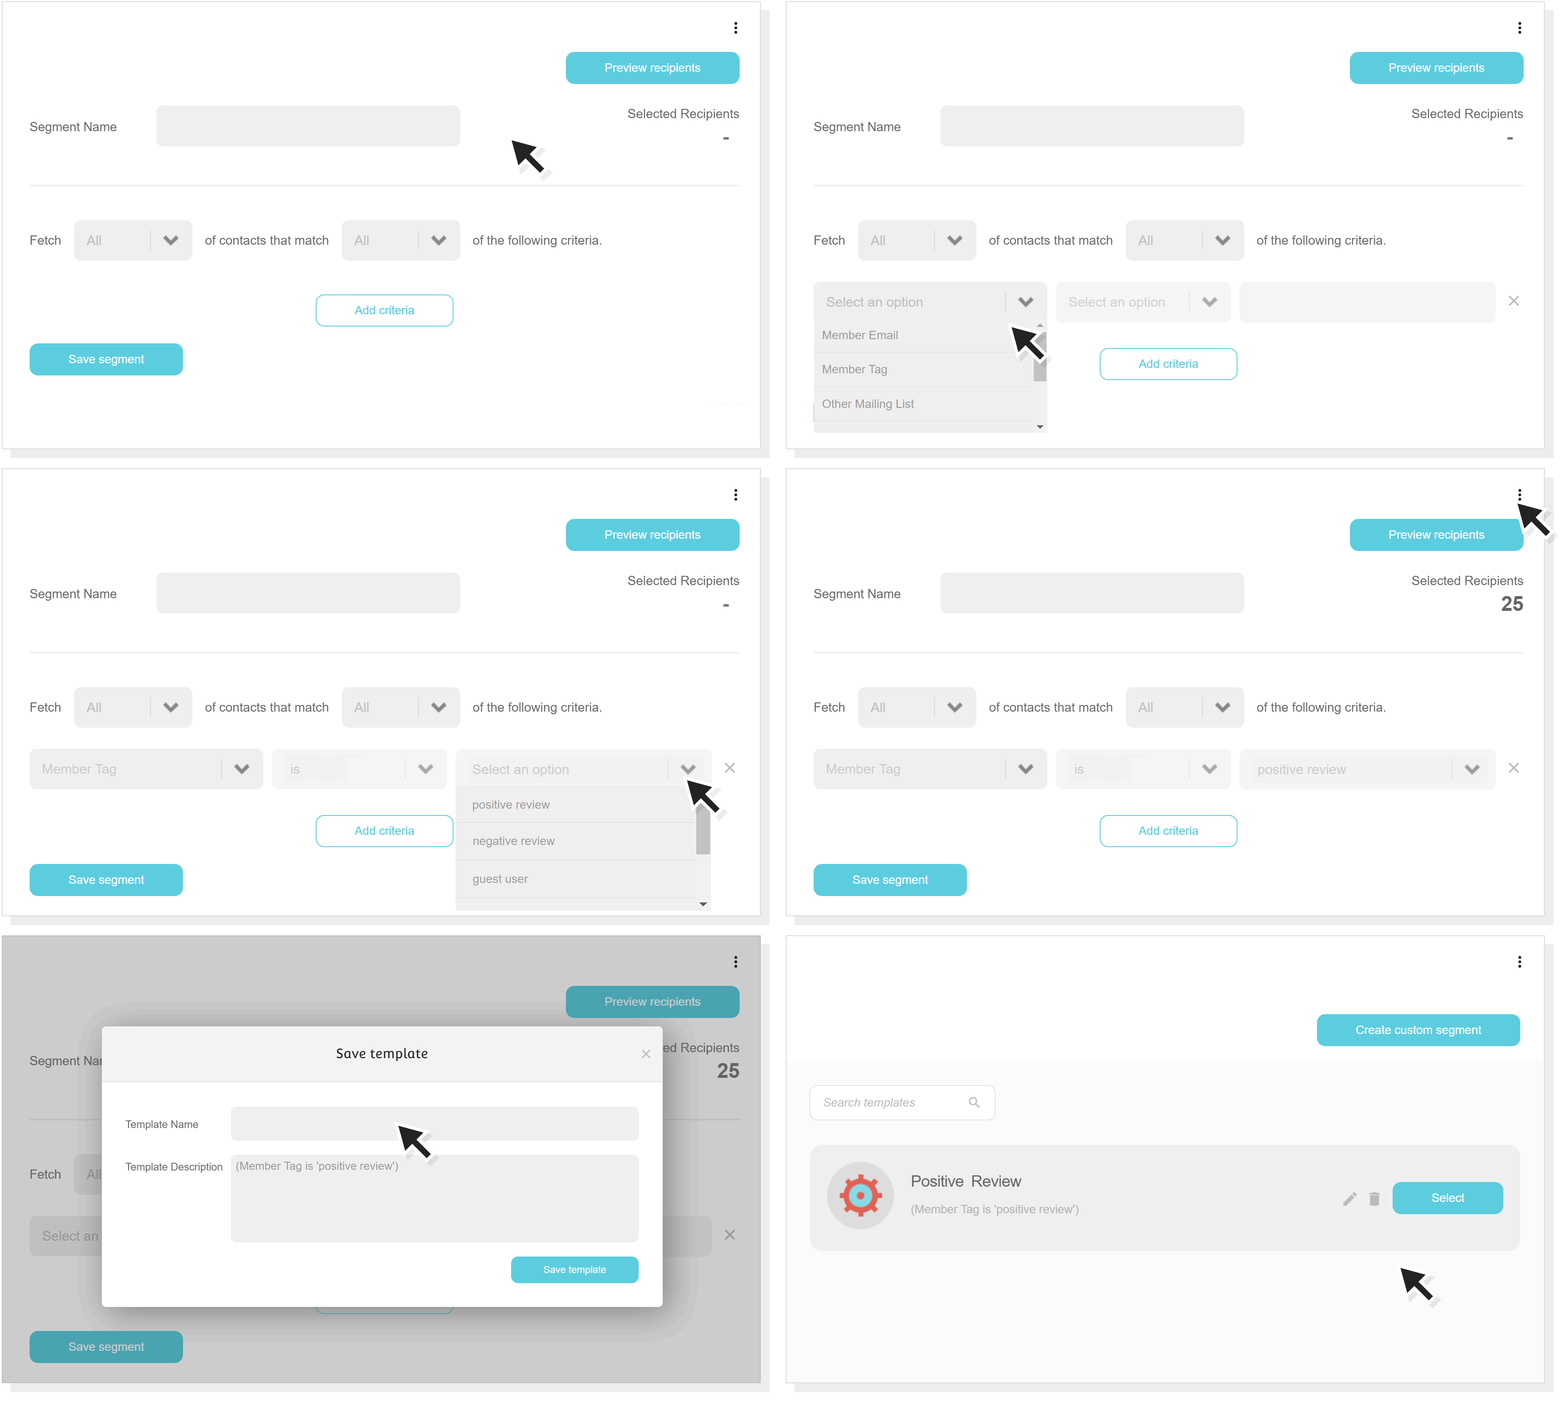
When visiting a segment’s control panel, you will notice three familiar dots.
You guessed it! From there, you can do all the amazing actions we previously mentioned, like deleting your segment or copying it to another mailing list.
By clicking on the dots, you will discover one more important action: Save as a template.
This option will help you get started creating common types of segments faster.
Members
This is the old View list tab, with information about your subscribers. And it’s also revamped and amazing!
9. Manage your subscribers with new ways

Flexibility is crucial when it comes to managing your mailing lists.
That’s why, along with exporting your subscribers, you can now make a bunch of new actions by selecting as many members as you wish, without having to visit their profile:
- Archive or delete any subscribers you want, instead of only being able to remove them.
- Set custom field values on the spot
- Copy any subscribers you want to another mailing list
- Change the status of your subscribers directly (active, unsubscribed, archived)
- Trigger any automation instantly for specific subscribers
- Add to the suppression list.
Yes, you can now use a suppression list! It’s a list of subscribers that you don’t want to receive your communications and it’s an essential tool for protecting your sender reputation. You can access it by clicking the settings icon on your top right. Oh, and one more thing! You can also use suppression lists in your automation campaigns. Just choose the action Then add to suppression list when creating an automation.
10. Add tags
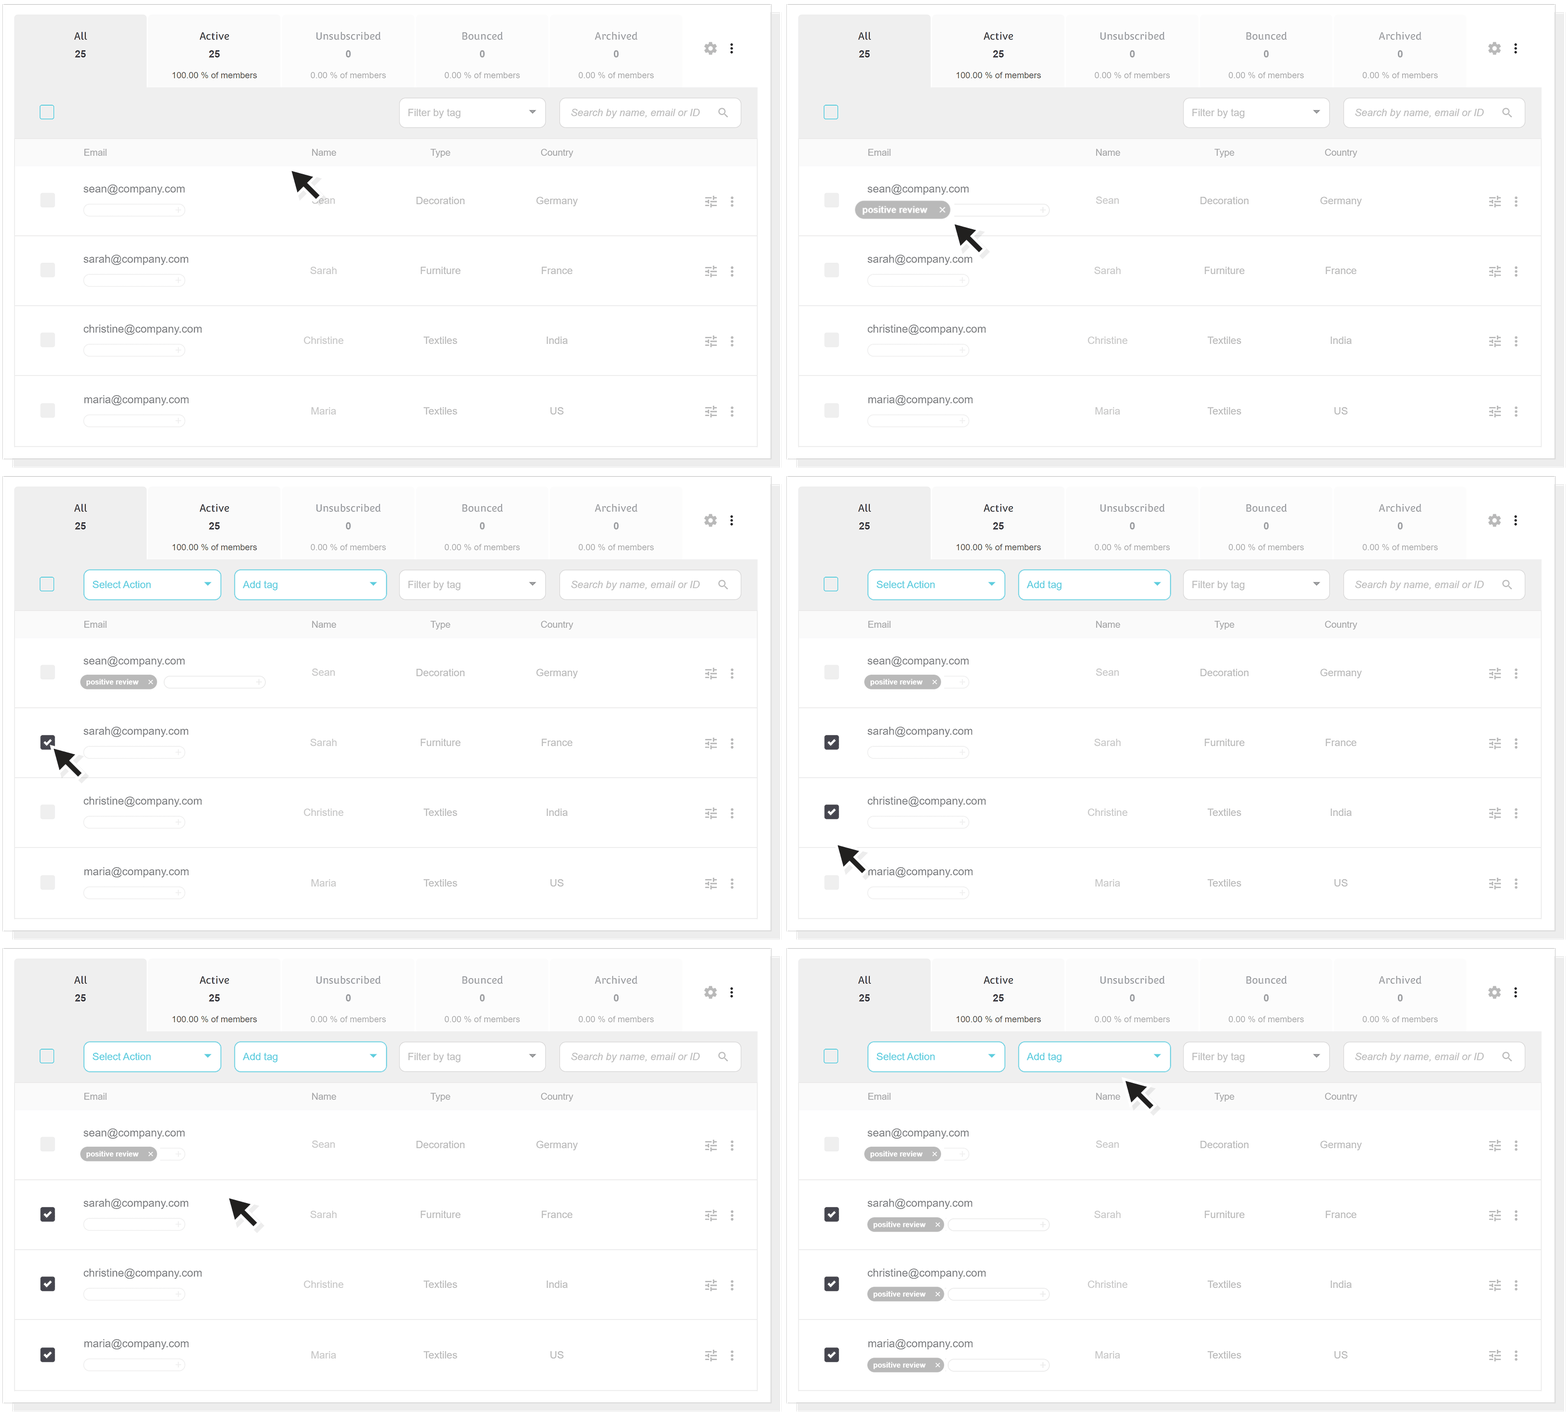
We know how you couldn’t wait for this one! Now you can easily tag multiple subscribers in your mailing list with a click to better organize your audience. Just check the subscriber you want and type in the tags of your choice in the corresponding field.
Additionally, you can apply an existing tag to various subscribers by selecting them and using the Add tag dropdown menu.
Bonus feature: Automation triggers and actions based on tags
Since we’re all excited about adding tags, this is the perfect time to reveal one more new update! New triggers and actions are now available for you to use when creating an automation
Actions:
- Then add tags to member
- Then remove tags from member
Triggers:
- When any tag is added
- When any tag is removed
- When a specific tag is added
- When a specific tag is removed
11. Filter, search and sort subscribers conveniently
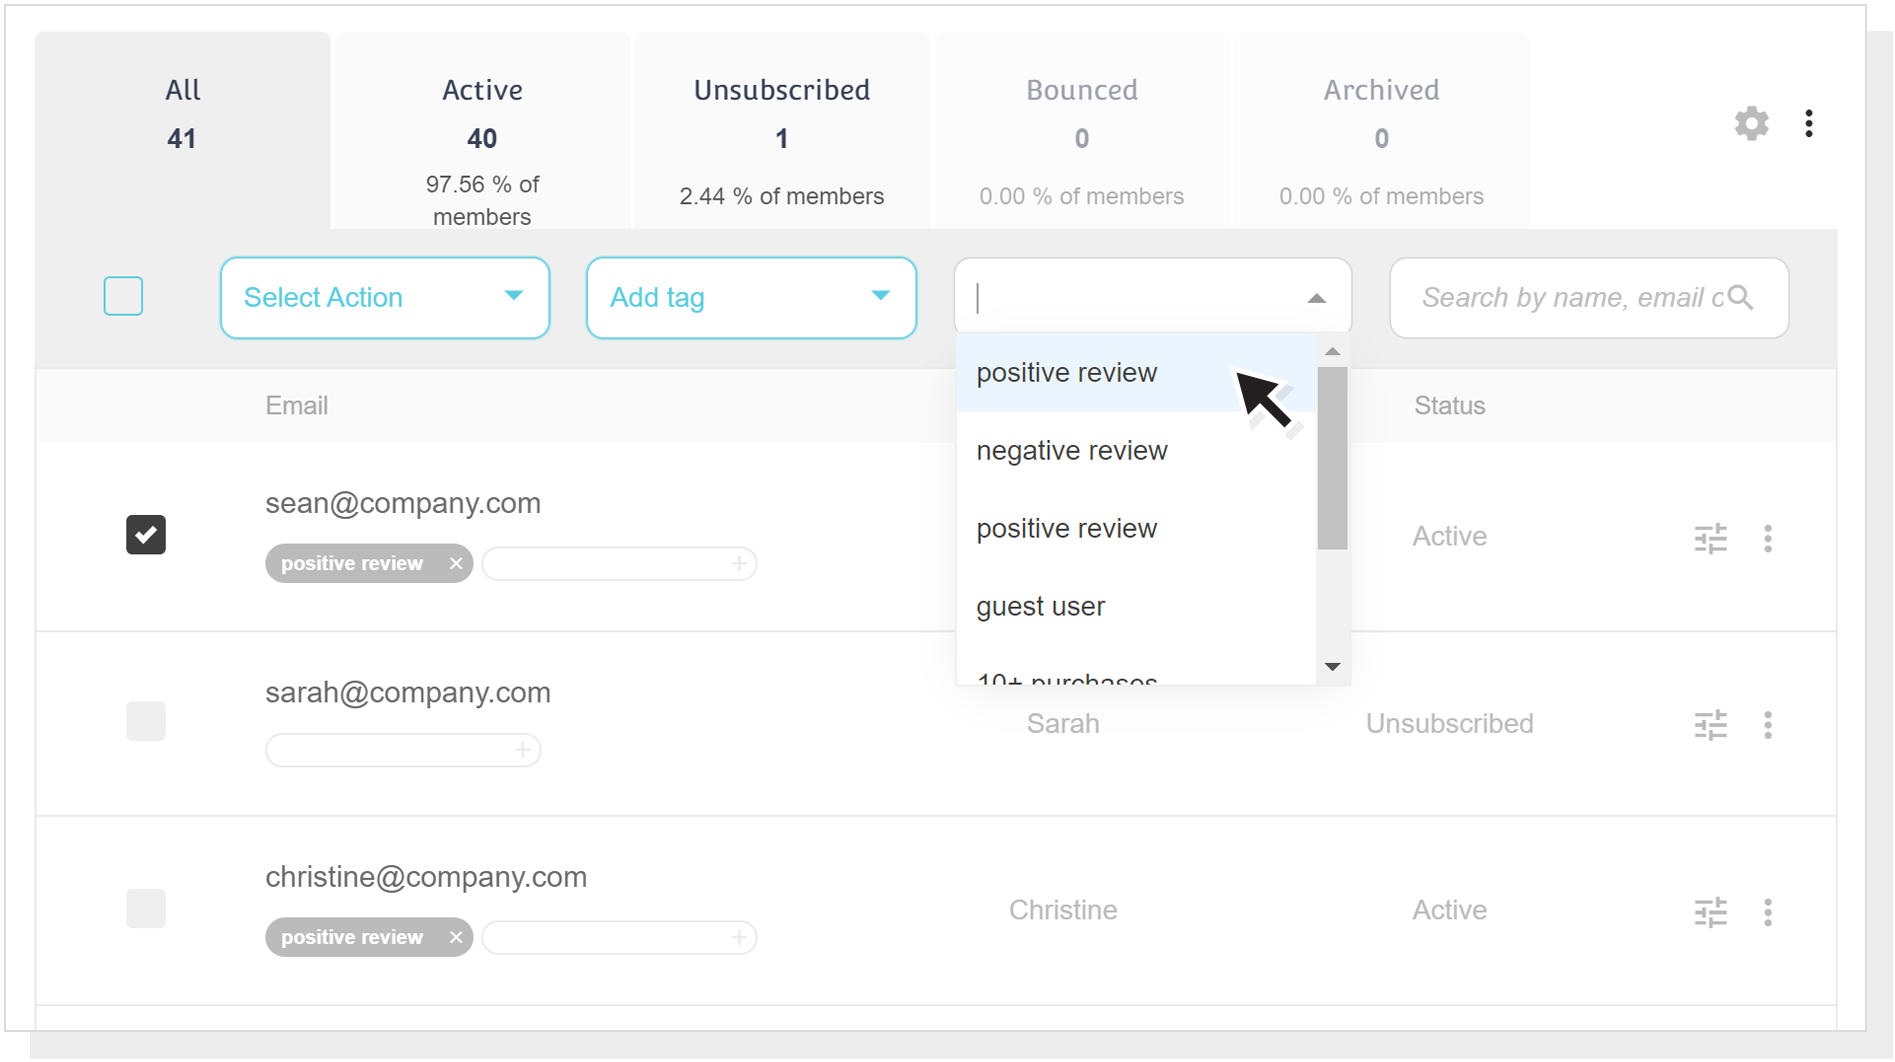
Looking to save time managing your subscribers? We’ve got your back! Easily filter your subscribers by tag to better use them for your campaigns, or search them by name, email, or ID.
You can also take it one step further and sort the members of a list according to their name, status, or date they were added.
12. Access your subscribers’ activity fast
For viewing any subscriber’s activity, you no longer need to visit the Reports tab.
Go into exactly as much detail as you’re interested in by clicking the three dots on the right of a subscriber’s information and selecting the corresponding action.
13. Display the information of your choice
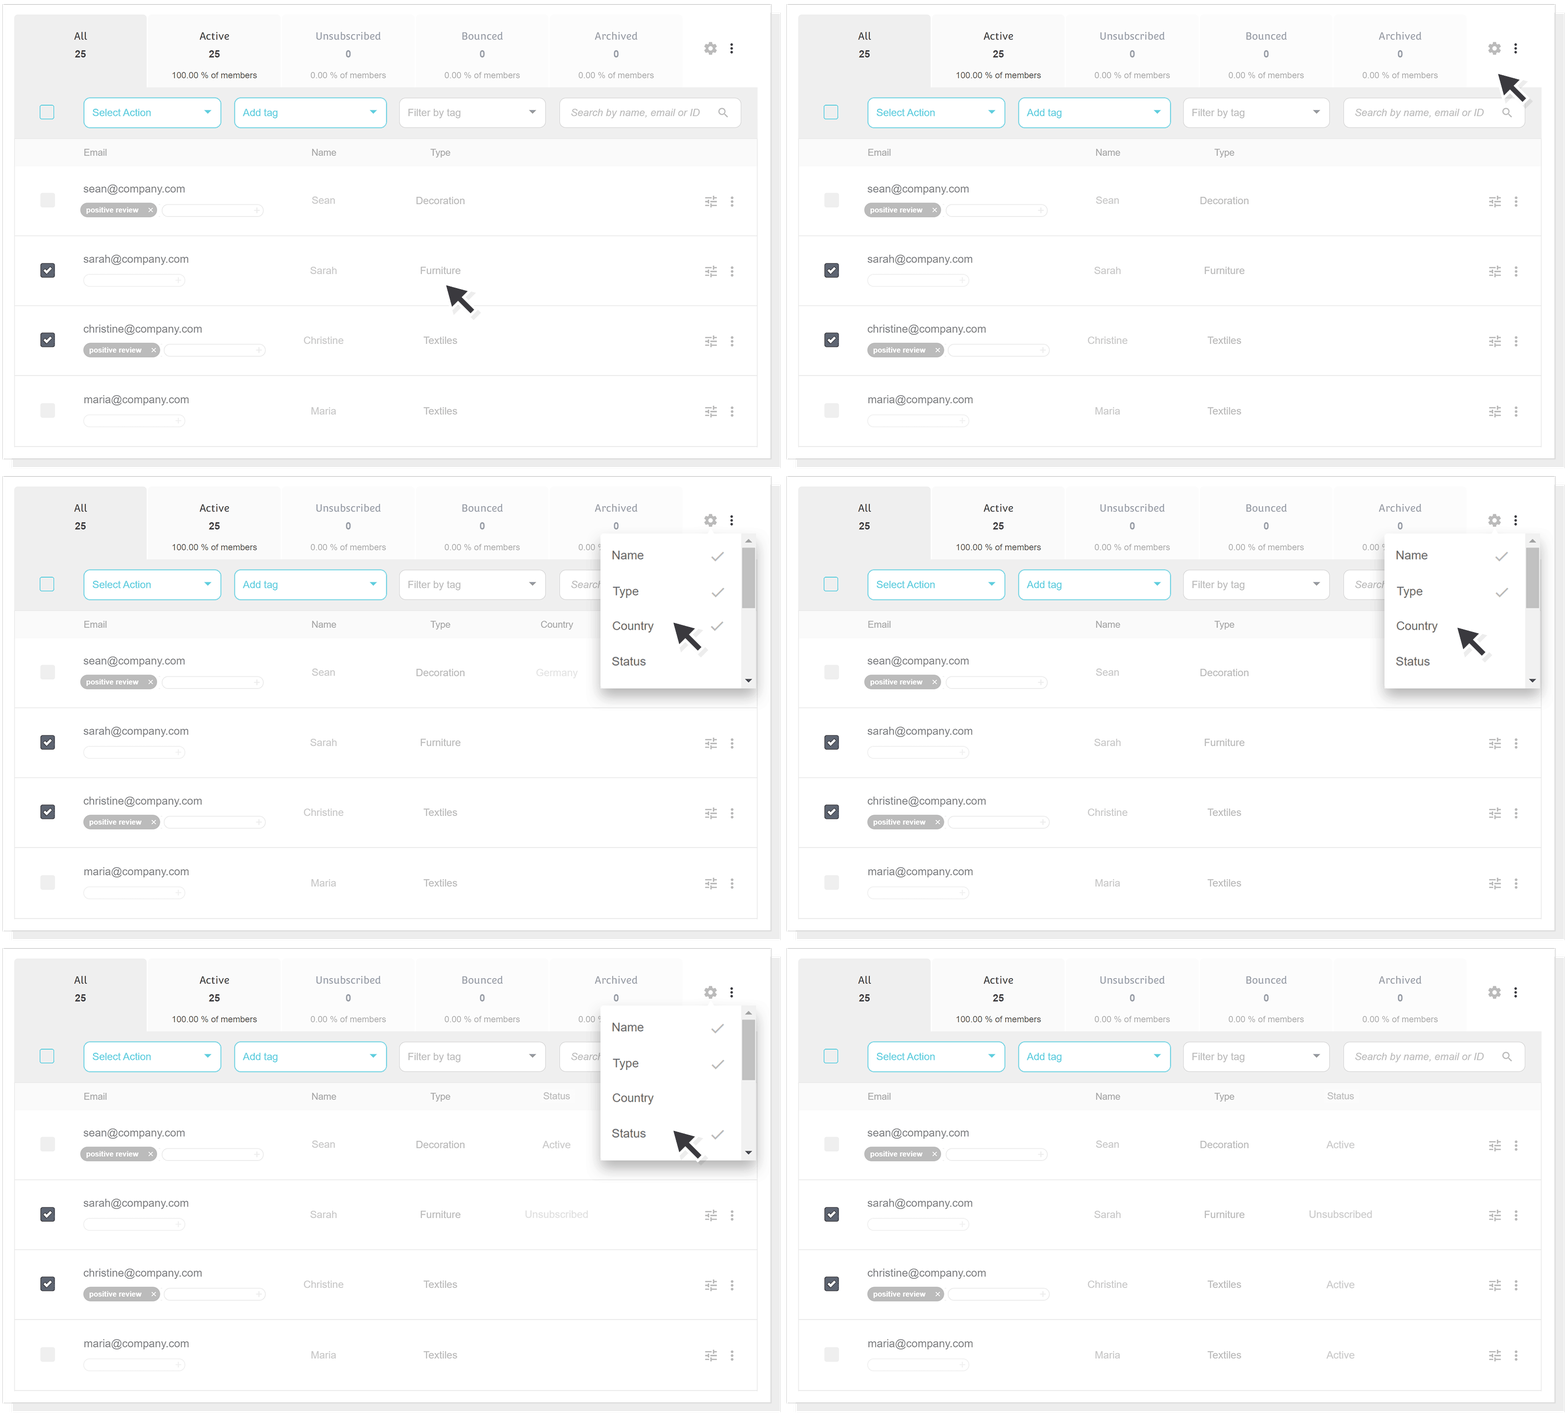
Some information you need, some not. We get it! So we let you gain better control of your control panel and choose what you want to see by selecting the information and custom fields of your choice with a click.
Just click on the gear icon and check any of the available options.
14. Access each member’s settings instantly
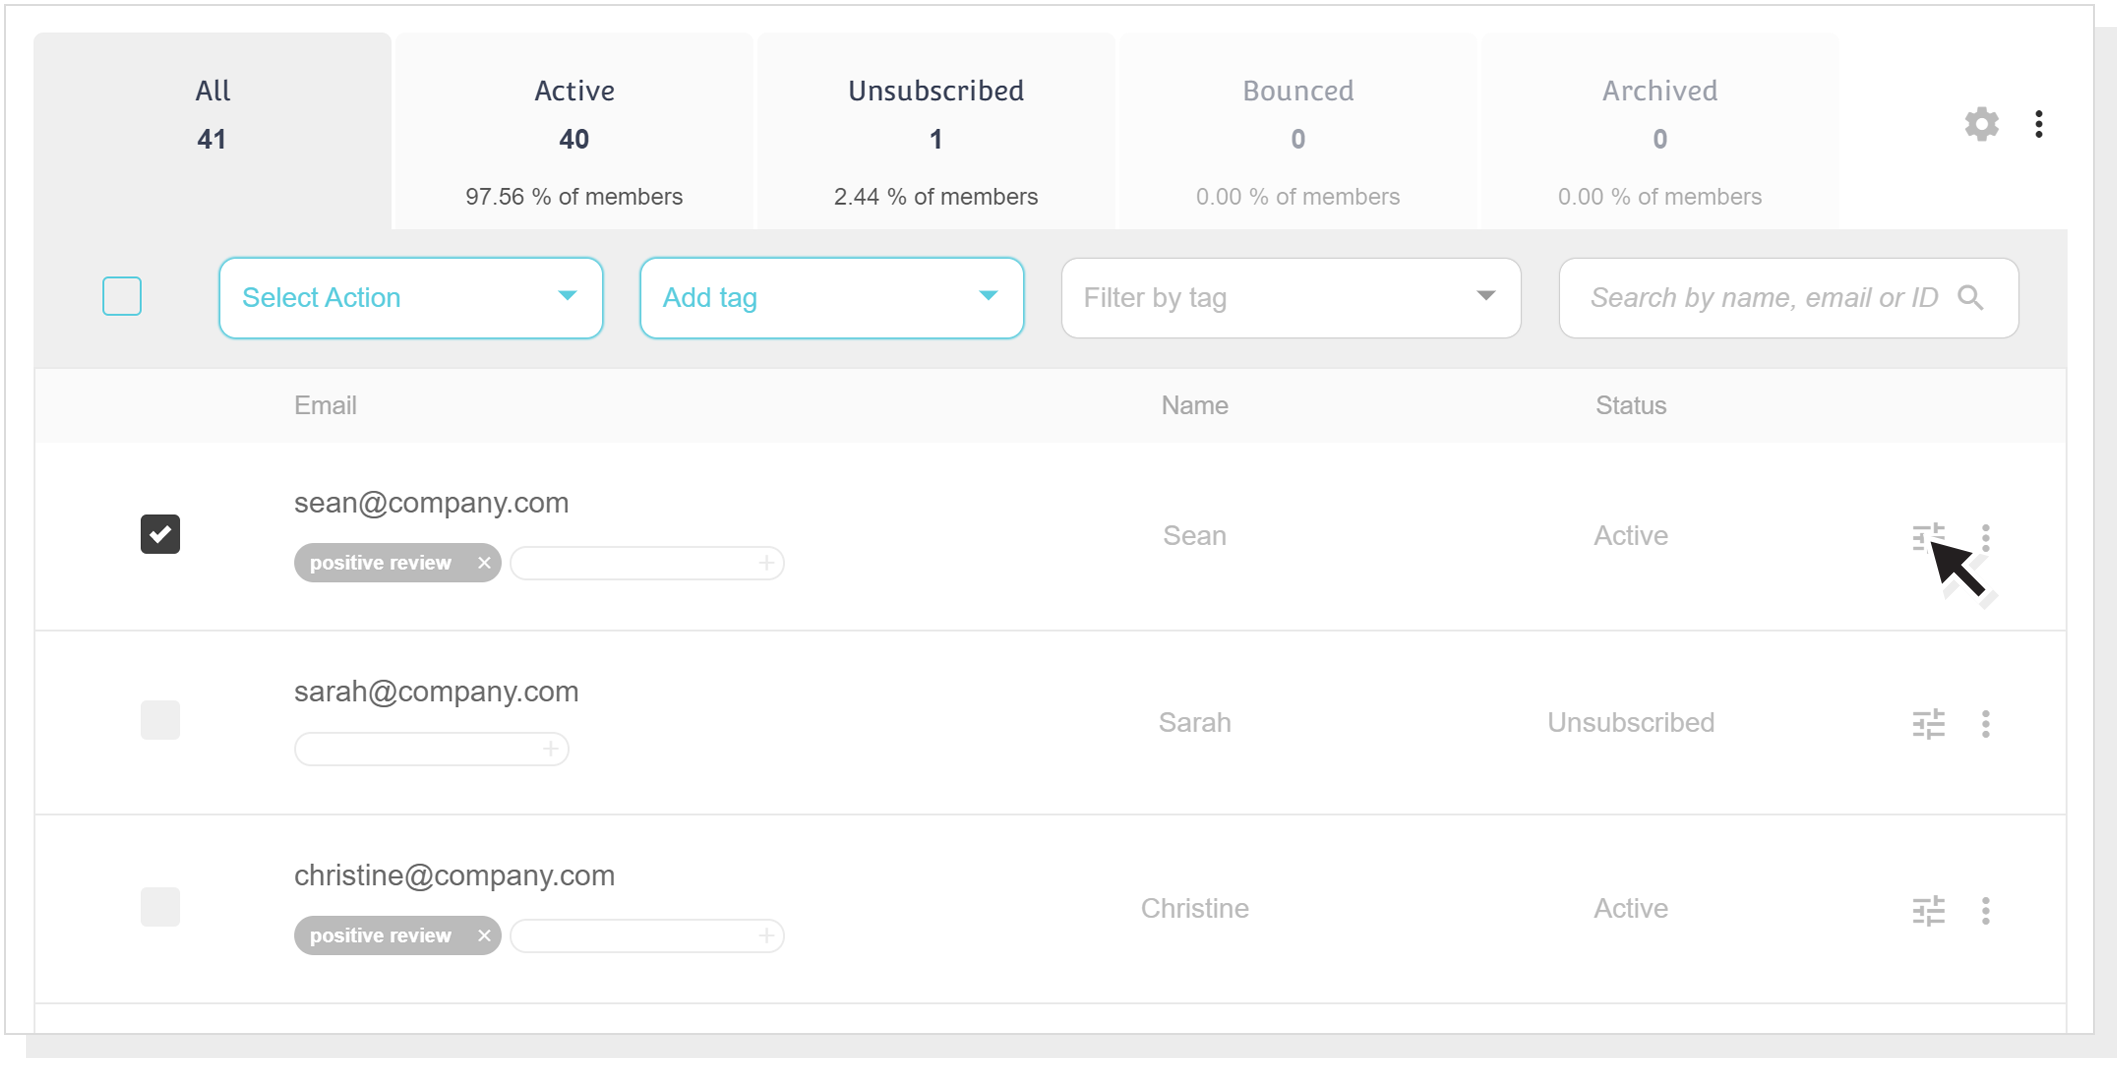
Manage each member individually through its settings.
Click the settings icon on every subscriber’s left to visit its profile on the spot and make any changes or adjustments you wish. Click Update member, and you’re ready to go! For more actions, you can also click the three dots.
Batch actions
Another brand spanking new tab that will become a favorite, we promise!
15. Apply an action to multiple subscribers
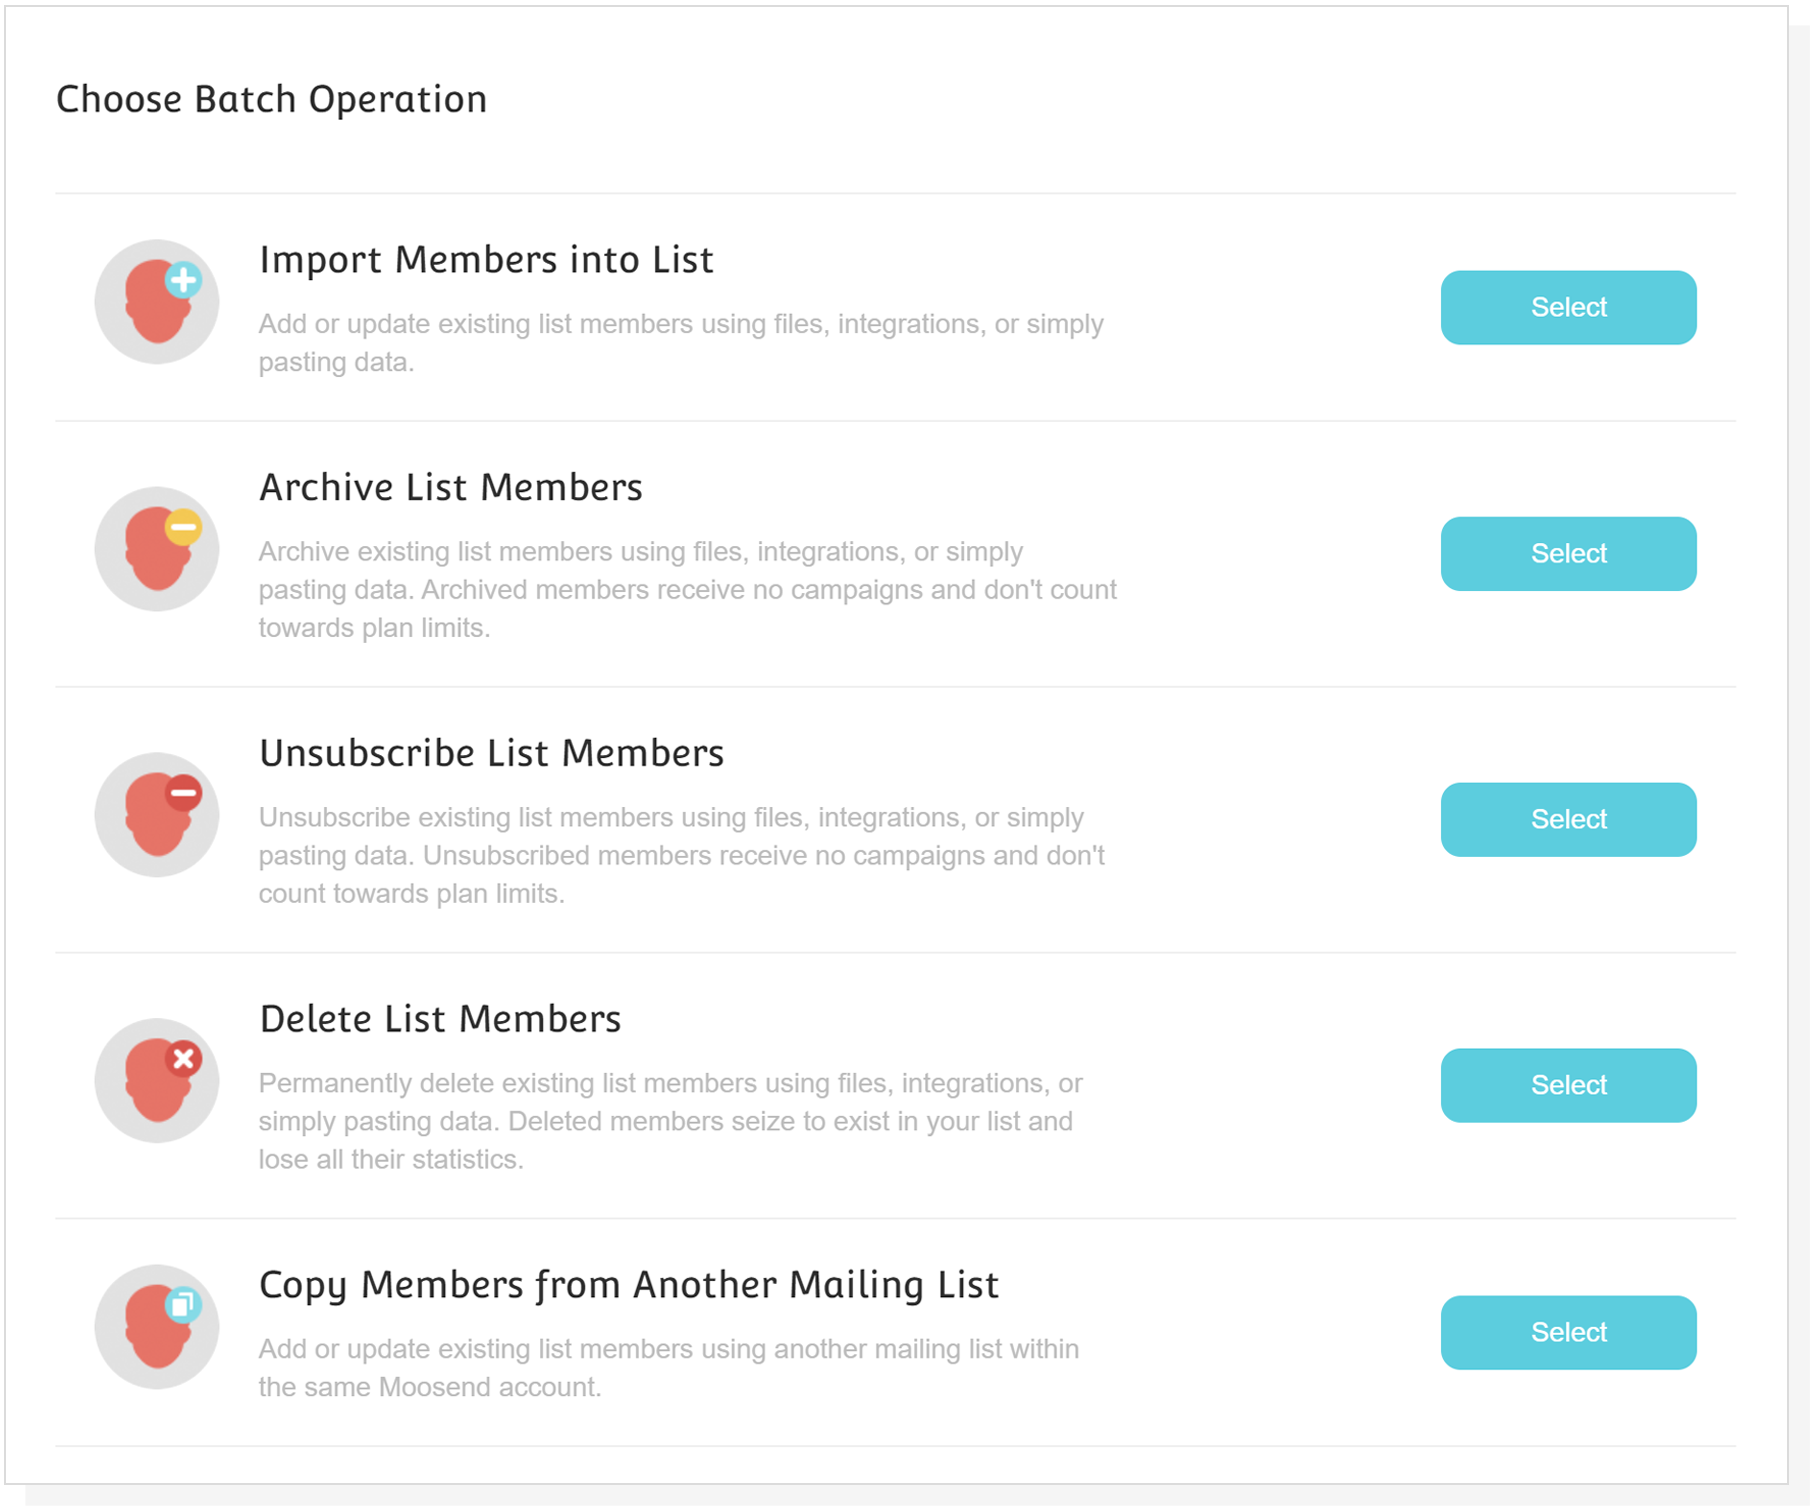
Now you can complete certain mailing list actions for multiple subscribers at the same time fast and easy:
- Import members into a mailing list
- Archive mailing list members
- Unsubscribe mailing list members
- Delete mailing list members
- Copy members from one mailing list to another
16. Create custom fields after uploading a mailing list
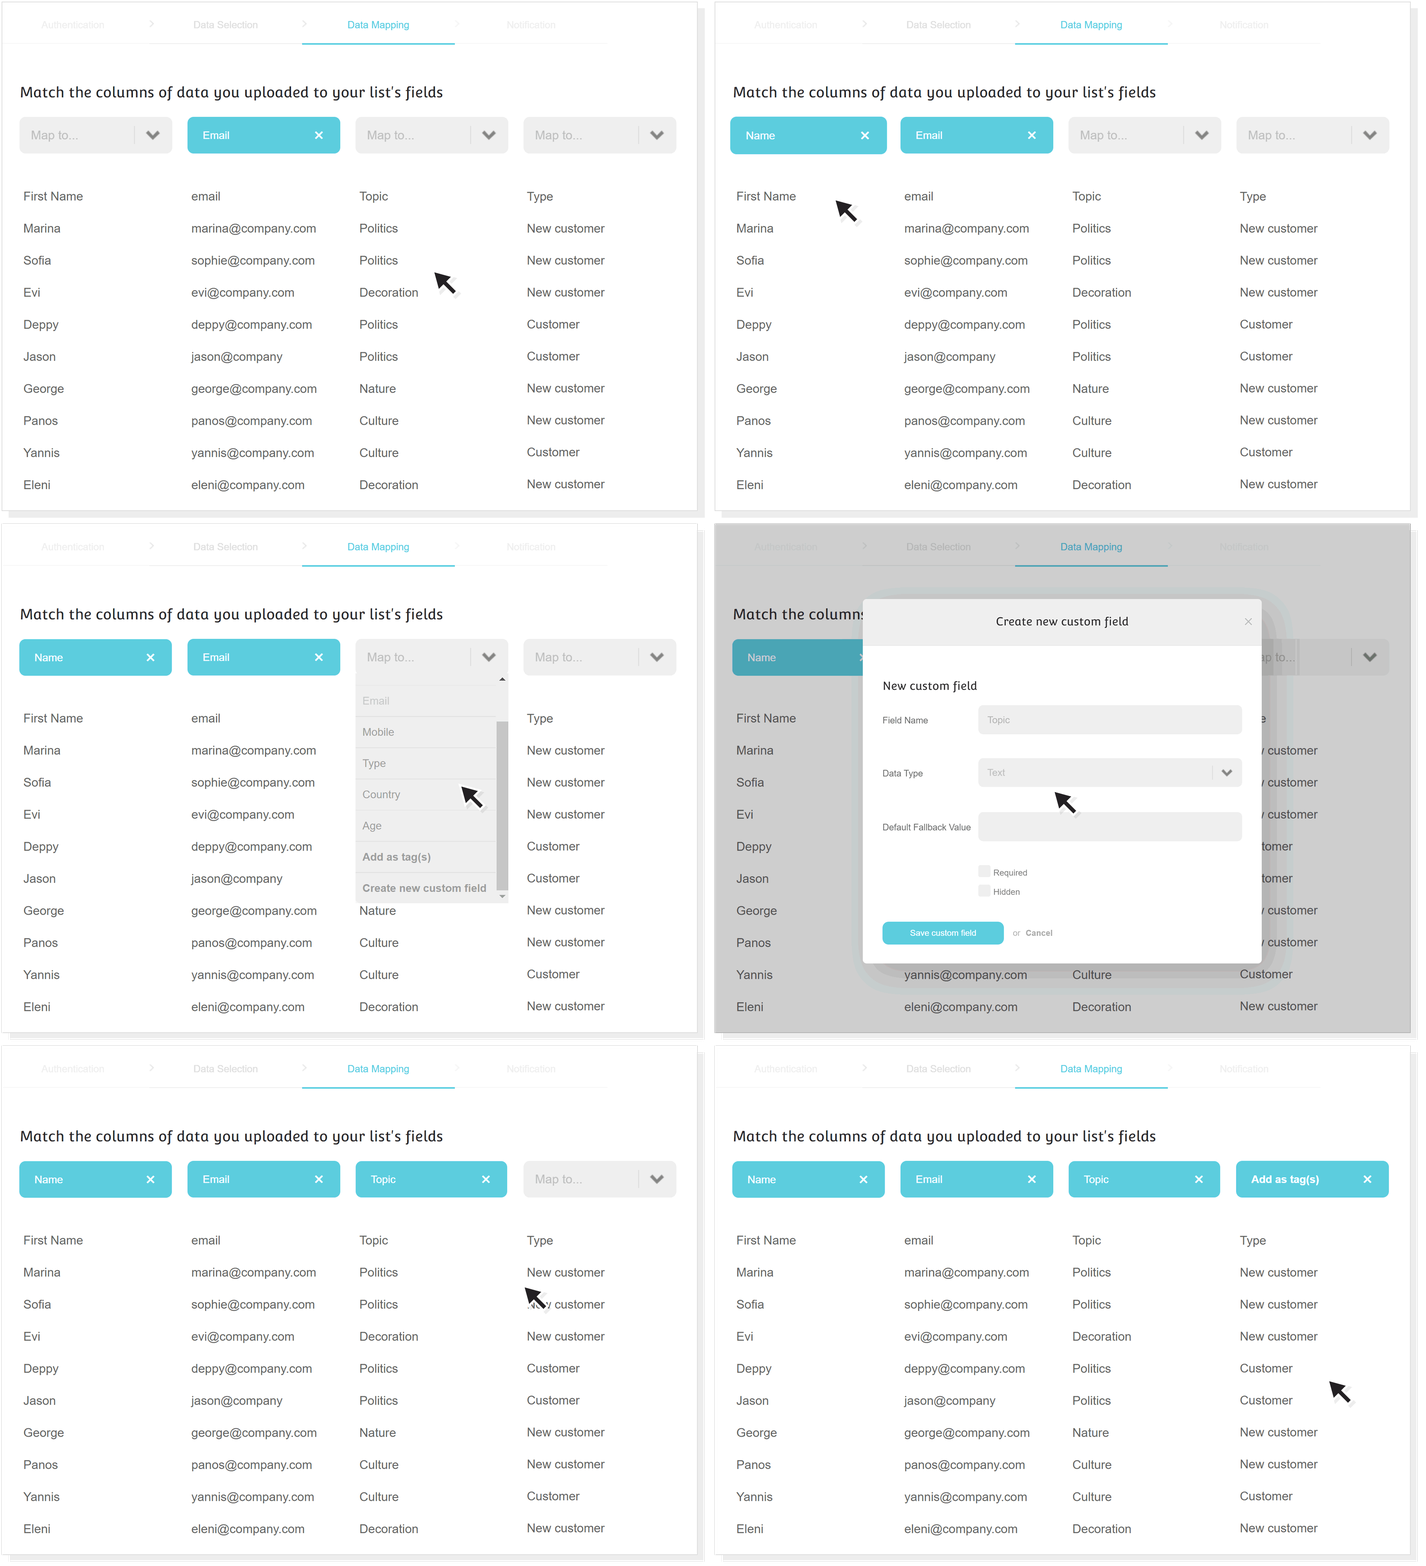
To match your custom fields with your mailing list columns, you had to create all custom fields beforehand. Not any more!
When you map a mailing list, you can now choose the option Create new custom field from the dropdown menu and add the one missing instantly.
Likewise, you can add a column’s data as a tag by selecting the corresponding option.
Settings
17. Fully customize your double opt-in message
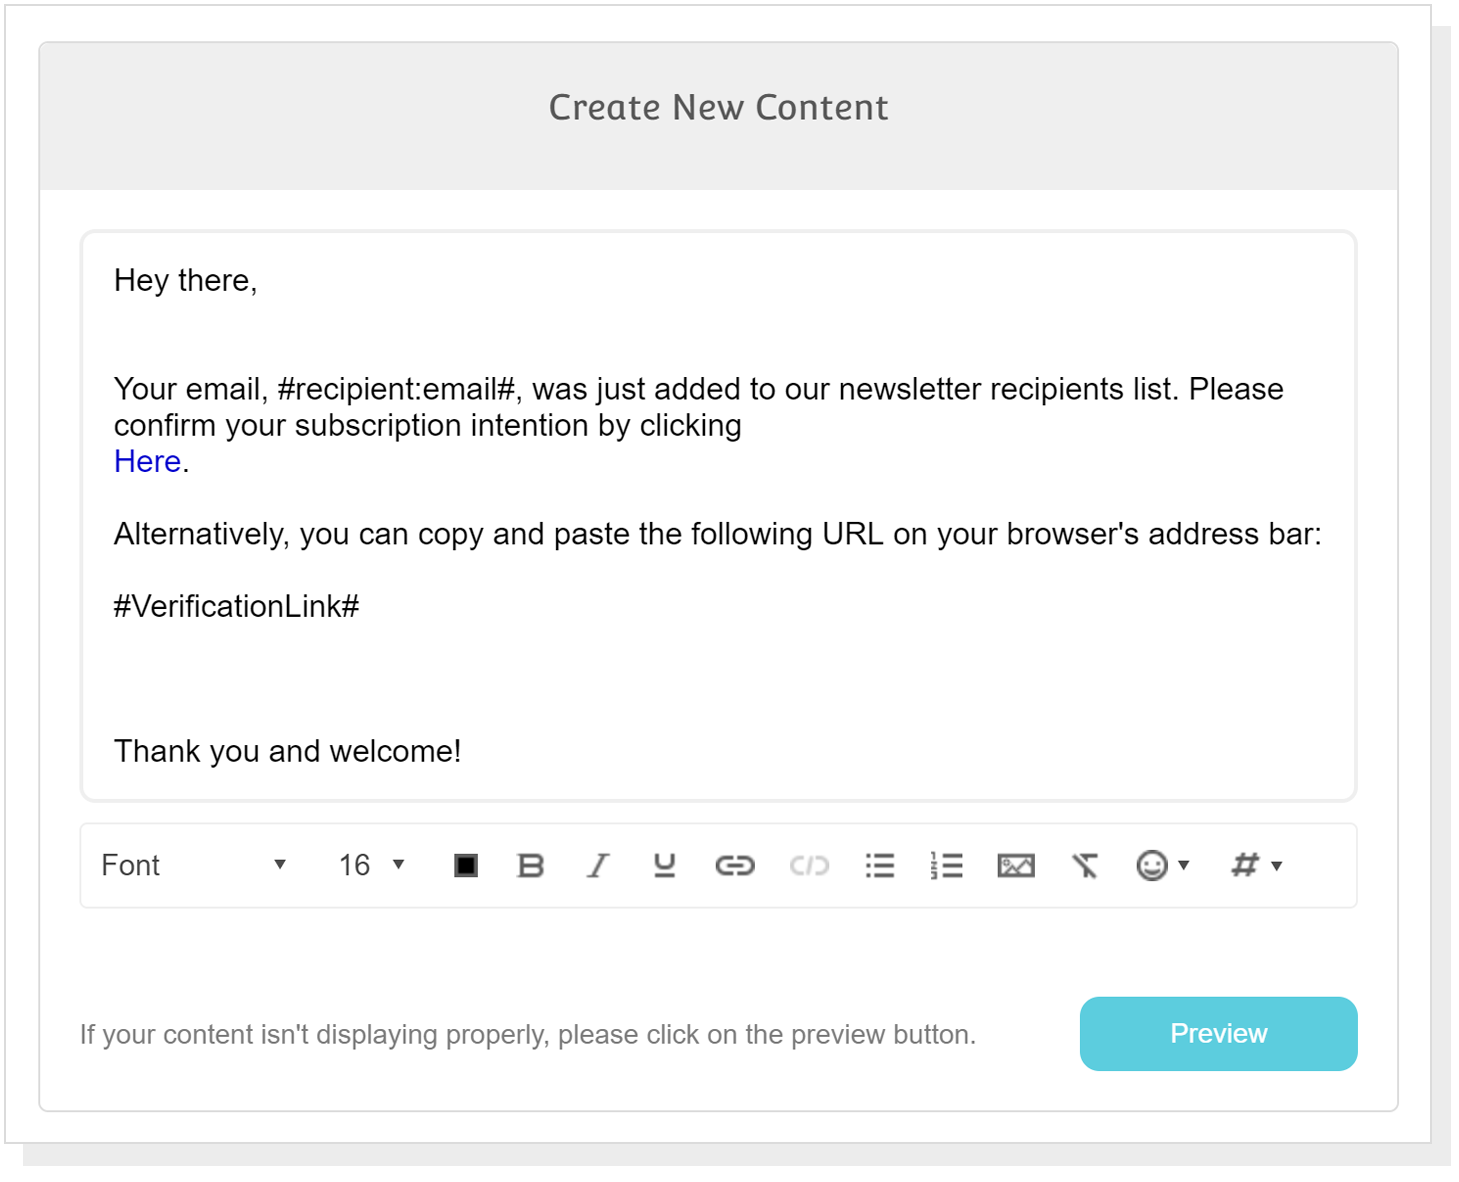
For those of you who want mailing lists filled with engaged subscribers, this one is for you! Our revamped rich-text editor is perfect for creating on-brand, optimized subscription confirmation emails that convert.
Create plain text emails with HTML formatting capabilities, add links and images, and style your message just the way you want to increase conversions.
Custom fields
18. Manage your custom fields with a series of actions
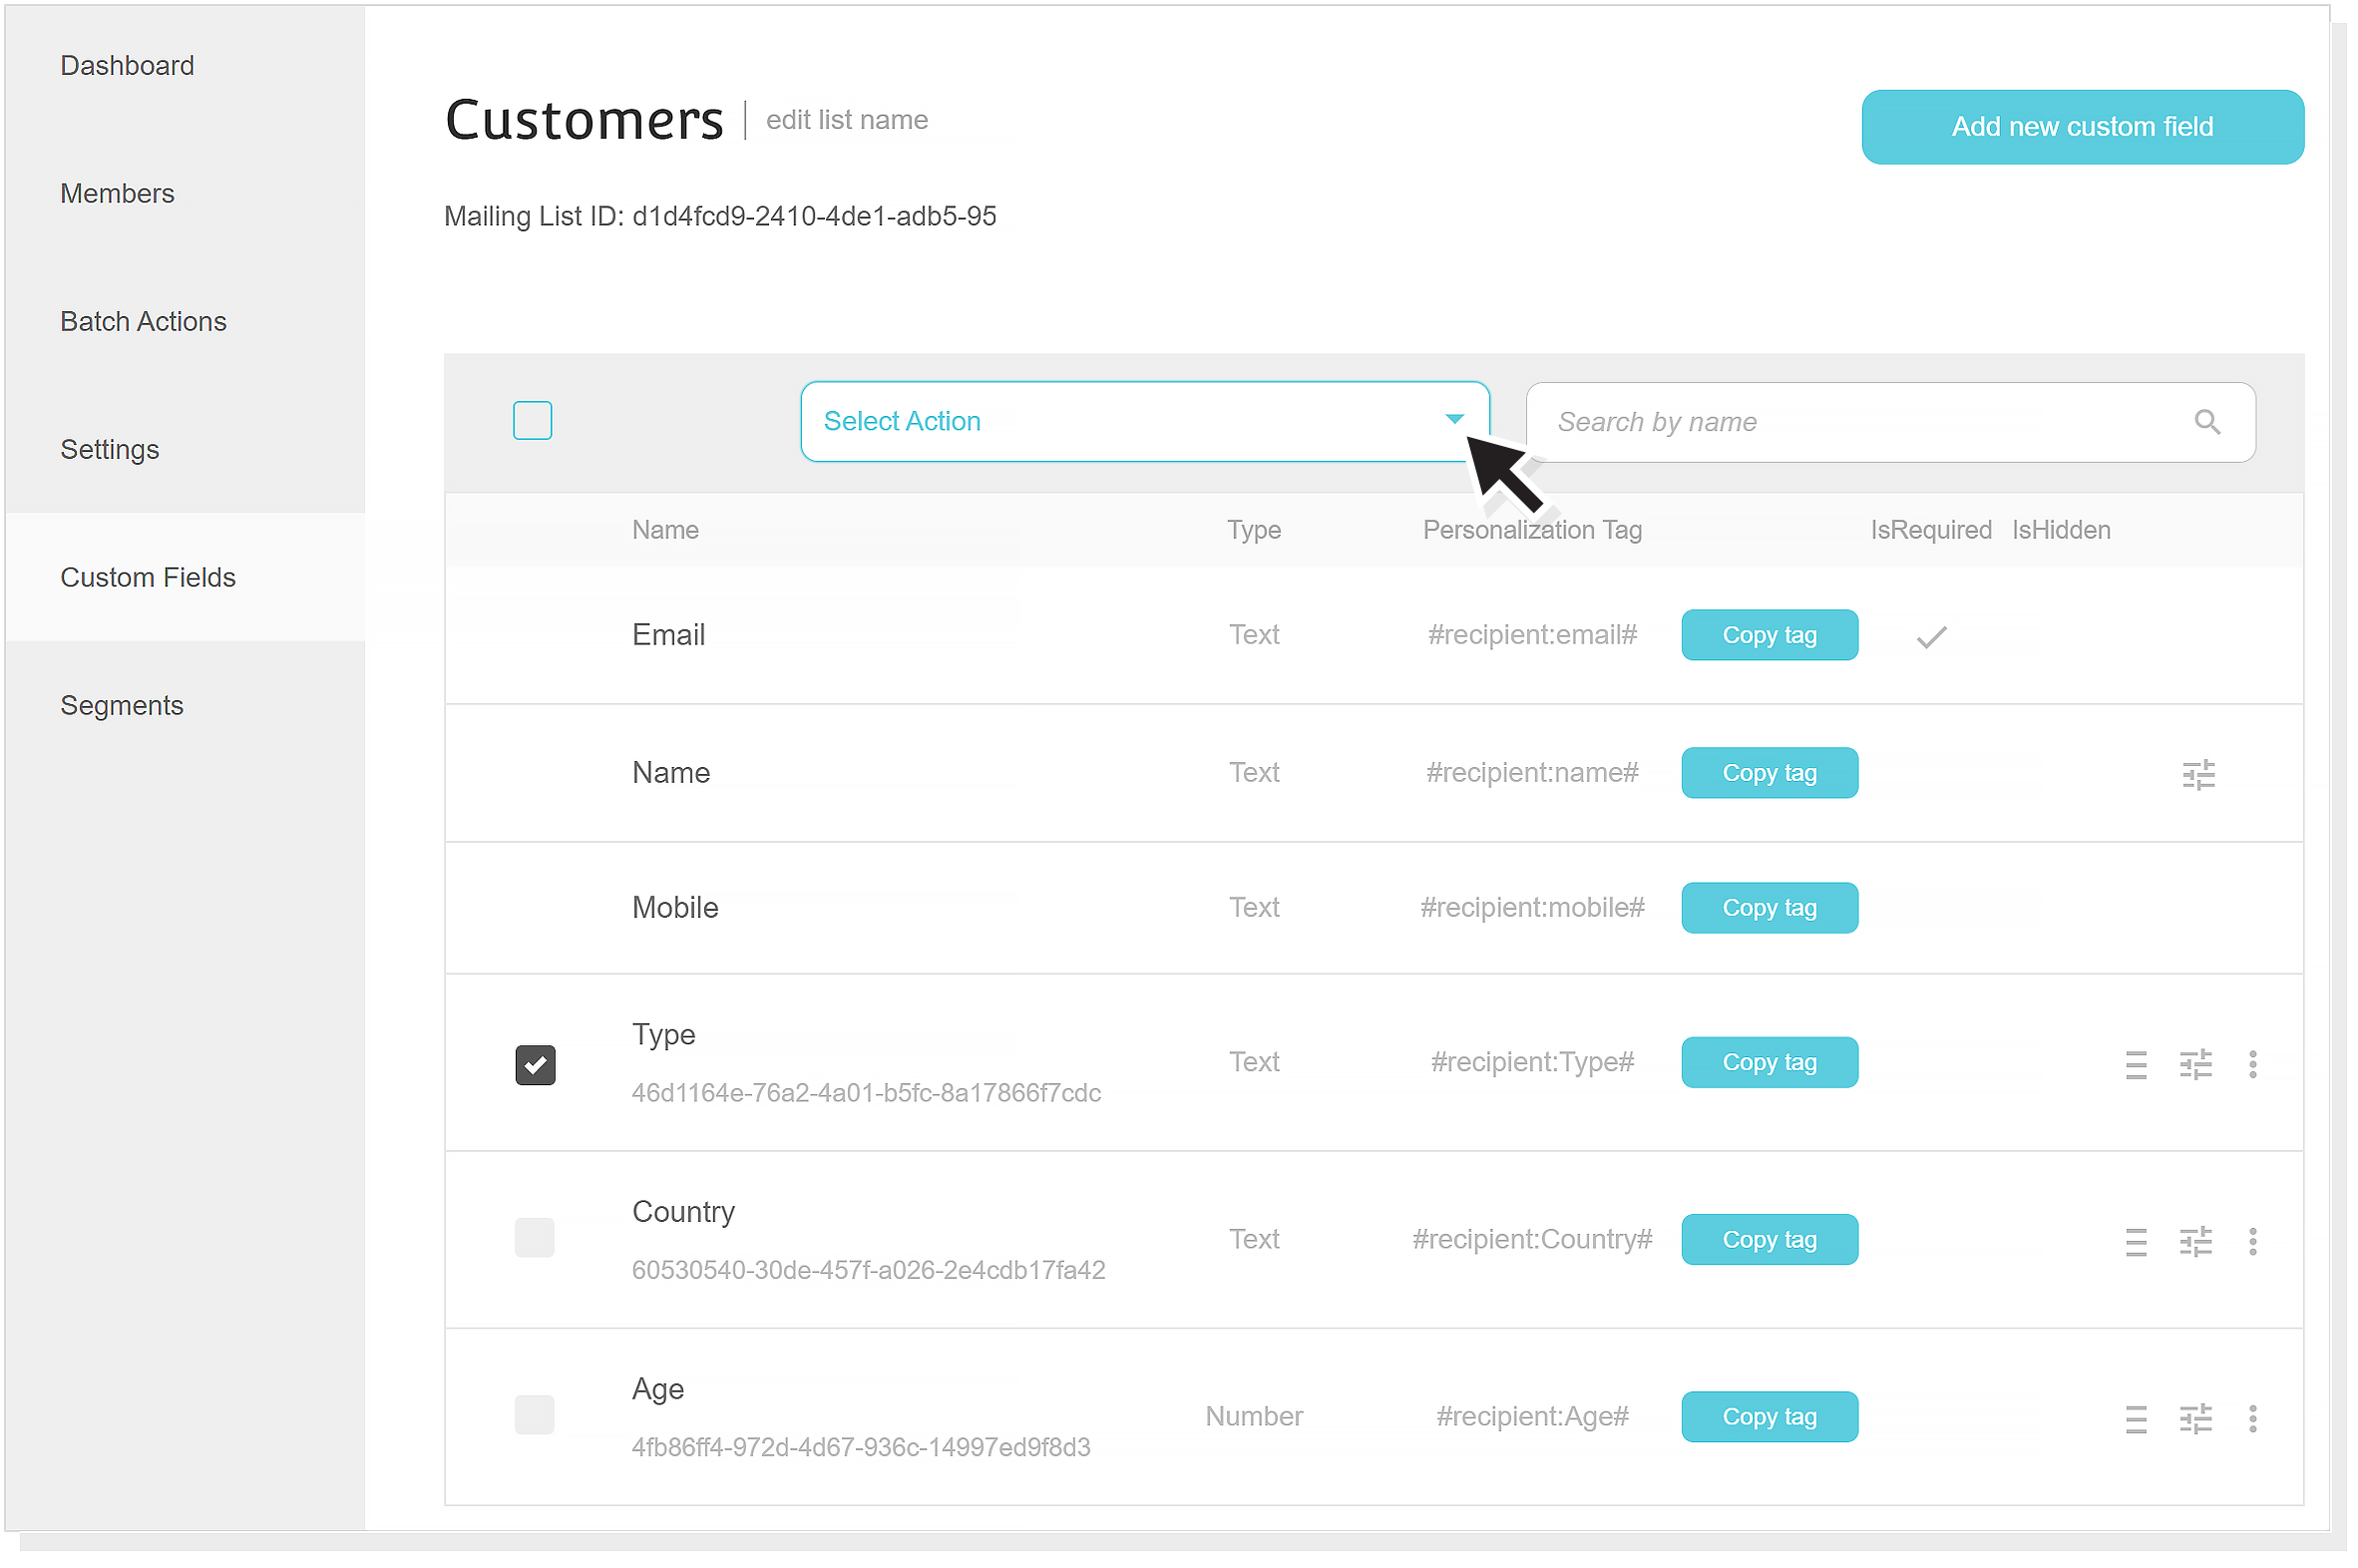
Need better control of your custom fields? You got it!
Select as many as you want from the checkbox on your left and choose to delete or copy them to another mailing list. You also have the ability to search a certain custom field simply by its name.
You can also access the same actions by clicking the three dots on the right side of a custom field.
19. Copy a tag instantly
Adding personalization tags inside your campaigns is the perfect way to create a highly personalized experience for your subscribers and increase engagement.
And since saving time is important for any marketer, we now allow you to copy any tag with a click so you can paste it into your email fast!
20. Arrange custom fields as you prefer
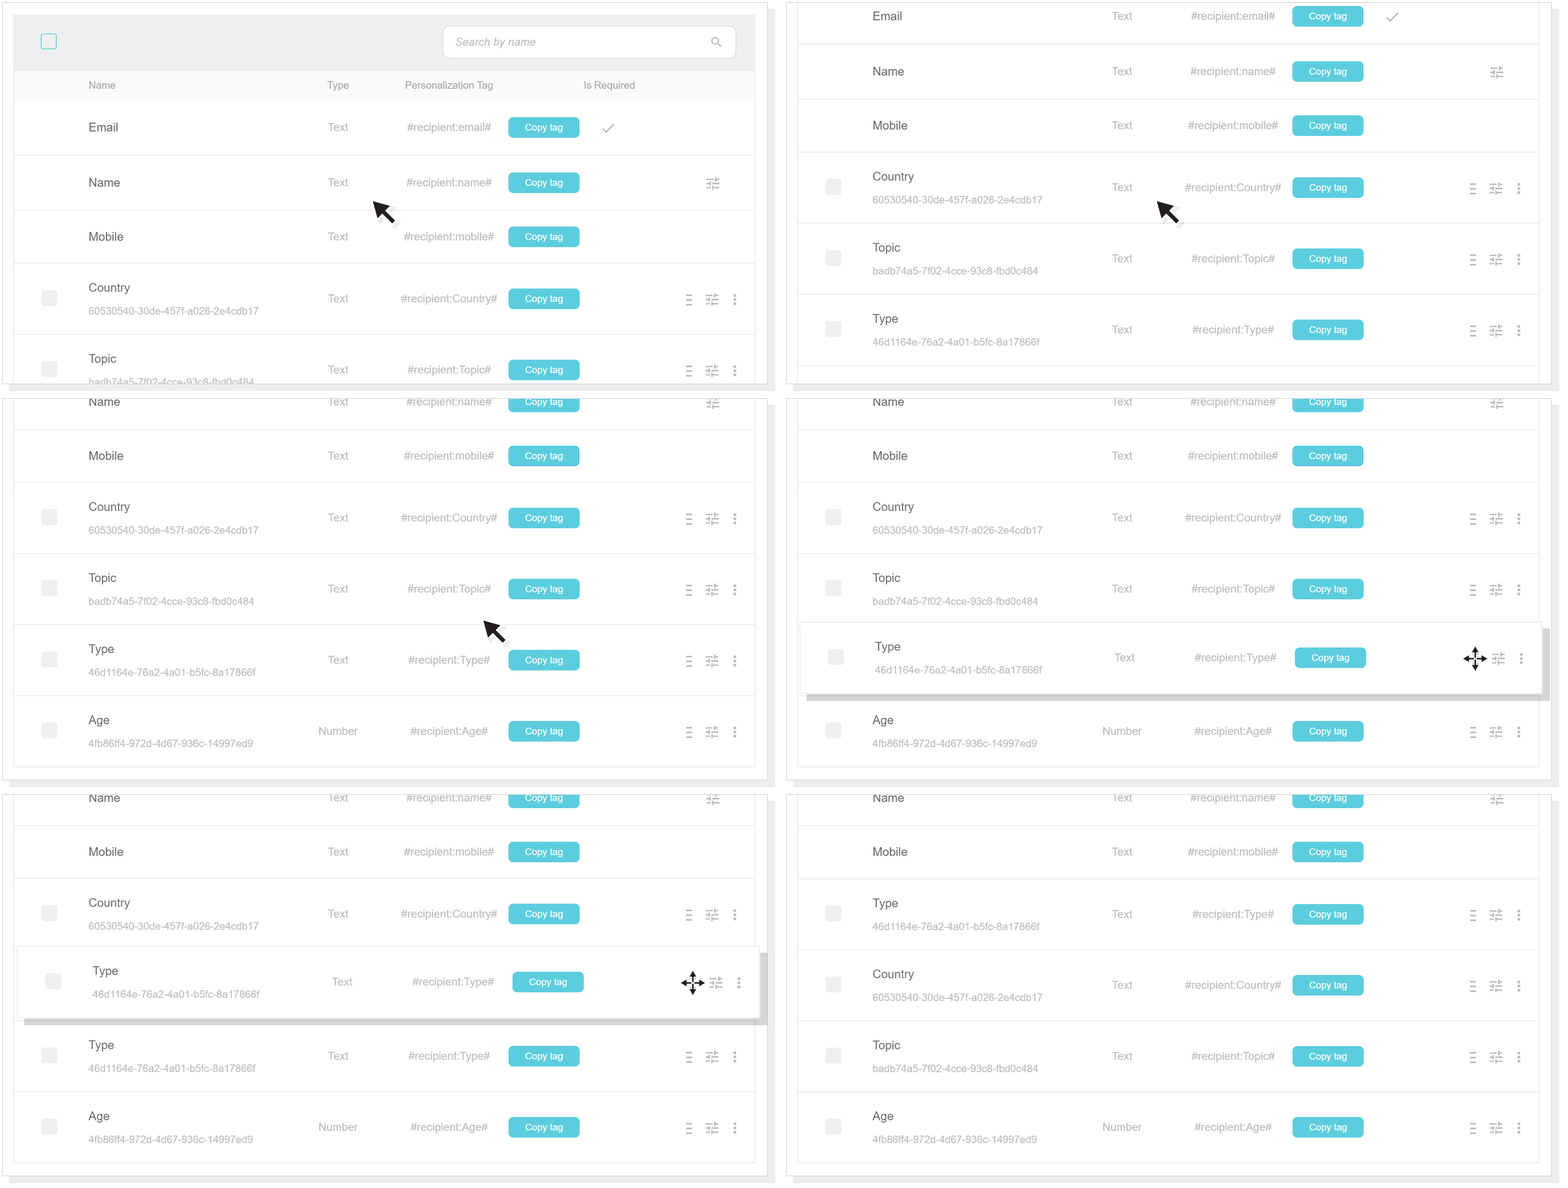
Maybe you want “age” after “location.” And maybe you want “company” right below those two. Who are we to judge? Click on the three lines next to any custom field and put things in the right order with a casual drag & drop!
21. Add default fallback values

When creating personalized email campaigns, fallback values are crucial for recipients who don’t have any data (values) for that custom field. To add a default fallback value, all you need to do is go to a custom field’s settings and fill in the value of your choice.
Keep in mind that, when editing an email campaign through the Moosend editor, the fallback value you add is the one that will be applied.
That’s all, Moosenders!
Woah, that was a lot of new stuff! No need, to thank us. Just head over to your Moosend account and see what’s in store for you!
No Moosend account? Oh, man, let’s fix this. Create your free account today!


