
How To Whitelist An Email In Gmail, Outlook & More [2026]
As an email marketer, you want your carefully-crafted content to end up in your subscribers’ inbox, not their spam folder.
However, it might be harder to achieve this, especially when email service providers like Google or Yahoo Mail have improved their spam filters to combat junk email.
Without whitelisting, all the effort to create the perfect email will go down the drain as it might inadvertently get caught by the filters.
To avoid this situation, today we’ll learn how to whitelist an email and provide all the necessary answers to boost your marketing efforts, so let’s get started!
What Does Email Whitelisting Mean?
Whitelisting — or safelisting — is a method by which email recipients create an approved or safe-sender list that prevents content from ending up in their junk folder.
This lets email service providers know that the recipient trusts certain email senders, whose content is therefore marked as “not spam.” The recipient allows the email addresses on their approved-sender list to send content to their inbox.
If your email address is whitelisted in this way, it guarantees that your customers receive your emails and helps you boost open rates and email engagement, no matter which provider they use.
So, the main reasons to ask your subscribers to whitelist you include:
- Enhancing your email marketing campaigns
- Improving email deliverability rates
- Ensuring your subscribers don’t miss important emails from you
But how does anyone whitelist an email?
To ensure your content reaches your subscribers, you need to make recipients of your emails aware of whitelisting. But first, let’s look at how to whitelist emails for different email service providers.
How To Whitelist An Email In Gmail
Gmail is a popular email provider, with over 1.8 billion people worldwide using it to receive and send emails in 2023.
It’s probably why so many marketers use Gmail as a way to boost their email marketing strategy and engage customers; however, it has strong spam filters in place that can hinder your efforts.
So let’s see how to whitelist an email in Gmail:
- Log in to your Gmail account.
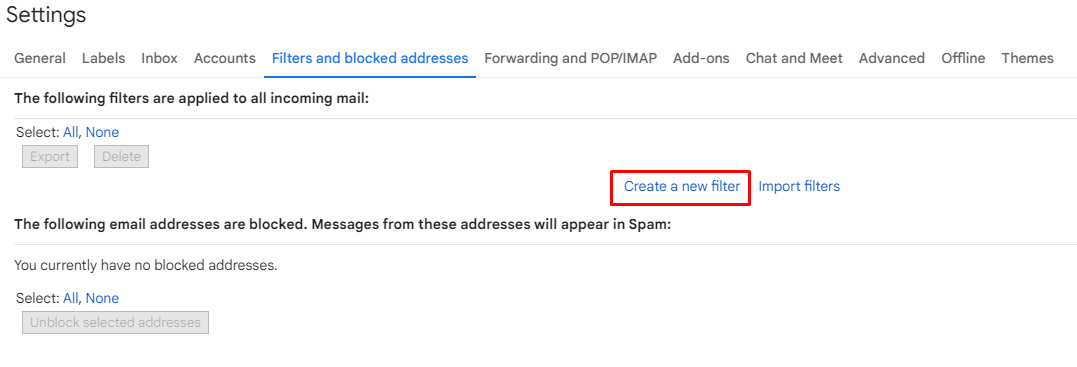
- Select the gear icon in the top-right corner of the screen and click “See all settings” from the drop-down menu.
- Pick the tab “Filters and blocked addresses” from the top menu to see your existing filters and blocked senders.
- Select the “Create a new filter” button and enter the domain or email address you want to whitelist in the “From” field.
- When finished, click “Create filter,” and then check “Never send to spam” to successfully whitelist every email the filter applies to.
How to whitelist an email in the Gmail app
While you can’t access your filters and block addresses on Android or iPhone, you can add a sender’s email address to your contact list, thus giving them access to send you emails.
If you want to filter your Gmail spam folder properly, it’s best to do it on a computer.
Here’s how you can whitelist emails on an iPhone:
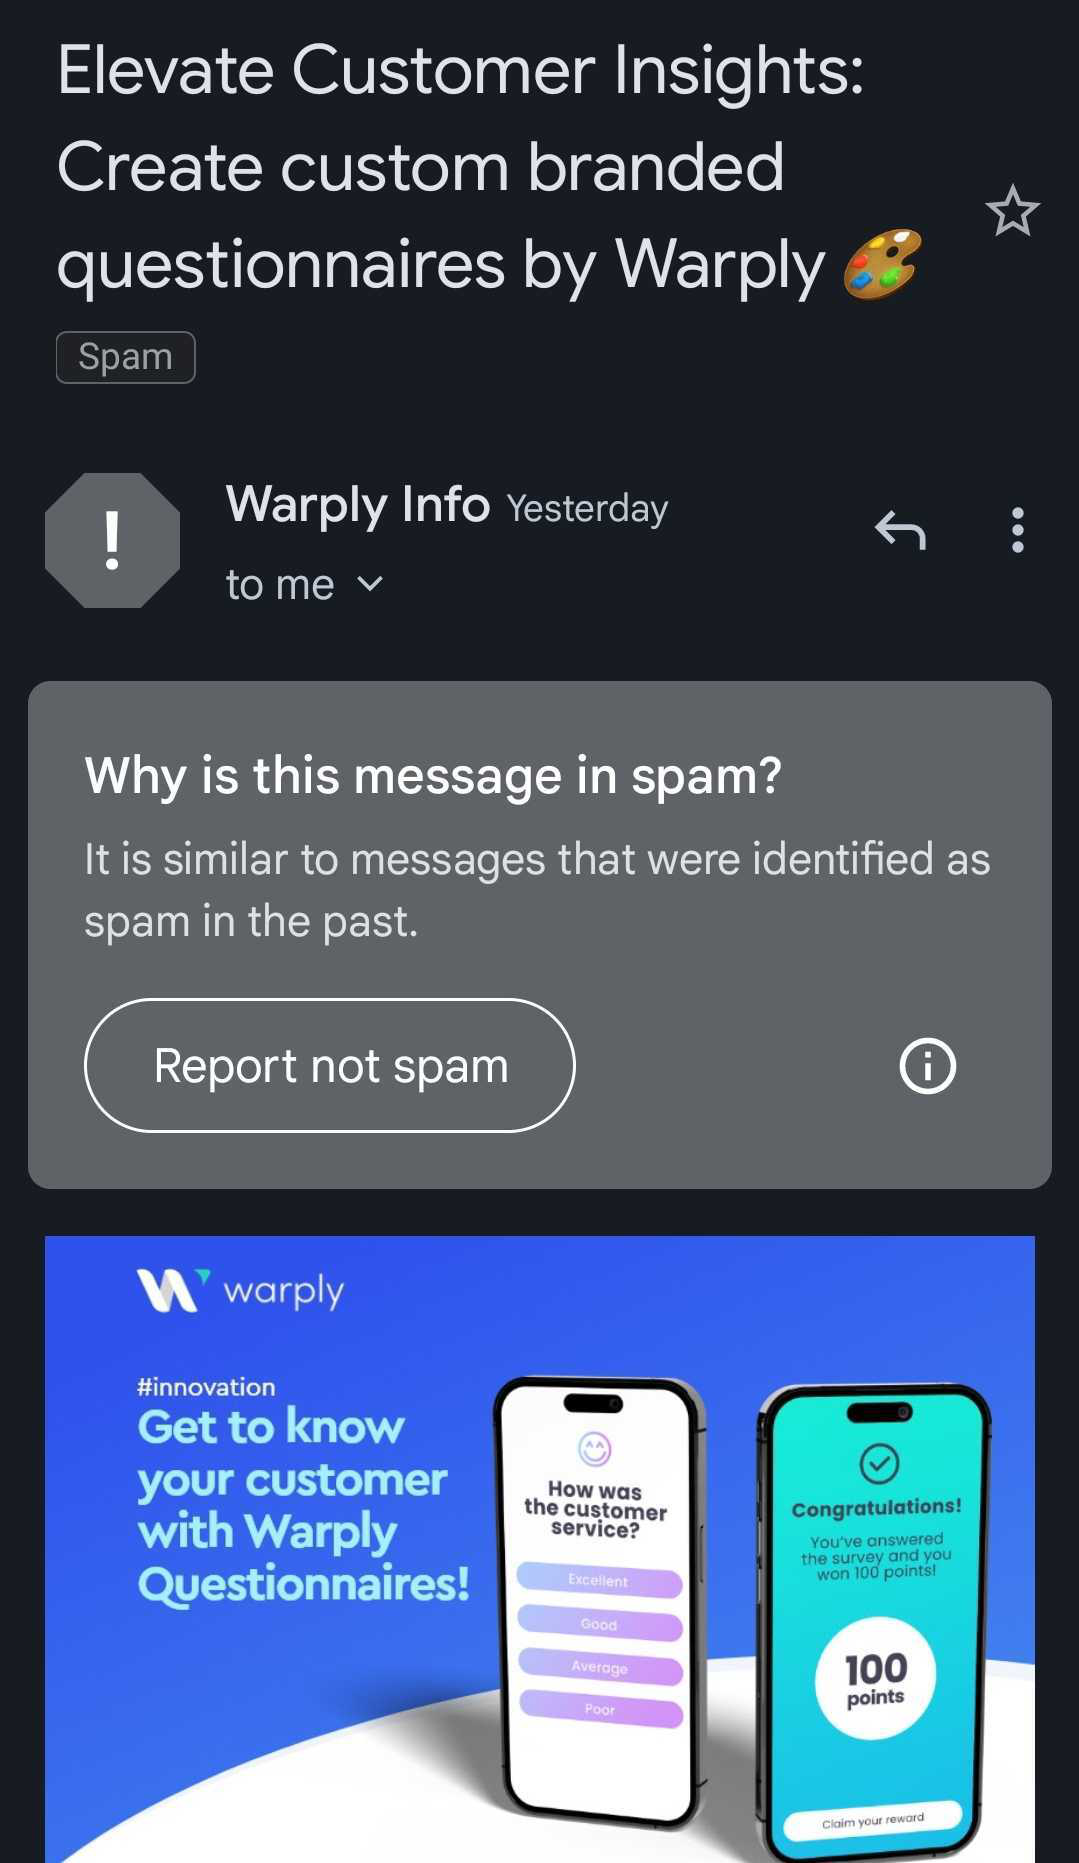
- Go to your spam folder, track down the email you want to whitelist and click on it.
- At the top of the email, you should see a square gray box with the option to “Report as not spam.”
- By clicking this button, you let Google know you consent to receive emails from this sender.
Alternatively, you tap the three dots in the upper right corner and select the same option.
Now let’s see how you can whitelist an email on Android:
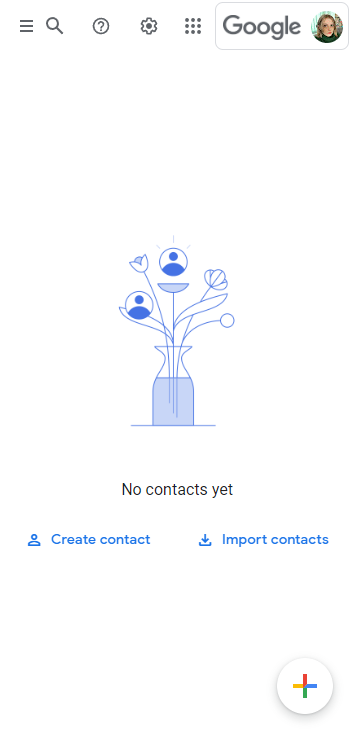
- Open the “Contacts” app.
- Select the “Create contact” option at the bottom left.
- Enter the contact’s name and email address and connect the right account.
- When done, click “Save” to add contact.
Let’s see how to do this with another popular email client.
How To Whitelist An Email In Outlook
In resent years, Microsoft has ensured safelisting your favorite addresses or domains is as easy as pie.
Let’s see how to whitelist an email in Outlook:
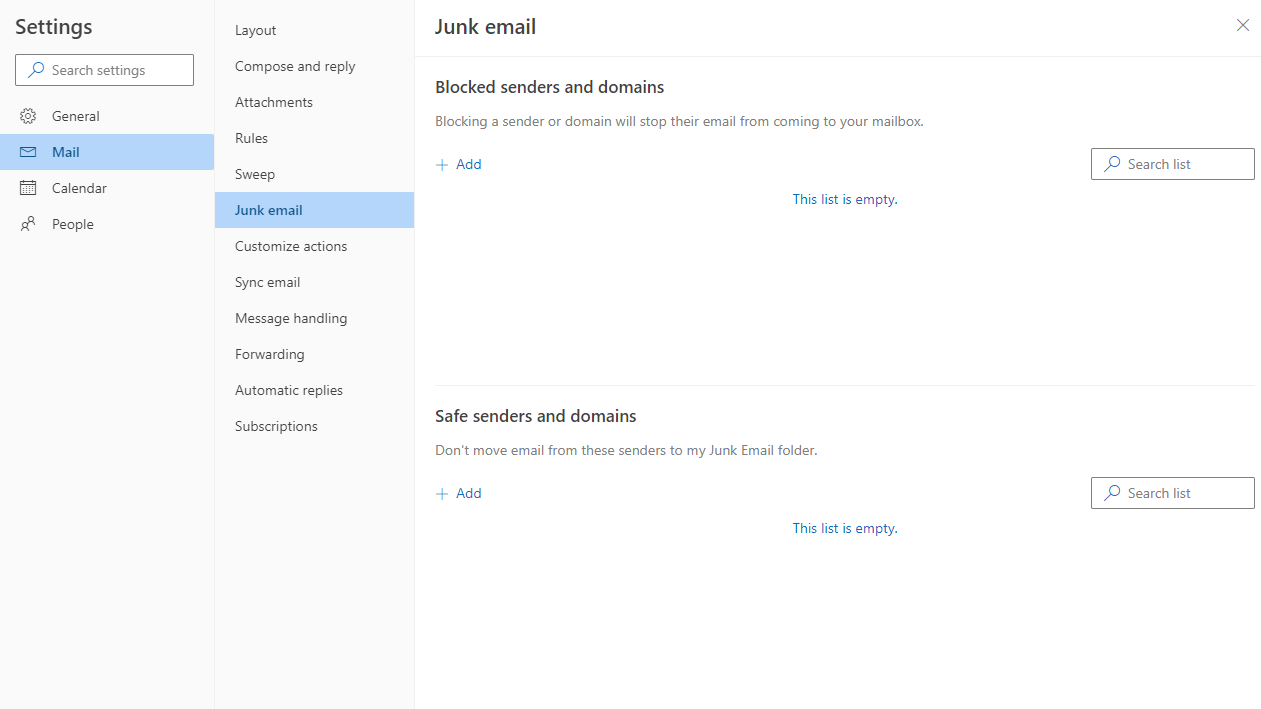
- Like Gmail, click the “Settings” (or gear icon) option in the top right corner after logging into your Microsoft Outlook account.
- From the pop-up settings menu, select the “Mail” option.
- Select “Junk email” from the submenu.
- Enter the email address you want to add to safe senders, then choose “Save.”
Easy, right?
How To Whitelist An Email In Yahoo Mail
Yahoo Mail still has over 227.8 million users in 2023, and it’s a classic email service provider used by older generations for personal and business purposes.
What’s great is that Yahoo Mail makes it easy to move a sender or domain name to your whitelist.
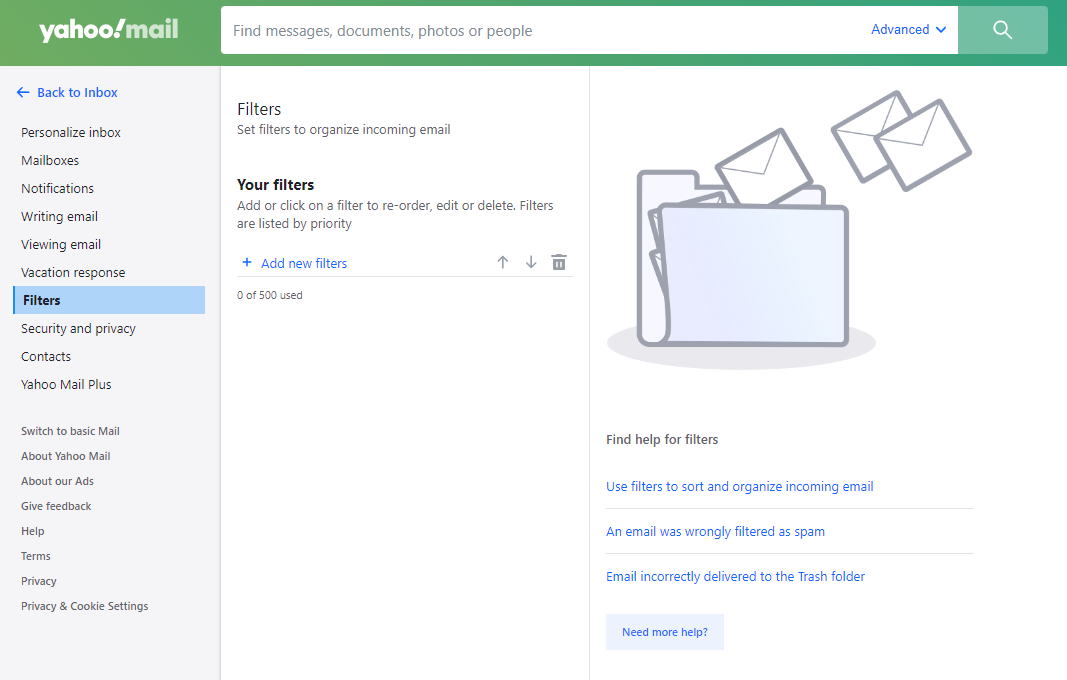
Here are the whitelisting instructions for Yahoo Mail:
- Navigate to “Settings,” located on the right side of the screen.
- From the drop-down menu, select “More Settings.”
- Click on “Filters” to access your filters.
- Hit the “Add New Filters” button and enter the email address you want to whitelist.
- Click “Save” to finish the process.
How To Whitelist An Email In AOL
AOL, short for America Online, is a free email service provider requiring no special software.
Since it’s mostly a web service, you can simply access your AOL account on your favorite browser.
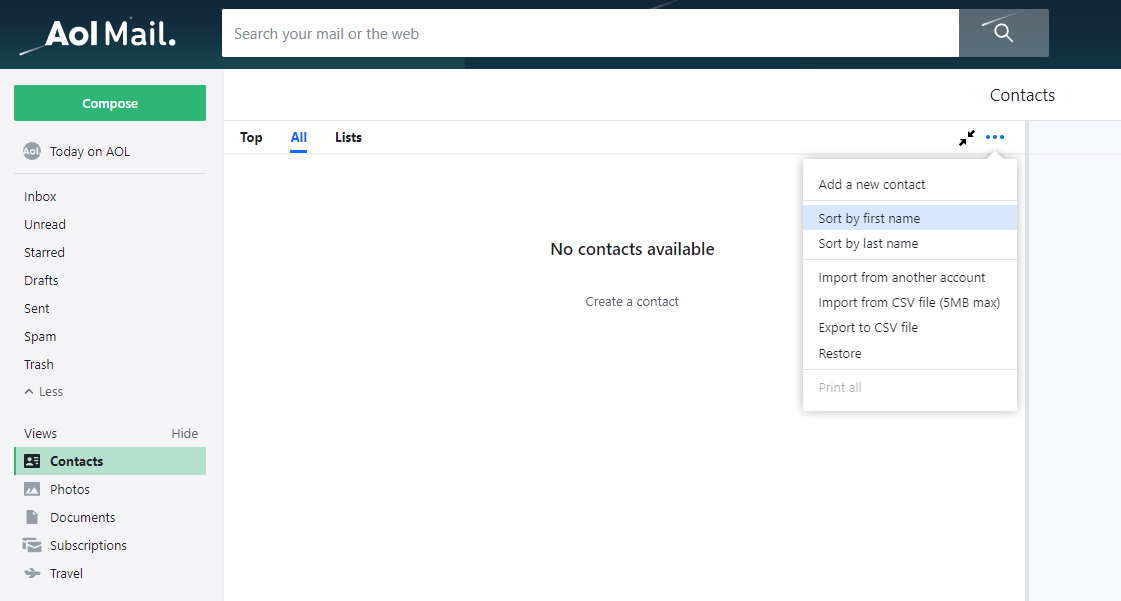
Regarding whitelisting, you only need to add specific emails to your address book to successfully create your whitelist since AOL considers your contact list safe.
Let’s go through it step-by-step:
- Select “Contacts” from the left menu.
- Click on the three buttons at the top right and select the “Add a new contact” button.
- Enter the required data, then click the “Save” button located at the bottom to add the contact.
How To Whitelist An Email In Apple Mail
Technically, Apple Mail is both an email service provider and an email client through which users can check and receive emails from different accounts.
You can add your Gmail or AOL account to iCloud Mail and view all the emails these accounts receive in a single app.
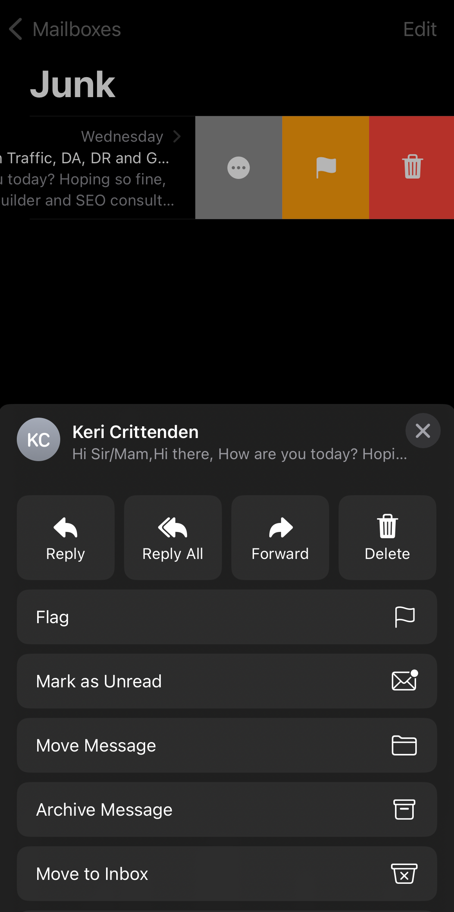
For the Apple Mail app, you can do the following:
- Open the app and go to the “Mailboxes” screen.
- Go to the “Junk” folder and find the spam email you want to whitelist.
- Swipe left on the specific email and select the gray box with the three buttons.
- Tap the “Move to Inbox” button to “whitelist” your emails.
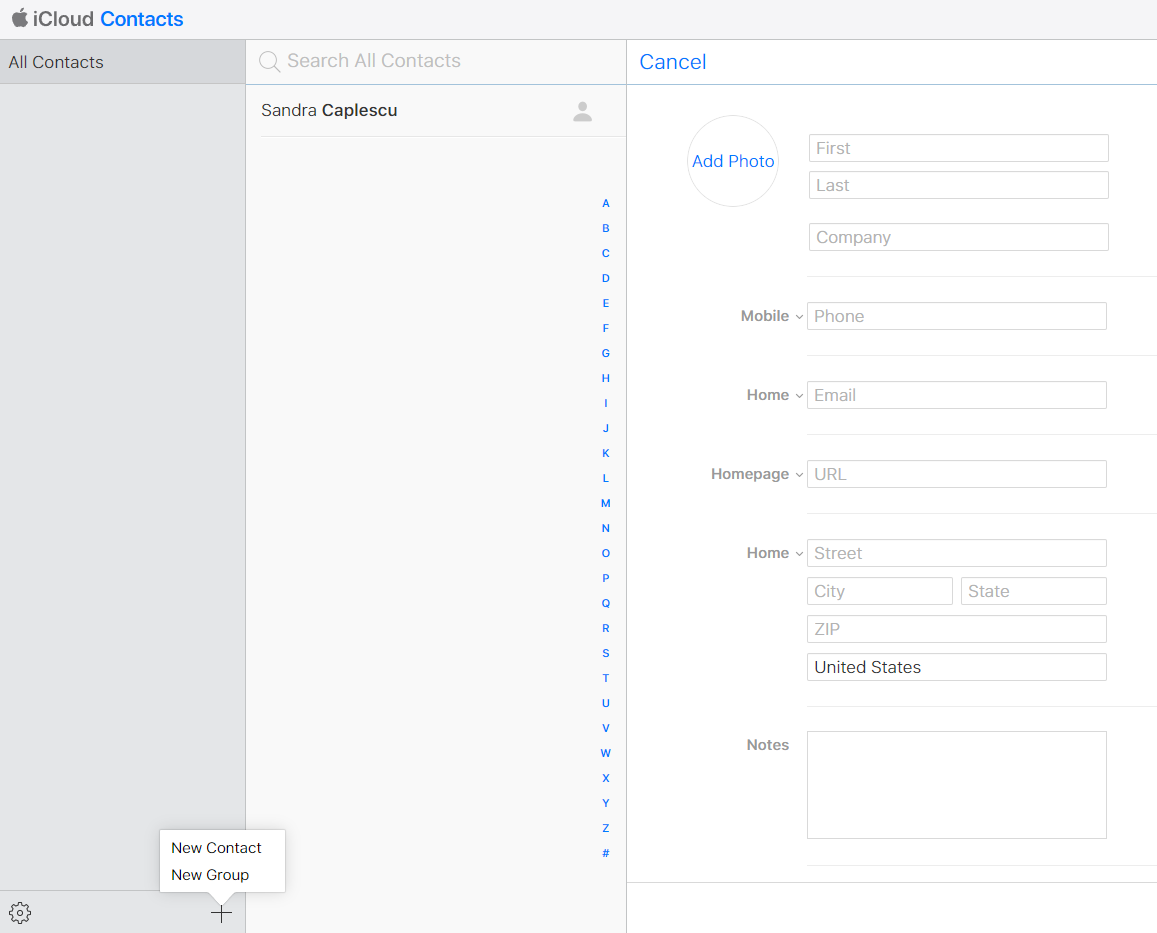
Moving on, to whitelist emails in iCloud email, here’s what you need to do:
- Sign in to your iCloud account.
- Go to “Contacts.”
- Click the plus icon on the screen’s bottom-left corner, then select “New Contact.”
- Fill in the gaps and click the “Done” button in the bottom right corner.
How To Encourage Your Recipients To Whitelist Your Email
To encourage email recipients to read your newsletters and whitelist your email address, you can add a simple and friendly reminder in your emails, followed by instructions.
If you frame it like a benefit, you can ensure people will always receive your emails. For example, you can say something like this: “To never miss our emails, please consider whitelisting us.”
Here are some other useful tips for encouraging subscribers to whitelist your email:
- Add the message to your first email: To improve deliverability, include this message in a postscript section at the end of your welcome email so it’s more likely to stick in the recipient’s mind.
- Use FOMO: The fear of missing out on your updates will encourage prospects to whitelist your emails so they won’t miss future emails with news, updates, or recommendations.
- Employ humor: Using lighthearted jokes makes your brand more relatable to your readers, which will help you make your way onto your subscribers’ safelists.
- Give clear instructions: Some people might struggle with whitelisting email addresses or be unfamiliar with the procedure, so include links to step-by-step instructions.
Now Over To You
To ensure your subscribers get your content, you need to properly “teach” them how to whitelist your address.
In return, you’ll receive fewer spam complaints and improve your deliverability rates.
But the best strategy to ensure your content won’t end up in the wrong place is to improve your email marketing strategy.
Moosend is a simple, modern, and effective solution at an affordable price, offering excellent deliverability rates and great automation features that will take your email marketing efforts to the next level.
See for yourself by trying Moosend for free today.


 Published by
 Published by